How to Upload, Link, Organize, and Publish Images & Gifs to Steemit!
Steemimg.com is the first and only Dedicated Steemit Image Hosting Website. https://steemimg.com allows you to host all of your Steemit Post images/gifs in one central location with a user friendly and easy to use interface alongside a reliable service ;) Don't waste any more time trying to properly link multiple images from different sources and losing precious time on what matters most, your actual content. With SteemIMG you can even take photos with your mobile device and upload them right to the site!
steemimg.com is 100% Free to use, Forever! That being said it does cost to run the large hosting servers so your support is what will keep it going! If you're currently use SteemIMG and love it send some love back by commenting and sharing!In the event that funds run out or the server load gets to great, I will suspend the uploading of new images and simply host the images already on SteemIMG from then on. This will guarantee that your Posts, Articles, Bogs, & Comments that contain images hosted on SteemIMG will be there forever, as they should be.

Many of you reading this may be new to Steemit, so instead of juts reintroducing SteemIMG to the community I created several tutorials on getting your images displayed properly within your posts and comments.
How To Upload, Link, Organize, and Publish Images/Gifs to Steemit
Step 1: Selecting/Creating The Image(s)
First in order to have images in your post you must first have them. You can get images by either selecting them from online (that may already suited to your needs) or you can create them. If you have the capability to create your own images ie. Photoshop / illustrator / Drawing Software etc... and a little bit of artistic talent (doesn't take much) I would suggest doing that. You gain an originality to your Steemit post which many don't have (Or even care about) and this will attract more potential readers. Otherwise there are a lot of images on the internet to choose from, in all shapes and sizes, one will defiantly fit your needs. If you do choose this option please add a referencing link to where you found the image and or artist.
Step 2: Uploading The Image(s) to Steemimg.com
There are many different ways to upload an images on SteemIMG and really it comes down to preference (all are pretty easy).
Since we just touched on Images found on the internet we will start there. Since you don't want to rely on the current whereabouts of the image you have found (could be deleted without notice) you will want to host it via SteemIMG of course.
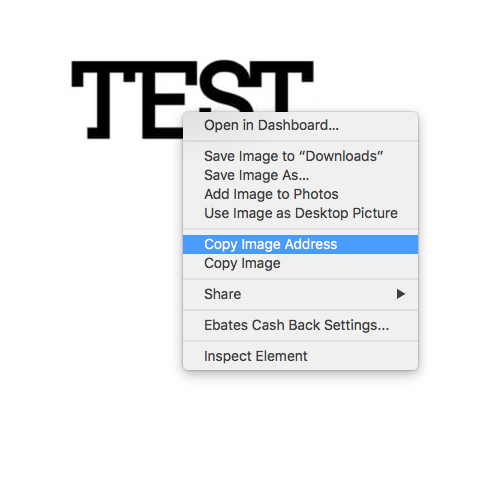
- Right Click on the image
- Select Copy Image Address
- Head to http://steemimg.com and select UPLOAD

- Next you will Select add image URLs

- Then just simply Paste the copied URL image address

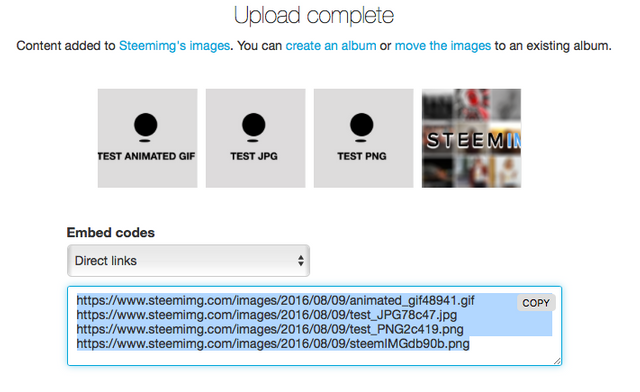
- Press Submit It will load and show you a small icon display of the image
- Choose a category (not required) and press Upload.

- Your image is officially on SteemIMG!
- Skip to step 3 for placing the image in your post.
To upload a Image you have created or that is already on your Computer / Mobile Device or even take a live photo and upload it right away, follow any of these methods!
Method 1: Drag & Drop
- Open https://steemimg.com on your browser
- Take your select image(s) and drag them onto your browser window and drop them anywhere!
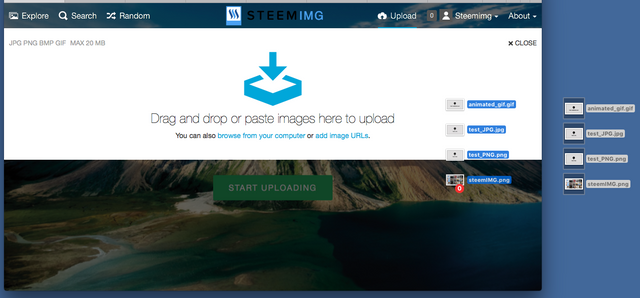
- You will see preview icons for each of the photos you've dropped.
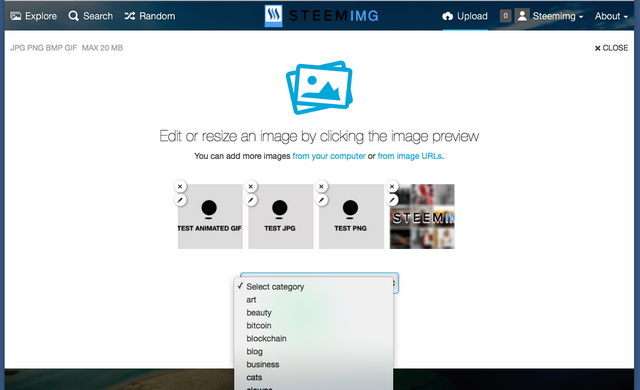
- Choose a category (not required) and press Upload.
- Your image is officially on SteemIMG!
- Skip to step 3 for using the image(s) in your post.
Method 2: Browse & Select File
- Open https://steemimg.com on your browser
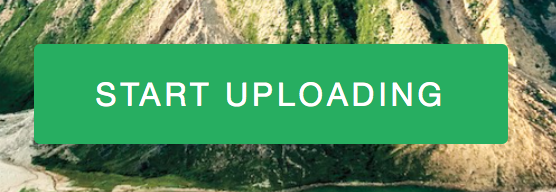
- Select Start Uploading
- browse your computer and select the image(s) you want to upload.

- You will see preview icons for each of the photos you've selected.
- Choose a category (not required) and press Upload.
- Your image is officially on SteemIMG!
- Skip to step 3 for using the image(s) in your post.
Method 3: Mobile Phone Upload / Take Photo
- Open your favorite browser on your Mobile Device
- got to https://steemimg.com
- Tap Start Uploading
- You will see multiple options to choose from
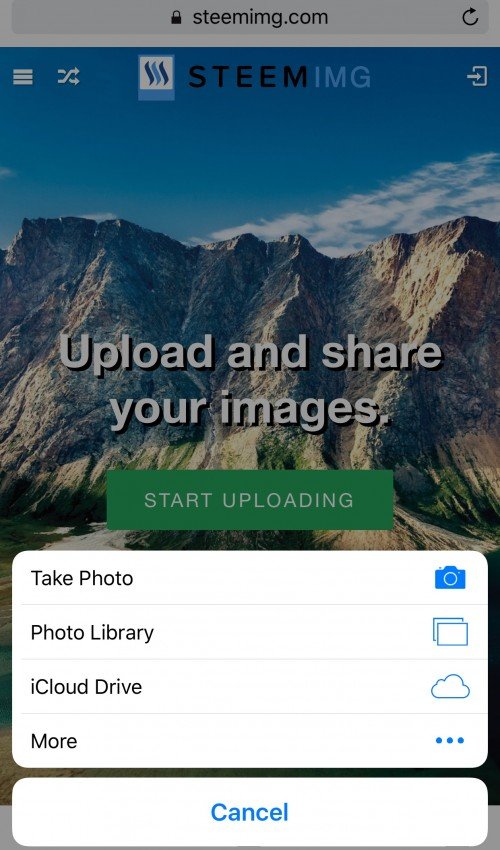
- Select Photo Library to choose a photo your have already taken with your phone or have saved to your phone.
Browse your photo and select one or multiple - Select Take A Photo to do just that!
Take the photo and it will automatically bring you to the upload page
- You will see preview icons for each of the photos you've selected to taken live.
- Choose a category (not required) and press Upload.
- Your image is officially on SteemIMG!
- Skip to step 3 for using the image(s) in your post.
Step 3: Using your newly uploaded images inside your Steemit Post
Now that you have successfully added all your images on SteemIMG it's time to use them throughout your post!
Let's start with your main image, your Header or Title Image. This image will be used as the thumbnail and preview image found in the multiple feeds on Steemit. This image is very important and gives the first impression of you and your post, so choose wisely. If you do not follow this simple step Steemit will choose a random image from within your post (I haven't seen any rhyme or reason to it yet anyway) and this couldn't be disastrous!
It's Easy (desktop)
- If you're not there already go to https://steemimg.com
- With your image selected Navigate to Embed Codes
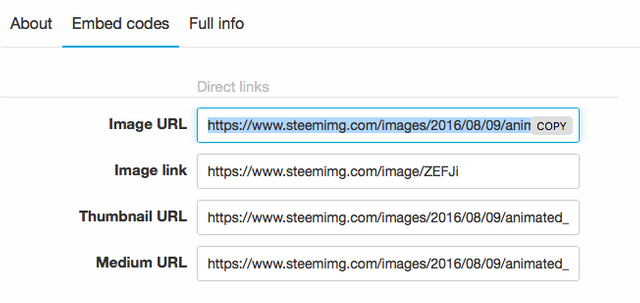
- Then copy the Image URL displayed below the image (There are many other options for advanced use but for beginners always just select the top link)
- Paste the url into your article where you want it to display
- That's It! seriously.
Mobile
- Open your favorite browser on your Mobile Device
- got to https://steemimg.com
- The image will open within the browser window
- Tap and hold your finger and select copy
- Go to article and Tap and hold and select paste!
- Done.
Now to make it the Title Image Place the Image in a Header 1 tag <h1>IMAGE URL HERE</h1>
That's all it takes for title image, but you have to remember to always do it!
Test Images Example


Current SteemIMG Stats
| Images Hosted | Albums | Users | Disk Used |
|---|---|---|---|
| 18,761 | 267 | 573 | 17.6 GB |
Happy Uploading! - Blue
Hi.
Is this site still working ?
Thanks for the tutorial but I am having big problems using SteemImg. I do not see an upload button anywhere, and I also can not drag and drop either. Each time I try the browser (Chrome on Mac) just opens the image in the browser window and shows the path of file on my local drive in the URL bar.
I can not do anything at all in SteemImg.
Any help would be greatly appreciated. And yes, I did create an account and verify it.
By the way, I also can not even upload a profile picture either. I get the endless spinning wheel when I try, and it never uploads.
Thanks.
I can't use it either. I made a post here:
https://steemit.com/steemhelp/@tyvain/anyone-having-trouble-uploading-on-steemimg
Thanks tyvain. Gave up in the end and now using another free service that works really well so far. Let me know if you need the URL. Sorry I don't have it bookmarked on this laptop and I forgot the name !!
yes please, I give up. I really wanted to used steemimg... but well...
I am having the exact problems that you are describing.
Thank you it is useful
@simant Are you on a mobile device? I figured I was going to just try on my computer next if it was just a mobile issue. 🙁
Thanks blueorgy! This is the kind of post that I love because it adds value to the community.
I started out from scratch and have learned everything that I need to know in order to succeed right here! I do need to change my image hosting service as it is uploading with broken links and then I have to go into edit and add them manually. I would also like to try the animated gifs.
Great tutorial and keep up the fabulous quality of your posts! Followed!
Very helpful for everyone I think. I only knew how to do images from the laptop, thank you for sharing this, very useful. I will be using this for future posts as well :) Alla x
Thanks! Yes the Mobile Upload can come in quite handy! I've used it many times while out and about steeming!
Yes exactly, good stuff! A lot of work you did!
Great project!
It would be great to keep development going and building business model around it so to have support.
I suggest, maybe in future thinking about hosting plans dedicated for Steemit community would be great. Writing smart contract on Steem blockchain would also ensure service longevity. Smart contract can be, initially user might have 1GB space for free and after certain threshold or limit is reached, user has to deposit some STEEM or SDB to get extra space, etc. I am sure there are other models you can think of. It is just an idea to keep service providers like yourself long term support. As for development, you can still improve service and offer developers like myself API so that we can inject in our projects. For example, Steem Mobile - eSteem user would be able to upload file within app while they are writing a story/post. API simple takes file (upload) and returns link to the file, or many other types of improvements. As I mentioned, project is great and would really like it to move next stages and keep service alive. Just my 2 cent...
PS: Serious Steemit addict here, I
d pay for a working upload when I need it (tech noob here, you nerds know how whiny we get) and Im happy to donate because I want you to become perfect!Hey @blueorgy just wanted to say I love the site. It's super easy to use. One problem I had was trying to upload a panorama picture. I kept getting an error when attempting this. Any ideas on what the cause of the problem is?
I will look into this, I have uploaded Pano myself and them have worked. Did they by chance go over the 20MB limit?
It was just over 7MB. I will try again tonight I'm on my work computer right now.
7MB should be fine, I put a very high limit on the site so we can all post High Res Photos if needed. Also the site can proceed medium and thumbnail size as well!
Hey again. I tried with an 8.3 MB which is 10800 × 2438. I'm not sure if it's too wide? I keep getting the following error:IMG_0440.JPG - Server error (Internal server error)
This is really nice!
Let me try UpVoted :)
This site is great! I use it with pleasure! Thank you, @blueorgy! Upvoted.
I am new to this site. I am having trouble creating a new account to upload and stuff. I enter my info and email address to receive a confirmation link. Every time I hit Resend activation, I get nothing. It says to wait up to 15 minutes. Several hours have already passed by without a single activation link. I have checked Spam files etc with no luck. What gives??
I'm not sure, This problem hasn't come up for any other user. You can for now just upload your images as a guest. Maybe you entered the wrong/incorrect email address?
I just drag and drop it in there. Works every time!!

Question: once I put up an image there and forgot about it. The next day, I tried to put ia gain and it said " duplicate " but never gave me the link to the original photo i first uploaded.
Couldn't find it anymore [ I was not logged in ]. What to do?!
Oh thats a good point , i'll look into displaying the original link when that happens.
Sorry for inconvenience!