Viewing Steem Blockchain Data in a Web Browser. Part 1: Very Basic HTML
This is the beginning of a series of blog posts that will describe how to use the Steem Javascript API to display data from the Steem blockchain in a web browser. The first few posts will talk about setting up some basic HTML. All that is needed here is an ability to make text files on a computer and a web browser. I am starting from scratch and trying to make things as simple as possible. Readers should not have to download anything from the internet since most computers already have some means of writing text files. If your computer doesn’t have those means or you don’t know what to use, here are some suggestions:
Text editors:
An On-line text editor called "Edit Pad". When you are done writing text in Edit Pad, the text file can be downloaded to your computer.
Atom is a good texteditor for web page development. You have to download it and run it like an App.
If you are running MacOS, you can use the textedit application. Click on the "format" dropdown menu and choose “Make Plain Text” to save the file appropriately. If you save as .html, it will include some HTML markup tags that may be undesireable.
Command line editors include vi/vim, nano, gedit, etc.. Most Unix-like or Linux distributions come with vi but it is not immediately obvious how to use it and "getting up to speed" will be necessary.
Required Elements in an HTML File
We will start by creating an HTML file that includes only the necessary elements for display in a web browser:
<!DOCTYPE html>
<html>
<head>
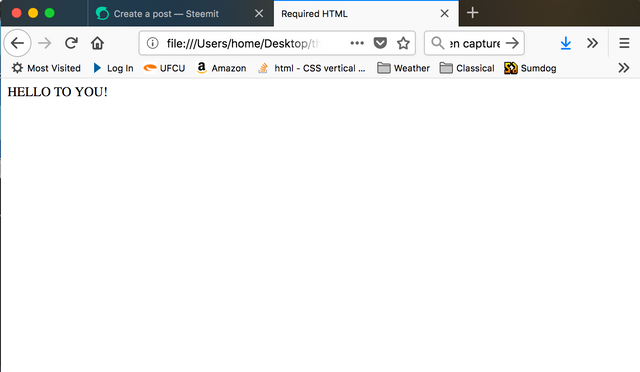
<title>Required HTML</title>
</head>
<body>
HELLO TO YOU!
</body>
</html>
The first line in an HTML file always contains the Doctype tag. This is required. Notice that the tag is inside of pointed brackets. This is typical for HTML tags. The next line has the html tag. This tag is paired with the /html tag at the end of the file to indicate that the html is inside of this section of the document. The html section is divided into head and body sections. These are required. The head section is enclosed by the head tags and the body section is enclosed by the body tags. Information for search engines and browsers is included in the “head” section. You can also pre-load scripts and formatting files and put paths to online javascript or CSS libraries in this section. The “title” tag inside of the “head” section is required. Whatever you put in the title section will be the name of your web page in the tabs of the browser. The content of your web page will go in the “body” section. Though it is not required to put any text in, I put "HELLO TO YOU!" inside of the body section so that something will be displayed when the file is loaded into a browser.
Notice that tags are inside of pointed brackets and, in general, tags have an opening tag and a closing tag. A pair of tags encloses a section inside of the HTML file and tells the browser how to format that section.
Copy and past the HTML file text into a texteditor and save it as a text file with .html appended to the name of the file. To look at your minimal web page, you might be able to double click on the file and have it open automatically in your default web browser or you may open your web browser and use the File dropdown menu and choose "Open File" to look for the file on your computer. Alternatively, if you know the path to the file you can type it into your browser’s address bar preceded by "file://" .
You should see something like this:
I recently discovered how to sign in Javascript and verify in Beem (Python) thus allowing Steem logins in a way that the server can use (with no private keys sent to the server!)
 August 6th : Sign in Steem-JS, verify in Beem!