Steem Engine DEX: A technical deep-dive on JWT Authentication
The new Steem Engine DEX adds a JSON Web Token (JWT) layer on-top of the exchange allowing users to safely login and verify they are who they say they are. It's a problem that has been solved in many different ways and for most decentralised blockchain applications, a secondary layer of authentication is not even required.
Handshakes and secrets
When a user attempts to login to the DEX either through the Keychain extension or their Steem password/Posting key, all we know is their username. In the case of Steem Keychain, all we have is the username.
The old DEX simply stored the username in localStorage and referenced that to determine who the logged in user was. Because all operations require approval through Keychain or Steem Connect, it's a vanity thing. However, you could change the username to give the appearance of being logged in as someone else because all of the data fetching calls referenced this value.
Because you're verifying every single action taking place on the blockchain, only the real account holder can perform an action for a specific account. But, on the new DEX we needed the ability to have KYC (Know your customer) for legal compliance reasons to use some exciting upcoming features in the DEX.
The flow
The process for how JWT tokens are created and users are truly logged in goes along the following lines:
- User attempts to login
- A request is made to the auth API to return an encrypted Steem memo containing an AES string with the users username and a randomly generated guid
- The encrypted memo uses the users public posting key to encrypt using the steem-js memo function
- The encrypted memo is sent back to the client containing an AES encrypted string
- The user then uses Steem Keychain or their password/private key to decode the memo with their private key revealing the AES string
- Server decrypts the AES string and confirms if it is valid and provides a JWT token to the user
On the client-side an authenticated session looks like this:
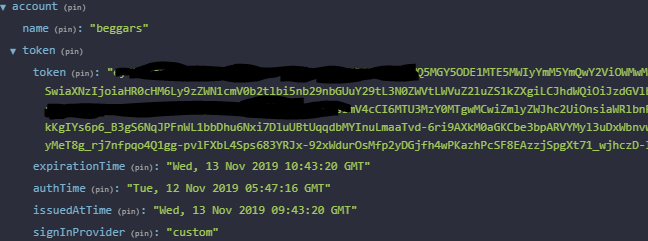
In typical custom JSON form, you have a token which is valid for 1 hour. A token not pictured here (the refresh token) is then used to get a fresh new token on any subsequent requests when the token expires.
The token setup allows us to encrypt uploaded KYC documents and set constraints on who is permitted to access them in the application. It also allows us to securely store user settings and other personalised pieces of data that you do not want anyone else to be able to change except for the user.
While the process might seem convoluted when you break it down, from a UX perspective, it doesn't complicate the login process and the end user is really none the wiser to what is happening underneath the hood. As with anything, we're always looking for ways to improve what we've done, so there might be tweaks and changes over time to how this all works. For now, it seems to work quite well.
@untersatz curate 100
Posted using Partiko iOS
The @untersatz witness and manual curation is under the guidance of @contrabourdon and @organduo.