Guide to Creating a SmartCash SmartNode VPS in 10 Minutes with Vultr
Hey everyone! With all the excitement for SmartNodes I thought it would be good to make an easier guide to get up and running. You don't need a crash course in Linux and PGP ssh keys to make it work. Hope it is helpful!
I’ve created this guide as a simpler way for people to get started with hosting a SmartNode.
Each step is required. If it’s not in the guide it is not required. Details matter; skip a detail and more than likely your SmartNode will not work. Take your time to read it patiently, follow the instructions, and verify each step is done correctly. And remember, do not give your private key to anybody or you will lose your funds.
This guide will cover step by step how to:
- Create your Vultr Instance that will meet the SmartNode Requirements
- Installing the SmartCash Daemon with a Script that installs and activates ddos protection and a custom ssh port
- Creating the required “genkey” for a SmartNode. (assumes you have a fully synced wallet with txindex=1 one in the smartcash.conf folder)
- What are some suggested next steps, including Improving the Security of your SmartCash SmartNode on Vultr here: https://smartcash.blockchainlibrary.org/2018/01/improving-the-security-and-reliability-of-your-vultr-smartcash-smartnode/
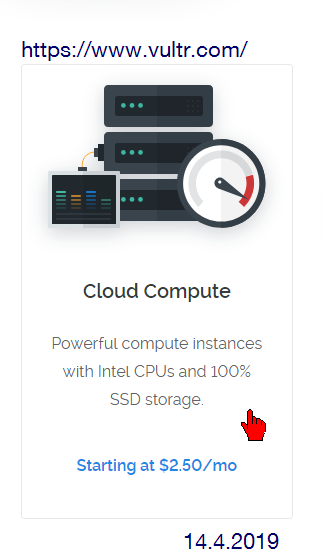
First of all you need to create an account at Vultr. Here is my referral link: https://www.vultr.com/?ref=7295941

Vultr enables you to quickly create the required dedicated VPS instance at $5/month. Once you do your first payment using credit card or PayPal you can send later payments using Bitcoin. Vultr generates invoices on the 1st of each month based off previous months usage. You can also easily create more nodes by creating a snapshot of your original SmartNode, which makes it easy to manage.
Once you create your account you need to deploy a new server instance at this link: https://my.vultr.com/deploy/
Select any server location. Spread out your nodes geographically to help support the SmartCash network.
Server Type: Select 64-bit OS, Ubuntu 16.04. See screenshot below.

Server Size select $5/month 25GB SSD, 1 CPU, 1024MB Memory, 1000GB bandwidth. Anything more is not required.
You can leave all the options for sections 4-7 unchecked right now. Section 8 give your server any name. SmartNode is fine.
Click “deploy now” and Vultr will create your dedicated VPS server. It takes a a minute or two for it to get it ready for you.

You will see your server being created with the “installing” in orange and a spinning thing.

Take a moment now to go to your SmartCash Desktop Wallet, making sure it’s the latest version. You need a special smartnode genkey. You can generate that from your desktop wallet from About -> Debug -> Console and typing “smartnode genkey” without quotes. Here is a screenshot. Keep that written down you will need it in another few minutes to set up the VPS.

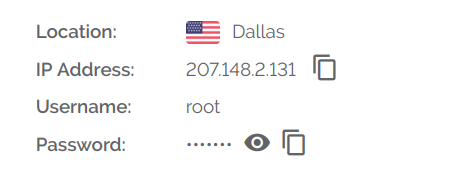
Now let’s go back to Vultr and check on your server at this page: https://my.vultr.com/.When it is done there will be an IP address written under the server name and the server will show Running in green on the right.
Write down the IP address as you will need it later. In my example it is 207.148.2.131.

Click on Manage on the right side of the row.
Now we need to connect to the server to manage it. You can find the username and password in the left side of the server info. Click the eye icon next to password so you can view the password and write it down.
Now we will log into the server using the built in Vultr Console Viewer. This tool does not support copy and paste so it is a little more tedious to use. You can also use Bitvise or PuTTY to connect to the server. Just put the IP address into the connection field, port 22, and use the root login and password. This step is beyond the scope of this guide — so just look it up on google if you need help. Otherwise the console in Vultr is fine as we won’t be typing too many commands. You can login to the console in the top right of the current screen where it looks like a monitor. It’s in the right side of this screenshot.

Click on view console and it will load up a new window to connect. First, make your window a little bigger by clicking the bottom right corner and resizing the window. Then login. Your login username is “root”, type that without quotes and press enter. Then type in the password and press enter. The password will not show up on the screen as you type don’t worry.
You will then be logged in and see this:

That’s great because you’re now connected to and sending commands to the server.
Now we need to start sending commands in. Let’s use the nice installs script that was created (you can browse here if you want to learn more about those: https://github.com/SmartCash/smartnode)
Type in:
wget https://raw.githubusercontent.com/SmartCash/smartnode/master/install.sh
Then press enter.
Then type
bash ./install.sh
Then press enter.
It will prompt you that it will reboot. Press enter.
It will prompt you for a custom SSH port (it’s a security technique to change the default). You can change to anything — something between 100 and 1000 is fine. Just don’t use the SmartNode port of 9678. Write that down.
222
It will prompt you to type in a unique genkey which you created while the Vultr was being created. Type that in now being careful to type it correctly and exactly.

The script will download and install a bunch of requirements for SmartNodes.
When it is done, it will reboot the server. Now it will take a moment to reload the server.
Login again with your username root and password you wrote down. If you don’t need SmartNodes right away you can stop now and it will automatically sync up the blockchain. If you’d rather get everything loaded and ready to go now you can bootstrap. Let’s go ahead and bootstrap.
Let’s download all the network blocks manually by sending these commands to the server.
Press enter after each line.
If your server has been up a while type this to stop the daemon wallet:
smartcash-cli stop
It’s okay if the above command didn’t do anything. That’s what we want. Then continue with this, the symbol that looks like ~ is a tilde, it’s shift `, next to 1 on the keyboard, by the way:
cd ~/.smartcash/
wget http://proteanx.com/txindexstrap.zip
apt install unzip
unzip txindexstrap.zip
When you do this last command, you may need to press A (hold shift and press a) to overwrite the blockchain files already existing on the server if it has already run once. That’s good, it means that the daemon automatically started up at least once. It would look like below. So overwrite and move on to the next step!

Then let’s make sure the daemon is running with the command below and check on the status.
smartcashd
smartcash-cli getinfo
smartcash-cli smartnode status
The wallet will load from the downloaded blocks. It takes a few minutes. Once that is done getinfo will show the current block and network state and smartnode status let’s you know how you are doing.
If you get to a screen like this below you’re good. All you need to do next is tell the SmartCash network to use your node, which you need to do from the desktop wallet. From the wallet you also need to create the 10,000 SMART transactions.

Other things you may want to do:
- Adding a Vultr Firewall for just 9678 – the script we used automatically drops traffic but any less traffic actually getting to your server firewall is better for your server. Here is a guide on improving security of your vultr smartcash smartnode: https://smartcash.blockchainlibrary.org/2018/01/improving-the-security-and-reliability-of-your-vultr-smartcash-smartnode/.
- Add Two Factor Authentication to your Vultr account here: https://my.vultr.com/settings/twofactor/
- If you want to be able to copy and paste commands you can’t use Vultr view console. Add an authenticated user for SSH logins using public/private keys with Bitvise or PuTTY. If you do this you might as well disable root logins with password, or login with password keys entirely.
- Create your 10000 SMART transactions that are required to be able to generate unique transaction keys to activate the node.
- Setting up a smartcash.conf file on your desktop wallet that uses the IP address of your node and port 9678, the genkey, and the special output from the 10,000 SMART transfer you need. A simple guide is here: http://smartnodes.cc/files/SmartCash_SmartNode_Setup_Guide_v1.2.pdf
- Activate your smartnode in the smartnodes tab of the desktop wallet… why wait?
- Assess your security practices — have you backed up your wallet.dat recently? Do you keep it safe and encrypted? Did you create a backup paper wallet? Have you thought about other security issues?
- Create a snapshot of your server on the Vultr snapshots tab. This is especially useful if you create multiple nodes and you do custom scripts or security. Then you can use the command
pico ~/.smartcash/smartcash.conf”to edit the configuration on any cloned snapshots from the vultr terminal. After you do that restart the daemon to load the updated configuration with the command “smartcash-cli stop” and “smartcashd” to stop and start. This is all that is required for your extra nodes, other than adding a second line in smartnodes.conf on the desktop wallet with the required IP, genkey, transaction id and activating.
Thanks for reading! Original post address is here: https://smartcash.blockchainlibrary.org/2018/01/guide-to-creating-a-smartcash-smartnode-vps-in-10-minutes-with-vultr/
Thanx for the article,... but
i am a bit confused:
you write about 10.000 SMART needed for a smartnode, but on the smartcash webpage it says: 100.000 ?
Was there an update? Or are these 2 different kind of nodes? Thx for your info, wanted to write about it, now I'm stuck :D
plus: what do you say about the problem mentioned below @toon?
is this the vultr.com offer that you refer to?:
Found one answer, since Jan 2019 it's 100.000 SMART, required to invest in a masternode:
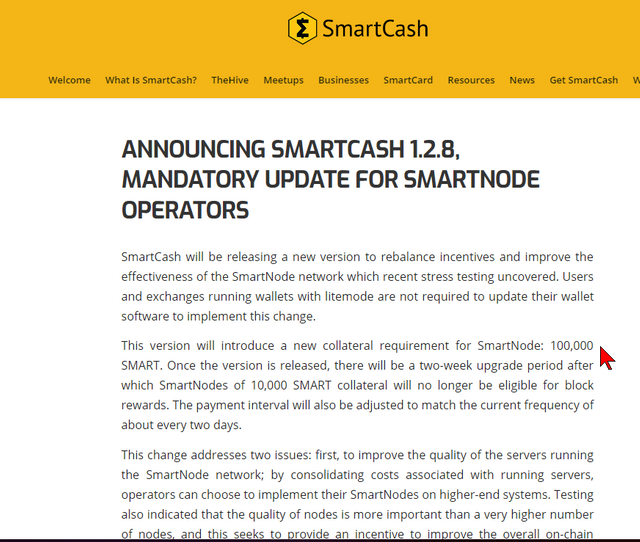
https://smartcash.cc/announcing-smartcash-1-2-8-mandatory-update-for-smartnode-operators/
Smart Cash for the win! Thank you so much for these instructions. Someday, when I'm able, I'd like to start up a Smart Node. @ironshield
There are major issues with SmartCash that are NOT being transparently and proactively communicated to the public, potential investors or existing holders.
Summary:
There is an bug in SmartCash 1.1.1 code that has not been fixed for over 3 months
Someone is actively exploiting the bug to steal hundreds of thousands to millions of SmartCash from mining rewards.
SmartCash moderators censor and ban members that speak of the exploit.
SmartCash community members do not have power to vote on SmartCash development. They can only vote on proposals.
For more info please see my articles on SmartCash:
https://steemit.com/altcoin/@toon/beware-of-smartcash-major-smartnode-exploit-not-being-publicized-or-fixed
https://steemit.com/smartcash/@toon/smartcash-deleted-reddit-posts-of-the-week-ending-5-4-18