Preparing your novel for Kindle Create: Everything you need to know to Self-Publish (Part 1)

If you're anything like me, your manuscript may have started out looking like Sloth from The Goonies, but you nursed it and nurtured it, for months if not years, and are finally ready to set it free, but what do you need to know to publish it on Amazon? In this series, I'll share everything I've learned about self-publishing on Amazon, so that you won't make the same mistakes that I did.
In Part one, we are going to cover preparing your manuscript for Kindle Create.
Kindle Create is a fantastic, free formatting tool, created by Amazon, that will give your manuscript a polished, professional look.
It's a new tool, and as such, it has its limitations, but it's free and gets the job done. Please note, that it's geared towards publishing on Amazon, and as such, only creates a .mobi file, which isn't compatible with other stores. We will cover other methods in another post.
There are a few things we need to set up though, before we can import the manuscript into Kindle Create.
For this, I'm going to use LibreOffice. LibreOffice is an opensource word processor that looks and functions like an older version of Microsoft Word. I've chosen LibreOffice because it's free and works on all desktop platforms.
You can download a copy from the official website.
If you would prefer to use Word or some other word processor, the principles are the same, but the steps may be different.
These are the steps we will cover in this tutorial:
- Adding the front matter.
- Creating a Table of Contents.
1) Adding the Front Matter
The front Matter is any information that appears in your novel before the actual story begins. This could include a title page, legal information, a dedication, an index, maps etc.
Please Note: Don't add a cover to your manuscript. You will add it separately in Amazon KDP just before you publish.
Title Page.
This usually appears at the front of the book and includes the Title, subtitle/series name and number, and author name.
For my first novel, I used:
The King and Guardian
Riftwalkers
(Book 1)
Brad Carsten.
Add a page break (Insert > Page Break)
This keeps it neat and organised and tells Kindle Create where you want one page (or Section) to end and the next one to begin. We will cover sections in a later tutorial.
The Boring stuff
- Copyright info
- Publisher's info
- ISBN
- Edition
- Publication date
- Credits
- Disclaimers
I'm not a lawyer, so I cannot advise you on what you should or shouldn't say in your copyright notice, but fortunately, there are plenty of online resources at your disposal that will allow you to use one of their templates for free.
For reference, this is what my "Boring stuff" page looks like:
All rights reserved. No part of this publication may be reproduced, distributed, or transmitted in any form or by any means, including printing, recording, or other electronic or mechanical methods, without the prior written permission of the author, except in the case of brief quotations embodied in critical reviews and certain other noncommercial uses permitted by copyright law. For permission requests, contact the author, at:
*My Email address.*
978-0-6399549-0-5 : Paperback
978-0-6399549-2-9 : MOBI
Cover design and maps by Brad Carsten Copyright © 2018.
Map brushes Copyright © 2010 CaptScott http://captscott.deviantart.com
This book is a work of fiction. All incidents, characters, and dialogue are from the author’s twisted imagination. Any resemblance to actual events or persons, living or dead, or any other sources including other works of fiction is purely coincidental.
(Add a page break.)
Dedication page.
This is where you make someone's day by dedicating your months of hard work to them. This can be as long, funny, serious, or simple as you like. It's your book, so go ahead and indulge yourself.
I wrote:
To my parents Peter and Joan for always believing, and for always standing by me. I am truly blessed.
(Add a page break)
2) Table of Contents (TOC)
The Table of Contents is a list of Chapters and Sections, with links, that will allow your readers to move quickly and easily between them
Kindle books have two TOC:
- A logical TOC
- A HTML TOC.
A logical TOC works in the background. This is the TOC that opens when you click the menu button on your kindle. This is required for all eBooks, and will be set up automatically when we move onto Kindle Create.
A HTML TOC isn't required but is highly recommended by Amazon as people have come to expect HTML TOC's in their eBooks. This is an index that appears in the book itself. We will have to set one up before importing our novel into Kindle Create as, currently, Kindle Create doesn't play well with links.
In order to create a Table of Contents, you need to tell your word processor what you would like to include.
To do this, you need to add a style to the different Chapter Titles and Sections.
What are paragraph styles?
Imagine you wanted all your chapter titles to be bright red with a yellow background, using Arial font size 14. (Please don't create red titles with yellow highlights) Later you decide that Red isn't your thing, and you would rather change your titles to blue. Normally you would have to go through your manuscript, one title at a time, and change each one individually. That could take forever.
This is where Styles come in.
You can think of styles as a template for each element. So you can assign Arial, bold, 23 black to all your titles and Times new Roman, italic, 15, center aligned to all your quotes.
Now, if you want to change your title font to Times New Roman, all you have to do is change the template, (or style) and all the titles will be updated automatically.
LibreOffice also uses these styles to create the HTML TOC.
How do we create styles?
1) Highlight "Chapter 1," or whatever your title is.
2) Select the "Paragraph Style" drop-down box as seen in the following image. You can also find it under the "Styles" menu at the top of the page. Select "Heading 1".
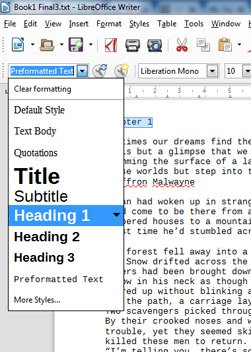
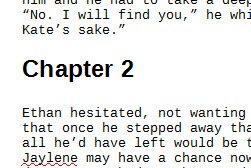
This is what your Chapter Title will look like: Don't worry about the font and size for now, and don't worry if it looks different to mine. We will fine tune that in Kindle Create.

Repeat for every Chapter title in your manuscript:
Once that's done, you can create your HTML TOC.
Adding your Table of Contents.
After your dedication page, you can finally add your HTML TOC.
In LibreOffice, click on Insert > Table of Contents and index > Table of Contents, Index or bibliography

Take a deep breath. The dialog that opens looks a lot more complicated than it is. Don't worry, I will walk you through all the important settings.
The left pane gives you a preview of what the TOC will look like.

The right panel has all the settings.
On the first tab (Index or Table of contents) I've highlighted the important settings:

Title: What do you want your TOC to be called? It defaults to Table of Contents, which is fine.
Protected against Manual changes: Make sure that this is unchecked, or you won't be able to manually add items to your TOC later.
Evaluate up to level: This setting allows you to insert multiple levels in your TOC, with headings and subheadings, and sub-subheadings. For a novel, you probably won't use subheadings, so set this to 1.
Let's look at the next tab.
Entries.

Make sure you are editing Level 1. (highlighted in Blue in the above image) If you have subheadings, you will have to repeat the steps for each level in your TOC.
The structure element (highlighted in green) will determine what the TOC will look like. It consists of 6 buttons:
E#: Chapter number. We won't be using this, so you can safely delete it. (I will cover deleting items later on in this section.)
E: The Entry. These are your chapter names: Chapter 1, Chapter 2 etc.
T: Tab space. This is the dotted line joining the Entry (Chapter 1) to the page number. This can be deleted.
#: this is the page number. Kindle pages are dynamic. The page numbers are different depending on the size of your screen, the size of the fonts etc, because of this we do not want to specify a page number. This item can be deleted.
Note: The order of the Structure buttons is important. E, T, # means that the title appears first, then the tab space and then the page number. If you swapped them around to #, T, E, then the page numbers will appear first followed by the tab spaces and finally the Chapter titles.
LS, LE: Link Start and Link End. If you are familiar with HTML tags, this is the equivalent of
<a href="url"> and </a>
The user will be able to click on each item in the TOC to navigate to that chapter or section in your manuscript. Any items that fall between the LS and LE buttons will be clickable and any items that fall outside of them, will not. In the image above, E#, E, T and # all fall between LS and LE, which means that the user will be able to click on the Chapter Number, Chapter title, the tab space and the page number. If I change the order to E#, E, LS, T, #, LE, then only the tab spaces and page numbers fall between LS and LE and so only they will be clickable.
Delete all the items that you don't want in your TOC. To do this, click on the item and press the delete key on your keyboard.
Delete E#, T and #, so that all we are left with is LS, E, LE in that order.
If you accidentally delete the wrong item you can simply add it to the menu again, by clicking the corresponding button below it. (Chapter No. Entry Text, Tab Stop etc)

Let's move on to the third tab.
Styles.
Remember earlier, when we assigned a Paragraph Style to each chapter title? This is where we tell the TOC which paragraph style we used.

Click the first item in the Levels panel. (Title[contents Heading] highlighted in blue)
In the left hand panel, select the style we used for our chapter titles. In our example we used "Heading 1." (Also highlighted in blue. )
With both of them selected, click the arrow button, (highlighted in green) to link the two together.
This tells the program what to look for when building up the headings and subheadings in your TOC. eg. If a title uses Style A, then it's a heading. If it uses Style H, then it's a subheading etc.
If you are using Subheadings, you will have to repeat this step for levels 1,2,3 or however many levels you are using.
We aren't using subheadings, so we are done.
Click OK to create the TOC.

Don't worry about the grey background. It won't show up in your ebook.
In the next post, we will go through some more advanced settings.
Please subscribe for more tutorials, reviews and my musings on everything fantasy and writing related.
If you enjoyed this tutorial, and would like to check out some of my work, Please visit my Amazon profile.
You can also follow me on Twitter, Minds and Gab.

Chat to you soon!
Hi Brad!
Great tutorial! I would advise you to make an #introduceyourself post for the community. Welcome to Steem!!!
Thanks for the welcome, and the great tip Anmitsu. I will do that. would you recommend building up some content first, so that people can go back and see what you are doing?
I would recommend finding users whose content you are genuinely interested in and commenting on their posts, interacting on the platform and getting to know people. Also don’t be discouraged when you don’t always get noticed in the beginning or if you don’t always get voted. Some ppl have been super active for 2 or 3 years, made friends, invested their own money, time and just shown that they are here for a long haul
Oh and one more thing :) try to not repost content you ve posted somewhere else before (or just try to modify it more) some ppl are fussy about it 🤷♀️ and can downvote in disagreement to rewards. Then if you use WP for your blog, there is a Steempress plugin to push it automatically to Steem later. Oh and check out writersblock community, since you are a writer :) Sorry I hope I don’t sound overbearing. Good luck and welcome!
P.S.
DON’T LOSE YOUR PASSWORD
it can’t be recovered and you ll lose the access to your account
Not at all. This is my first step into cryptocurrency and steemit, which seems a little more advanced than Facebook lol. I'm soaking up everything you're saying like a sponge. I was told that you promoted the post to OCD. Thanks so much for that. I really appreciate it, and once again for your guidance.
Hey, I think it will be good if you can write an introduction yourself post first, so people know what's your steem blog is all about. Then, you can start writing content. After a year or so, maybe you want to introduce yourself again, that's also fine.
Thanks for the tip. I'll get onto that.