Cold Storage - How To Create A Bulletproof Bitcoin Wallet
In this article I provide a step by step guide on how to setup a secure cold storage for your Bitcoins.
Crypto users are a popular target for hackers
As cryptocurrencies gain value and mainstream attention, the exploitation of insufficiently secured users has become a lucrative job for hackers. If one is able to obtain access to the users primary email address, chances are, that this email address is used for their exchanges. The hacker is then able to reset the the password from the exchanges website and steal all your tokens, if you haven't enabled 2FA protection.
I discuss the current climate and most popular ways to get hacked in this article and in this article.
The ultimate solution
The most secure way to store your Bitcoin in an offline paper wallet, the so-called "cold storage". Let me show you how this can be done.
Our goal is to create a random private key and Bitcoin address without ever exposing it online. You will need 2 USB drives for this.
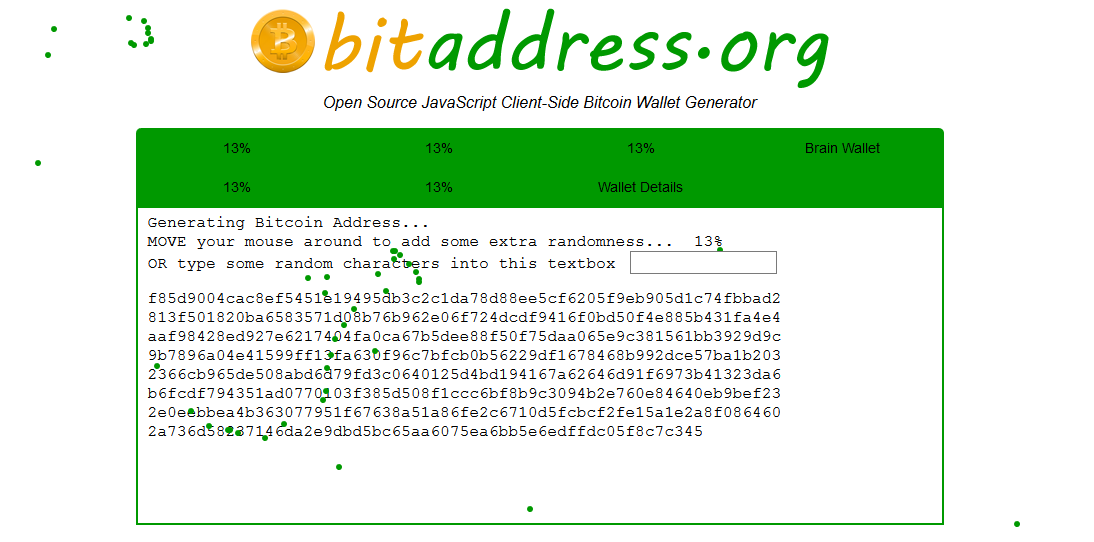
1. Go to the website https://www.bitaddress.org
This is a verified random address generator.
2. Go to the options menu of you browser and click "Save page as.."

3. Save the HTML page to a USB drive.
Great. Now we have an offline BTC address generator.
Bitaddress.org is a client-side JavaScript generator, which means it needs no server to run - your data is not transmitted anywhere - it runs only on your machine.
Now we want to create an isolated environment to create the key pair.
4. Go to the official Ubuntu website (www.ubuntu.com)and download the latest Ubuntu Operating System.

This is a large .iso file and may take a while to download.
5. Go to http://rufus.akeo.ie/ and download the Rufus Bootable USB tool.

6. Prepare a clean USB drive with 4GB memory to create an mobile OS.
Now you have Rufus and the Linux ISO. The next step is to create your operating system.
7. Launch Rufus.exe and select your .iso file and write it to your USB drive.

You have to fill out the Rufus form correctly but it's pretty straight forward. Make sure you don't have any important files on the USB drive since Rufus will overwrite it. If you run into any trouble follow this tutorial on how to do this step.
8. Restart your computer and launch from USB.
Usually, you have to press F12 during the first seconds of start up. Then you are granted access to the BIOS and there you can select to start from USB.

You have now lauched Ubuntu from USB.
9. Select "Try Ubuntu" to launch a live version without installing it.

Well done! The environment is ready.
10. Plug in you other USB from Step 3 with the bitaddress.org HTML Page and launch the webpage.
IMPORTANT: Do this step offline!! Don't connect to the internet, just click on the HTML file we created in step 3. or the address can be compromised.

Now onto the fun part:
11. Move your mouse around the screen to create random input until you reach 100%.

12. You have successfully created a paper wallet!

13. Click print to send the address to you printer.

IMPORTANT: Do this via USB connection to Printer and not over any wireless link because it could be compromised.
14. Send your Bitcoin to the public address on your paper wallet and never ever share the private key with anyone.
Your printed wallet will have some additional info on page 2, on how to use it.

Conclusion
In this guide we have created a secure paper wallet. We have gone to great lengths to create an a) isolated b) offline c)non-malicious environment. We have then generated a Bitcoin address and private key offline! This means that your keys exist only on paper and have never been exposed to any online system. This is a highly effective security solution referred to as cold storage. Please note, if you want to guarantee full security, when withdrawing from this address, remove all funds at once so that you don't risk exposing your keys. Just repeat the process and generate a new paper wallet to store the remaining funds that are left over after your transaction.
Stay safe, friends!
This tutorial is inspired by the book "Mastering Bitcoin" by Andreas M. Antonopoulos https://www.amazon.com/Mastering-Bitcoin-Programming-Open-Blockchain/dp/1491954388
More Articles like this:
Do you want to learn about a secure and safe Google alternative? (Read article)
Do you want to know how to protect Internet Freedom? (Read article)
- Nick ( @cryptonik ) -

Very thorough tutorial. Probably something I should do sooner rather then later with these crypto prices exploding.
Yes! If you want do hodl out these crazy waves, it's a safe bet. If you are moving coins around a lot, it's not so practical ;)
Thank you Niko for going all the way to explaining this.
I'm just wondering why did you go to detour over starting Ubunto from a USB stick. Never had anyone telling me this yet.
Yes it is a detour indeed, but a necessary one.
We want to create a wallet that is 100% not compromised. You could have the following malware already present on your computer, such as: keylogger, trojan, backdoor logs etc. There may be background services running on your PC that you are completely unaware of. Alternatively somebody could be monitoring your network and reading the packages you send.
Therefore we create a fresh system on USB, that is independent of your current computer system, which guarantees that it is free of virus. We launch it "live" from a USB to because in this mode no data gets saved. After shut down, all your activity will be lost.
The only place where your private key now exists, is on the paper wallet, there is no online or even digital copy stored anywhere if you follow the procedure.
That is as secure as you can get.
PS: I'm not making this up. The procedure is proposed in the book "Mastering Bitcoin" by Andreas Antonopoulos, but I wrote this tutorial to show exactly how this can be done in practise.
Thanks for the detailed answer.
It makes complete sense to me, haven't done any paper wallet yet.
I'm kinda concerned about printing, I don't have a printer myself can use the one at work though. You mean it should be connected to the of by usb cable ?
Yes, you can print at work, but use the USB cable. Do a test print with a different document first. Remember: if print attempt is unsuccessful, the printer stores the job in memory; Then your colleague could suddenly pick up your wallet, when the printer suddenly resumes printing. Don't show the print out to anyone. This solution is most suitable for long-term storage. It is recommended, that when you withdraw, you should take out all BTC at once and make a new wallet. So it is not convenient if you plan on doing many transactions.
Alright. Thank you.
Always wanted to try this, something to do for the holidays
This post received a 4% upvote from @morwhale team thanks to @cryptonik! For more information, click here! , TeamMorocco! .
STEEM Price : 2.062 $
@originalworks
The @OriginalWorks bot has determined this post by @cryptonik to be original material and upvoted(1.5%) it!
To call @OriginalWorks, simply reply to any post with @originalworks or !originalworks in your message!
upvote and following you. Thank you.
Appreciate it, thanks :)