How to encrypt your USB for the Deep Web!

Worried that the NSA's digging deep into your shady past with selling used gum wrappers? Or maybe a jealous ex is trying to track you down with her hired Russian assassins? Or better yet, you want to hide your valuable Japanese Tentacle Anime collection on some .onion site, but you're afraid of aliens touching down so you want to have your most sensitive information on your at all times. Encrypted.
Here are some basic rules:
-Never use the same username on the Deep Web that you have used on the Clear Web -Try to use a non-unique username
-Never give out any personal information, location, etc...
-Never tell anyone if you have been busted
-If communicating outside of PGP or PM system, only use Jabber with OTR (off-the-record)
-Never upload a picture or file without first removing the metadata
-Use common sense!
You will securely install a Virtual Machine on a USB drive that is encrypted. This is meant to have Windows as the base OS, and Linux to be ran through the VM. Your thumb drive can also be used as a kill switch, by promptly removing the thumb drive if you feel compromised. It’ll be encrypted as well, so nobody will be able to access the information on it. The items that you will need for this are as follows:
- A thumb drive that has at least 32GB of free space
- VeraCrypt (https://veracrypt.codeplex.com/) installed
- Vmware (http://www.vmware.com/) installed. Either buy this, or download from torrent site
- An ISO, for any Linux distro. (I will be using backbox for this demonstration)
- A VPN provider that does not keep logs that is not in the EU/USA jurisdiction
Step by step:
- Plug in USB (make sure it’s either new or NTFS formatted)
- Open VeraCrypt
- Click on “volumes” at the top, then click on “create new volume”
- Select the second circle that says “Encrypt a non-system partition/drive”, then click “next”

- Select the circle that says “Standard VeraCrypt volume”, then click “next”

- Click “Select device”

- Navigate to your thumb drive
- Hit the first circle that says “Create encrypted volume and format it”. It’s just going to be much quicker to encrypt this way. Next.

- Click “Next”, leave the encryption algorithm on AES. The other options basically encrypt it further but that’s not necessary, keep the hash algo the same.

- Create and confirm a password. I would suggest using an online password generator, such as http://passwordsgenerator.net/ (Don’t forget your password!)
- Click “Next”

- Select “Yes” for large files, then press “next”

- Move the mouse around, wait for the bottom bar to turn green, then click “format”. The longer you move it around, the better. It just makes the encryption stronger. If it gives you an error message about erasing and losing all files on the selected partition, just hit “Yes”.
- It will take some time to create this volume, leave it for a bit to finish

- Click “Ok” on the next “IMPORTANT” message and exit out of the Volume Creation Wizard.
Congrats! You just created an encrypted partition on your thumb drive!


- On the main screen, select any one of the drives on the list. If you exit out of VeraCrypt completely and click on the drive, it’ll come up with an error message telling you you’ll need to format the disk. That’s because it’s encrypted, so it won’t be accessible.

- Click “Select device”, and navigate to the file that you created on your thumb drive earlier. For example the N: drive was hit.

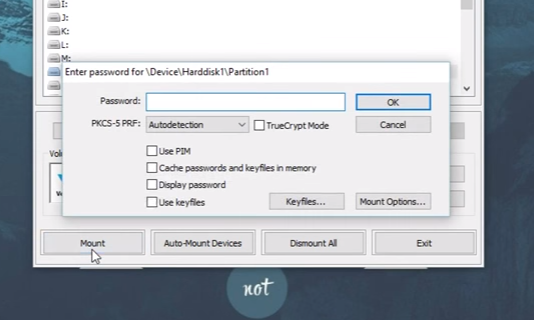
- Select “Open” then select “Mount” once you are back on the main screen. Type in your password that you wrote down. It may seem unresponsive for a bit, but you just need to wait.

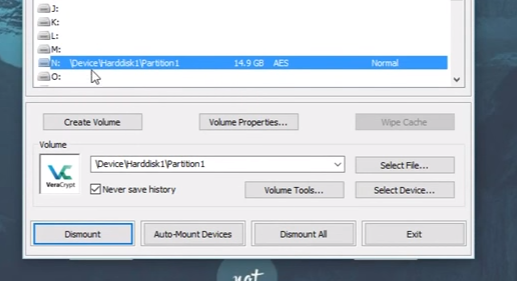
Once you get here, to exit all you need to do is hit Dismount.

- Leave VeraCrypt open, but minimize it. As you can see, the N: drive is showing up and should work
Of course, this is a for fun little tutorial.. this is only the beginning of your journey. If you'd like to go a bit further, please take a look at Whonix, spoofing your MAC address, using VM's, etc.

Interesting thanks
And thank you for coming over and engaging!
Congratulations @avilsd! You have completed some achievement on Steemit and have been rewarded with new badge(s) :
Click on any badge to view your own Board of Honnor on SteemitBoard.
For more information about SteemitBoard, click here
If you no longer want to receive notifications, reply to this comment with the word
STOPBy upvoting this notification, you can help all Steemit users. Learn how here!
yay , cool thank you :)
awesome post bro.
Thank you mate :) use wisely
Great post! Well memed! lol
Anyone here use hansa BEST DNM on deep web
so wait, would I be able to run qubes on this? Then run whonix through that ??
Thanks for a spectacular useful post! You got me!