how to make the Most Simple Electric Generator Cardboard Generator
This generator does not use a "commutator" (ie a kind of ring divisible to make its output DC), then its output is AC which is directly connected to the lamp. The lamp will not break as long as the voltage is suitable.
Ingredients:
4 pieces of ceramic magnet (1cm x 2cm x 5cm) or magnet other than the magnet of the former speaker
100 gr / 1ons email wire uk 0.1mm (there is also a thinner again)
1 mini lamp, 1.5V / 25mA or LED light
1lb used cardboard (or thin plexiglas / triplex), 8cm x 30cm
1 nail, minimum 8cm in length
sandpaper to clean the wire email layer
masking tape to wrap the wire coils
Optional: small electric drill to rotate the rotor
WARNING!
Keep magnets away from all electronic equipment (pc, hp, tv, vcd, disc discs, credit cards, etc.) as it will damage.
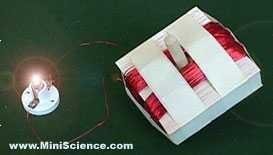
Box home generator:
Draw a line like this on a cardboard box. Determine the midpoint (for the nail hole later).
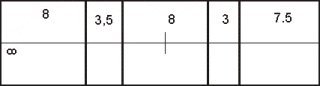
Note: If the box is from plexiglas / triplex, do not make it bigger than the picture above. The wire roll should be as close as possible to the magnet rotation to maximize the result. So make it to the length and width of the magnet.
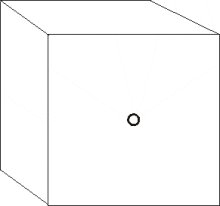
Next fold it by line so it is boxy, and paste it with masking tape. The center line should be on the outside to be easily pierced with nails
.jpg)
Push the nail in the centerline of the box until it goes through the back. Do not let the hole of greatness, the origin of the free spinning can be enough. Unplug the sack.
Rolling email wire:
Take the email wire. After over 10 cm, tape the middle wire box with tape and start rolling. From the middle down / up, then up again up / down, etc .., until the remaining wire 10 cm (if you can also have a position in the middle). It does not matter if the nail holes are closed. While still holding the ends of the wire, wrap the coil with tape so as not to decompose, but do not let the nail holes come wrapped up. Clean the (yellow) layer of both wires 2cm (may be more) from the tip with the emery around. With the hearts stretch the wire rolls that cover the hole until the spikes can enter, and make sure the spikes can spin freely.
.jpg)
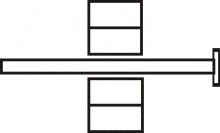
Placing a magnet.
From 4 magnets make 2 pairs (masing2 stick together dg partner). Paste the two pairs of magnets on the nails (inside the box) elongated laterally (shaped cross). Set the position of both pairs of magnets are equal and balanced., Then try turning the skate (hereafter called the rotor) until it is free to rotate. Allow the blank space between the magnet pair with cardboard to make it more solid. It is also possible that the magnets are wrapped with masking tape to keep them away from the nails.
.jpg)
Connecting to the light.
Make sure that each end of the wire is clean from its lining so that the current passing through can be free flowing to light the lamp, later

Test generator.
Rotate the rotor gradually from slow to capable of turning on lights with light. When it is known how fast the spin until the light is brightly lit, then make a benchmark. Because when exceeded then the lamp will break / burn. Note also whether the magnet is not rubbing with the box, either when played fast or after slowing down, as it will reduce the rotation as well. Light or dim light is determined by how fast the magnetic rotation is, and how close the magnetic distance is to the scroll.
If it turns out the light remains dim even though it has been rotated as fast (if also the same when played with mini electric drill) then would not have to be added wire coils. The way to stay / just wound the end of the wire finally with a new one (which is clean from the email layer) then roll dg same direction again. This minimum generator should be able to generate 2V voltage so that the lamp can be lit.
If you want to know how big the voltage when rotated at full speed, then add one more lights that are connected in series (the end of the lamp 1 dg the end of the lamp 2, the end of the lamp 2 dg the end of the generator). Still able to turn on both lights, add back the third lamp, and so on, until the last light does not turn on even though the rotor has played the fastest
Note.
The weight or lightness of the rotor is rotated depending on the load. If it turns dg mini light rotor feels heavy / hard rotated, then replace with LED lights (there are red, yellow, green and white). Led white dampening voltage 2-5V, led other max 3V
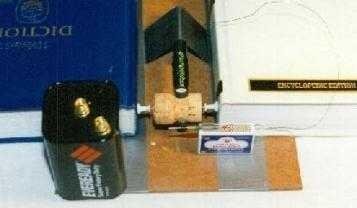
Making the motor.
One of the generator output wires connect to (+) a 6V (4x AA) battery, another wire touches to (-) it turns into a motor! To change the direction of rotation, + / - stay reversed.
Change the AC voltage to DC.
The easiest way is to use 4 diodes (common type IN4001, but unfortunately the current is reduced to ¾ dr generator output. Another option is IN5819, just a bit rare in the market).
Source reference..
https://www.google.co.id/amp/s/id.m.wikihow.com/Membuat-sebuah-Pembangkit-Listrik-Sederhana%3famp=1
Images that you're using are copyrighted. Read more on copyrights here.