(Review/Guide) AvalonMiner 741 7.3 Th/s, 1150W Bitcoin (SHA-256) ASIC miner
(Review/Guide) AvalonMiner 741 7.3 Th/s, 1150W Bitcoin (SHA-256) ASIC miner

Picture copyright (c) Canaan Creative.
Author:
HagssFIN
https://bitcointalk.org/index.php?action=profile;u=348185
- General information, other needed items
- Unpacking
- Overview
- Controller unit setup
- Install
- Configuration
- Testing
- Power consumption measurement
- Conclusion
- How to order
Last updated in: February 18, 2018.
Nicely formatted version (February 17, 2018) available for download here (Mega.nz cloud service):
https://mega.nz/#!45kQXA6K!7uUcotnsTH3ppYReveaCRNnHIPvWiM5PAPiAdEwGMm8
Bitcointalk.org thread:
https://bitcointalk.org/index.php?topic=2588105
1. General information, other items needed
AvalonMiner 741 is a Bitcoin (SHA-256) ASIC miner using 16nm ASIC chip technology, manufactured by Canaan Creative (headquarters in Beijing, China).
AvalonMiner 741 does not have a built-in controller and you need a separate controller, AvalonMiner Controller or any of the Raspberry Pi versions to run it. A good feature is that several AvalonMiners can by chained to be controlled by one Raspberry Pi.
These products were included with the miner:
- AvalonMiner 741 1 piece
- AvalonMiner USB Converter 3 (AUC3) 1 piece
- Micro USB Cable 1 piece
- AUC3 I2C 5PIN Cable 1 piece
AvalonMiner 741 weights 4.3 kg and outer dimensions are 320mm (L) x 136mm (W) x 150mm (H).
The nominal hashrate is between 7.3 to 8.0 Th/s with a nominal power consumption of 1150 Watts.
This is a review for both the hardware and for the buying experience from a local official Canaan distributor, Cryptouniverse.
Technical specifications:

Other items needed:
- A server grade power supply with at least 6x PCI-E 6-pin connectors, everyone with a dedicated cable, preferably at least 16AWG wires.
I used a 1600W power supply called Sorcerer Power Supply Unit to power my miner.
This is a custom power supply manufactured by Canaan Creative. - C13 power cord suitable to your country's electrical socket
- AvalonMiner Controller or Raspberry Pi.
- 5V 2.4A USB wall wart for the Controller.
- Micro USB cable between controller and the 5V 2.4A USB wall wart.
- Ethernet cable to go from the controller to your router/switch.
- Computer to set initial pool and configuration settings.
2. Unpacking
So, as Canaan Creative has changed their strategy by selling small quantity orders via their official distributors,
I bought this kit from their distributor called Cryptouniverse.
Cryptouniverse is located in Austria and their main area is the EU area,
but they also accept international orders.
Canaan Creative: http://www.canaan.io
Cryptouniverse: http://www.cryptouniverse.at
I bought a kit, which also included the power supply and the controller, which you would normally have to buy separately.
BITCOIN Mining Set Avalon 741: https://www.cryptouniverse.at/shop/bitcoin-mining-set-avalon-741/
(Link dead in February 18, 2018).

As I live in Finland, I'm really happy to see an European distributor selling Canaan hardware.
It makes the buying process so much easier, no need to go through the process with customs.
The delivery time from Austria to here in Finland was quick enough, seven days.
It was sent from Austria in December 5.
In December 12 it arrived via GLS (GLS Standard service) to their local delivery partner, Finnish postal service Posti and I was able to pick it up at the post office.
All the goods were packed in a big cardboard box and there was lots of foam for support and protection.
Packaging for the miner was good as it usually is with Canaan products.
The power supply was also packed nicely in foam.
And of course there is a basic setup instructions paper included.
More specific setup instructions can be found online at Canaan website http://www.canaan.io
Here are some picture showing the packaging material used in the delivery.


3. Overview
Here are some pictures showing the AvalonMiner 741, AUC3 converter,
AvalonMiner Controller (Raspberry Pi 3 inside a metal case)
and the Sorcerer Power Supply Unit.


The Sorcerer Power Supply Unit was something that I had not bought and tried before.
So it was nice to buy one in this occasion.
Only minus side that I can find about the power supply is that they have used CapXon capacitors in it.
Some other brand, better quality capacitors would be a nice change.
When I look at the product page for the power supply at http://www.canaan.io, I can see that there are Rubycon capacitors installed.
So I suggest they ditch those CapXon capacitors and continue with using only Rubycon capacitors.
Rubycon capacitors have better quality.
Otherwise the power supply looks very nice and well made.
I bought a C13 to Type F (schuko) power cord for the power supply.
I also had to buy a wall wart for the AvalonMiner Controller (Raspberry Pi 3) and one Micro USB Cable.


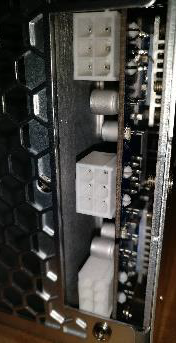
I also did a quick disassembly for the miner, took some pictures and then assembled it back together to continue the mining.
The disassembly and assembly was quite easy, only one screw driver (with Phillips screw head tip) was only needed.
I took some close up pictures of the daughterboard and hash boards.
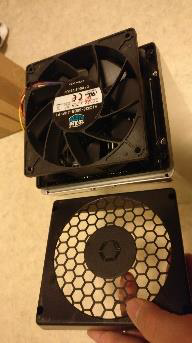
I really like the robust cooling solution that Canaan has come up with the latest AvalonMiners.
Those are some big ass sized heat sinks with fine fins. Very effective.
They call their solution Airforming Cooling Technology.


4. Controller unit setup
When it comes to the controller unit, you have two options:
1. You can use the AvalonMiner Controller.
Using it is very straight forward, because it is ready assembled and software is already installed on the Micro SD card.
AvalonMiner controller.
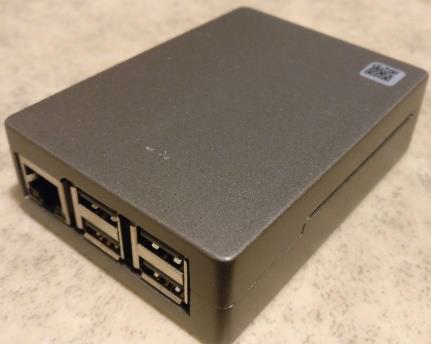
2. You can build one yourself by using a Raspberry Pi 3 and other supplies.
So in this next part I'm gonna show you how to build a controller by myself,
using a Raspberry Pi 3 single-board computer and some other supplies.
It's really easy to source these parts needed and I used my local electronics store to find these supplies.
Here is my shopping list:
- Raspberry Pi 3
- Transparent plastic case for the Raspberry Pi 3
- 8GB Kingston Micro SD card
- 5VDC 2.4A USB wall wart
- USB-A to Micro USB-B cable

Picture of my supplies.
Here are the instructions for doing the controller setup from scratch.
Instructions:
1.
AvalonMiner Controller’s firmware supports the following types of Raspberry Pi single-board computer:
- AvalonMiner Controller (Canaan Creative)
- Raspberry Pi 1 Model B
- Raspberry Pi 1 Model B+
- Raspberry Pi 2 Model B
- Raspberry Pi 3 Model B
2.
A minimum capacity of 4GB memory card is required.
There is no requirement for brands, speed rating is recommended for Class 10.
(Please be select type of memory card based upon your selected Raspberry Pi model)
- Raspberry Pi 1 Model B and Model B+ using a SD card
- Raspberry Pi 2 Model B using a Micro SD card
- Raspberry Pi 3 Model B using a Micro SD card
- AvalonMiner Controller using a Micro SD card
3.
We need a SD card reader.
When you buy a Micro SD card, you want to make sure it comes with a SD card adapter.
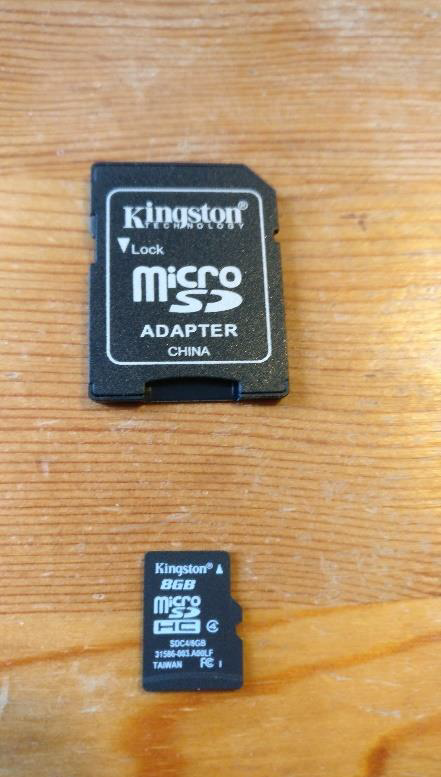
Put your memory card to the SD card reader.

I have an integrated SD card reader in my PC case front panel.
4.
Depending on your Raspberry Pi model, select and download the firmware version.
Raspberry Pi 1 Model B Firmware:
https://canaan.io/downloads/software/avalon741/openwrt/latest/rpi1-modelb/openwrt-brcm2708-bcm2708-rpi-ext4-sdcard.img
Raspberry Pi 2 Model B Firmware:
https://canaan.io/downloads/software/avalon741/openwrt/latest/rpi2-modelb/openwrt-brcm2708-bcm2709-rpi-2-ext4-sdcard.img
Raspberry Pi 3 Model B Firmware:
https://canaan.io/downloads/software/avalon741/openwrt/latest/rpi3-modelb/openwrt-brcm2708-bcm2710-rpi-3-ext4-sdcard.img
5.
Install a tool for writing a image to SD card, if you don't have one installed already.
Win32 Disk Imager: https://sourceforge.net/projects/win32diskimager/
6.
Open the tool software and select your SD card reader device letter.

7.
First click the folder icon.
Then locate and select your downloaded Openwrt firmware for the Raspberry Pi.

8.
Click Write, and then click Yes, to start writing your image.

9.
Wait for the process to complete.
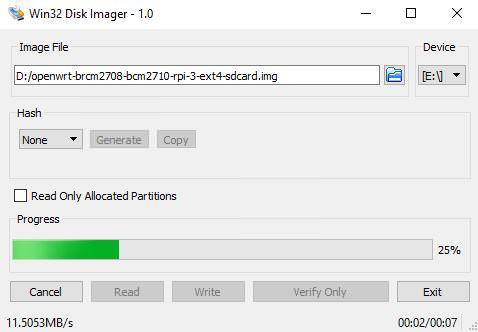
10.
When the following message is displayed, your program was successfully written.

Click ok and exit.
If you followed these steps successfully, your controller is initially completed.
5. Install
The installation process was pretty straight forward as it has been for several AvalonMiner generations now.
Connect the AUC3 (AvalonMiner USB Converter) to the AvalonMiner with a 5-pin cable.
Connect the AUC3 other end to the controller (Raspberry Pi) with a micro usb cable.
Connect the Ethernet cable to your controller (Raspberry Pi) and the other end to the router or switch device.
Connect the wall wart to the controller (Raspberry Pi).
And then you need a high power server grade power supply. Install all six pieces PCI-E 6-pin power cables to the power headers found at the front side of the miner.
Connect the power cord to the power supply and to the electrical wall outlet.
Canaan Creative has also made a nice tutorial video for visual instructions.
6. Configuration
You can follow these instructions for the controller configuration:
1.
Connect the power to the controller, and make sure the controller and computer is configured to be connected to the same network.
(You can also use the controller connected directly to the computer with a network cable).
2.
The default IP for the controller is 192.168.0.100. The IP address of the computer needs to be adjusted to access the controller.
3.
Use your web browser to access “192.168.0.100”, and you will see the following login screen.
4.
There is initially no password, so you can enter after click Login Overview screen.
5.
You can click Configuration to configure your miners and see your pool information.
For example, you can set up three pools and corresponding miners with the default execution priority pool1> pool2> pool3.
6.
If you need to change the network settings for the controller, click on Network to configure, click Save & Apply, and then power down your unit, and manually restart the controller.
7.
After the configuration, change your computer back to the automatic IP address acquisition.
8.
If the controller is properly connected to the Internet, you can access different sections in the miner web configuration page, for example the Cgminer configuration page and the miner status page. As long as a miner is correctly connected via AvalonMiner USB Converter to this controller unit, you will see them on the overview page and see relevant information on these devices.
Canaan Creative controller instructions for the A721 and A741:
https://canaan.io/question/how-do-i-connect-an-avalonminer-721-and-avalonminer-controller-including-raspberry-pi-1-2-and-3/
7. Testing
After all the configurations were made, it was time to test the miner.
I started mining with default settings.
The average hash rate was after two hours was close to 8 Th/s.
So this specific unit is definitely in the best perfomance area,
when you look at the nominal expected performance mentioned in technical specifications.
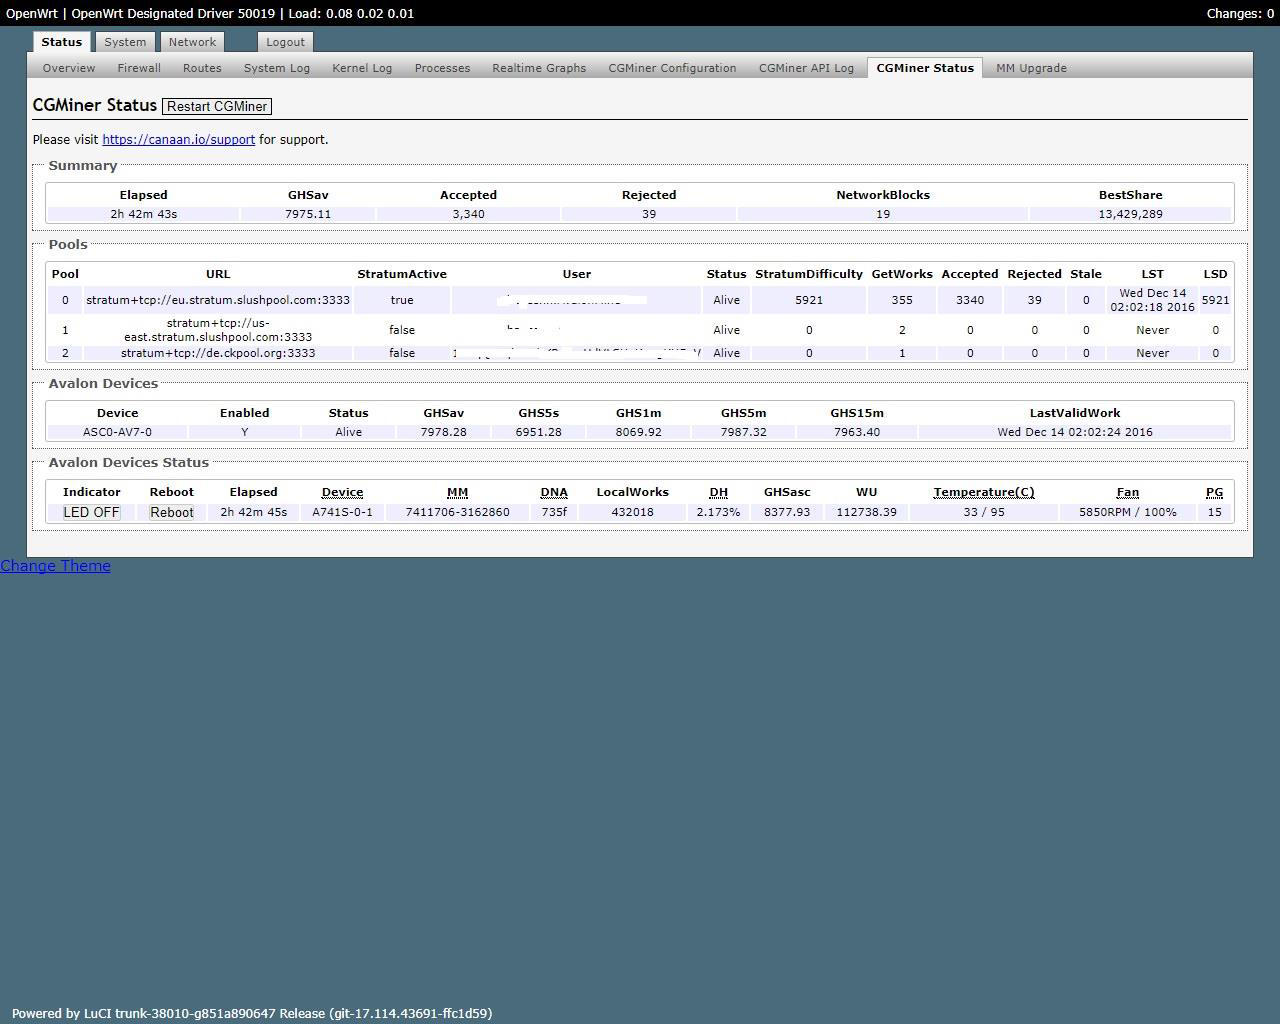
The firmware Canaan uses with the AvalonMiner is based on the OpenWrt
and it is really clear and easy to use in my opinion.
Canaan provides very frequently updates for the firmware and the cgminer software is always up-to-date.
When it comes to the software, they have an open-source policy and they respect it.
This is not the case with some competitors.
8. Power consumption measurement
The power measurement was done with Perel E305EM6-G energy meter.
Technical specs data sheet (.pdf document): https://www.perel.eu/downloads/22/e305em6e305em6ggbnlfresdptpl.pdf

Perel E305EM6-G energy meter.
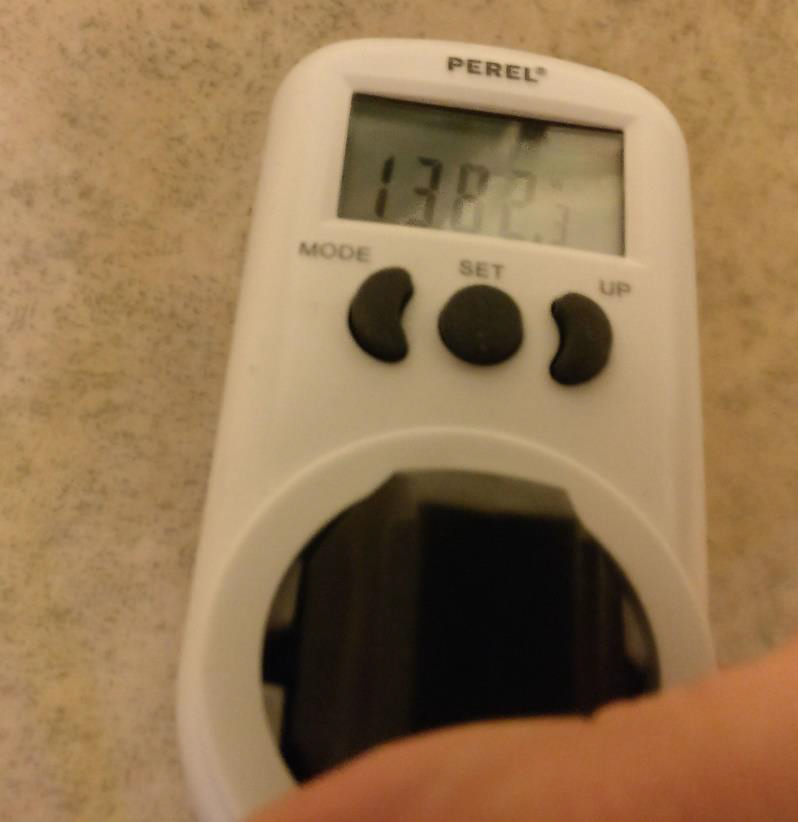
Power measurement.
Stable result for the power consumption (at wall) was 1382 W,
when the hash rate was close to 8 Th/s.
With these results we can calculate the power efficiency at wall.
1382 / 8000 = 0.17275 J per Gh/s.
9. Conclusion
AvalonMiner 741 might be close to EOL (end of life) as a new generation AvalonMiner model is coming available soon, but I think that it is still profitable
for some time and it is definitely one of the most robust Bitcoin mining hardware available and I wanted give it tribute by doing this review.
I would like to thank Canaan Creative and Cryptouniverse for a nice miner and I was happy to give a review for it here at the forum.
I really appreciate the sturdy design and reliability with the AvalonMiner.
My first experience buying from a official Canaan distributor was really easy and pleasant experience.
I hope to do business again in the future.
If you got any questions, feel free to drop them in the Bitcointalk.org forum thread or in the comments section.
10. How to order
Edit (February 18, 2018):
Unfortunately AvalonMiner 741 is EOL (end of life) product, only used secondhand units can be found for sale.
No more new units are produced, as Canaan Creative is now manufacturing the next, 8th AvalonMiner generation devices.
Canaan Creative: http://www.canaan.io