How to Repair Your AEG or Electrolux Dishwasher

In this short tutorial I'll explain how to fix a very common problem with about 3 to 6 years old AEG or Electrolux dishwashers. If the dishwasher works otherwise, but doesn't heat up the water anymore, the problem is very likely to be broken soldering in the circuit board. The problem can easily be fixed by just resoldering the broken connection.
In this tutorial I fixed an AEG Electrolux model 40660 dishwasher, but lots of people have reported that this fix works for many other models too.
Step 1: Opening the Front Panel
Opening the Front Panel

Start by unplugging the mains power connector for safety reasons.
Next, open the washers front door and unscrew the six screws pointed out by the red arrows in the picture. This allows for the top panel on the outside to come off, so you can remove the control box.
Step 2: Removing the Top Panel
http://www.instructables.com/file/FKT08M5HLR2Q65S/
Carefully pull out the top panel a bit by pulling towards yourself. Watch for the power switch cables (pointed out with the blue circle in the picture) and the door opener lever (green arrow in the picture).
Unplug the power switch (blue circle) carefully so you don't break the wiring.
The door opener lever comes out of it's position by moving the top panel to the side a bit. Watch the lever (green arrow) as it gets free from the opener.
Step 3: Removing the Circuit Board Box
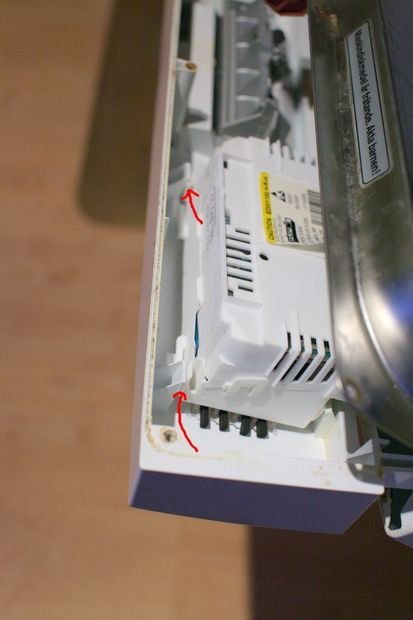
Note the two small plastic clips that secures the circuit board box in the top panel. Carefully push the clips so that the control box detaches from the top panel.
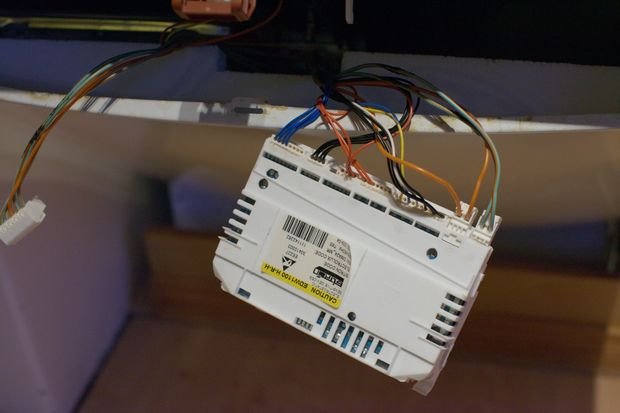
After unclipping the control box, carefully pull it out a bit to get access to the cable connectors at the back. Take note of the order and placing of the different connectors before unplugging them so that you don't forget in which order they should be inserted back after the repair. A quick way of doing this is taking a picture of the connectors with your cell phone camera.
http://www.instructables.com/file/FJ8SIP5HLR2L3OS/
http://www.instructables.com/file/FNGRF0XHLR22958/
The control box containing the circuit board can be opened by opening the two plastic clips on each side of the box. The control box opens up like a book when pulling the halfs apart at the connector side.
The relay to be soldered is pointed out with a red arrow in the lower picture.
Step 5: Soldering the Relay
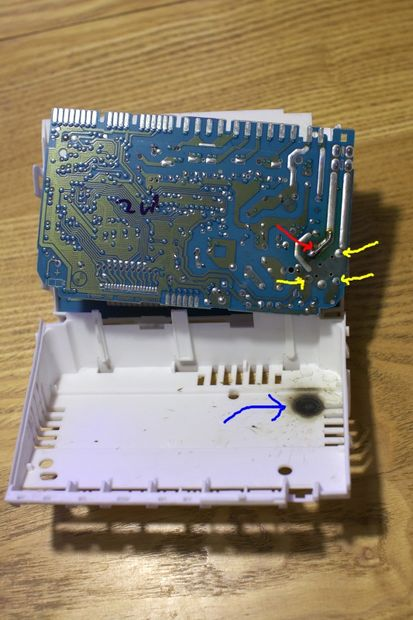
The problem is often very well visible when you open up the control box. In many cases there is a burned area that tells you where the soldering is broken. In some cases there are no visible marks of burning, but many report that the problem is still the same, so give it a try anyway, even if there is no visible burning.
In this case the copper track was burned so bad, that I had to solder a small piece of wire (by the red arrow in the picture) to make contact between the relay's leg and the copper track. It is a good idea to solder all of the relay's legs while you're at it anyway. Resolder the legs pointed out by the yellow arrows too, so you don't have to open the dishwasher up again soon.
If you look at the circuit board you'll find the relay itself on the other side (where all the components are). It looks like a small black box, and by comparing it to the position of the legs on the back side of the circuit board (showing in the picture), you can find the right legs to resolder quite easily.
After soldering, just assemble everything back in the opposite order to make you dishwasher work again!
I did fix my dishwasher yesterday, and now it is working ,,, i soldered the all all of the relay's legs, and it worked