More Homemade Frozen Treats | AKA Yummiest Popsicles Ever
Hello there.. ♡
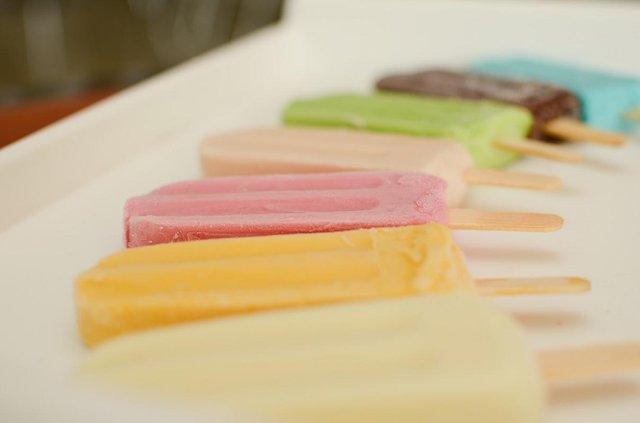
I'm really excited to bring you another installment of my frozen dessert line up. This week we're making popsicles and with all of the flavours, there will be something for everyone. So let's get started! To freeze my popsicles, I have this lovely popsicle tray that I got online but if you don't have one of these do not worry. You can always use a disposable drinking cup or you can always use an ice tray which every single house has. The first popsicle flavor we're making are two of my favorite summer flavors and that is mango and strawberry. Into your food processor, add in your mango chunks and then puree until really fine. When picking the fruit for your popsicles do not be afraid to use frozen or fresh because both of them will work really well. Sometimes frozen is actually better because it's picked in season and frozen really fast so kept in really good quality. Transfer your lovely mango puree into a bowl and then we're going to rinse out the machine and puree our strawberries. As you can see, it just takes a few minutes to get this lovely strawberry puree. Nice and fine, this is going to make a great popsicle. Now that we have our two purees, the only ingredients that we need to make our fruit pops. We don't have to add any sugar because there's lovely natural sugar already in this fruit. To create a really pretty popsicle, I'm actually going to put these flavors in in layers. So a little bit of mango. A little bit of strawberry. And then some more mango on top. Once your popsicles are done then on with the lid. And in with your popsicle stick. The great thing about popsicles is that they only take around 4-5 hours to freeze so you'll be eating these in no time. I made these earlier because I really wanted to show you what they looked like when they're done. They look beautiful and they taste great, too. They're a perfect summer treat! The next popsicle we're making is the best of both worlds. It's a little bit creamy and a little bit sweet and fruity. It is a creamsicle. In a bowl, add in your plain yogurt, cream, vanilla extract and some sugar and mix it really well together. So the reason we add sugar to the dairy is because if it froze on its own it would be like ice crystals so we add the sugar in there to help it freeze and make it nice and creamy. However if you don't want to add white sugar, you can always add honey, maple syrup or even a natural sugar. So we have our creamy layer done for our creamsicle so the next layer is fresh orange juice. Now you can use store-bought or you can make your own. To assemble this popsicle, we are going to fill up the mold halfway with our creamy layer. And then we're going to pour our orange juice in on top. When your molds are filled on with your lid and in with your stick. Another lovely popsicle flavor ready for the freezer. When your creamsicle is done, it should look like this. Ta Da! It looks fantastic. I know it doesn't look like a traditional creamsicle but it sure tastes like one. I'm going to try to get the orange and the cream at the same time. Oh that is delicious. Our next flavor up is definitely for the choc lovers and should evoke all of those lovely food memories of when you were young and that is a fudgesicle. In a heavy bottom sauce pan, we're going to add in our cream, milk and cocoa powder. And heat all of these ingredients until they come to a simmer. Now that your cream mix has simmered, we're going to pour it over our pieces of chocolate. I like to use dark chocolate because it makes the popsicle that bit richer. Now you just want to let this mix sit and let the chocolate melt for around 2-3 minutes and then we can whisk it all together. What I like to add to my fudgesicle is a drop of vanilla extract because it really lifts the flavor of it. Our last step before freezing is that I like to sieve this mix to get it nice and smooth so when it's frozen you have a beautiful silky popsicle. Go ahead and fill your mold all the way to the top. Put on your lid. And in with your popsicle stick. I'm particularly excited for these fudgesicles because once they're set they taste like frozen mousse on a stick. They are absolutely divine. When your fudgesicle is frozen this is what it should look like. Like a real fudgesicle. Look at that, I have to give it a taste. This popsicle is definitely for the chocolate lovers and I highly recommend having a little stash of them in your freezer. They're delicious. The next popsicle we're doing requires even less work than the other popsicles. Just two ingredients: lemonade and fruit and such a beautiful result. It is a lemonade popsicle. For the lemonade, I suggest you use fresh lemonade. I actually made my own with some simple syrup and some lemon juice. And I love a little bit of lime in my lemon juice because I think it really gives it a punch so I put a little bit of zest in there. Go ahead and add your fresh fruit to your mold. In the summer, I love peaches, strawberry, kiwi, raspberry and blueberry. And then just fill up your mold with your lemonade all the way to the top. It's that easy to make this beautiful fresh dessert. I love this popsicle because it's so easy to make. Once your popsicles are done then on with the lid and in with your stick. Now these little guys are ready for the freezer. How pretty is this popsicle and you can see all of the fruit inside. Make sure you use really good flavored fruit because that's what is going to make this so nice. mmm. It is so yummy! Our next popsicle is definitely a feast for the eyes and for the tastebuds and that is a rainbow popsicle. To create a beautiful all-natural rainbow popsicle, we're going to use the same method as we did for the mango + strawberry one. We're going to puree all of our lovely bright fruit to get all of the different colors and layers. I'm using strawberries for my red layer. Mango for my yellow layer. Kiwi for green. And of course, blueberries for blue. Once you have all of your fruit pureed, we're going to add thin layers of each color into our popsicle mold. Feel free to use any brightly colored fruit you prefer. Once your molds are filled all the way to the top, we're going on one more time with the lid and in with your popsicle stick. You will be so amazed at how these turn out. All natural rainbow popsicles. No food dye. No dairy. No added sugar. It is the perfect treat for a summer's day. Once it's frozen, this is what it will look like. Look at those gorgeous layers of color and flavor that we built. I'm excited to give this one a try. This lovely little popsicle definitely tastes as good as it looks. I really hope you get to try it out. Now you have a popsicle for every taste and occasion this summer. Thank you so much for checking this out! Enjoy!! ♡
Photo found on pixabay.com
Hello.
Good content and quite informative
Can you make a recipe of Pizza?
Good work❤
Thank you @prabalkalita! Yes definitely, coming soon.. ♡
Hello @amatchgirl,
We Love You and What You Do Here.
Thank you for posting this to the STEEM Network.
We have some statistics about your account, very interesting.
Average Votes Per Post: 48.1
Average Replies Per Post: 12.25
Average Post Word count: 422.35
Follow us for for more information. Show Your Supprt for @WeLoveYou by Delegating STEEM Power, with one of these handy links, select a level 1SP, 5SP, 10SP, 100SP, or Donate to Help Support
Smooth Posting,
@WeLoveYou.
We can also resteem and upvote more of your posts
Learn More, Read Our Introduction
If your reputation is lower than 30 resteeming with @WeLoveYou only costs 0.001 SBD