Create your own dynamic dns service with AWS SDK and Route53 using C#
I have several webservers running various services and websites but I had a need one of the servers to be aware of an ip address which is dynamic. I looked at dyndns service which I thought it would be free but to my surprise I had to pay $40 per year, which in my case wasn’t a good option. So, since I’m using from Amazon’s several cloud services, I thought, why not creating my own dynamic dns service utilizing the Amazon Route 53 highly available and scalable cloud Domain Name System web service? The implementation of it was much more simple that I thought.All I had to do find my external IP address, the one that is assigned from my ISP to my device and then use the Amazon SDK for Route53 to update my DNS records.Prior using the code you will need to have
- an AWS account
- a domain name
- a hosted zone with Route53
- an IAM user with the appropriate permissions set.
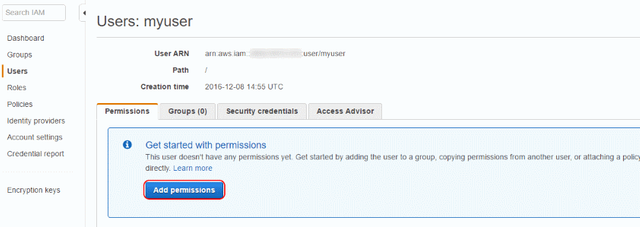
To create the IAM user with the right permissions for this post follow the below steps.Go to Amazon console, select the IAM Service and add a new user, setting your desired user name, make sure in the access type section you have the Programmatic Access checked and click on the button Next: Permissions

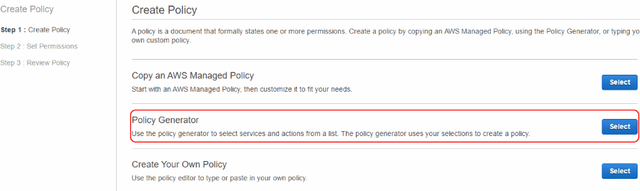
At this stage leave everything as is and click on the Next: Review button to create the user with no policies attached to it, and then click on the Create User button.Note down the Access Key and the Secret Key that is generated by the system.Now go to IAM user initial screen and select Policies, click on the Create Policy button and select the Policy Generator
You should see the screen for editing permissions.
- Effect is set to Allow
- AWS Service dropdown selection is set to Amazon Route53
- For the Actions you will only need to select 2 options, the ChangeResourceRecodsets and the GetChange
After you set the values click on the Add Statement button and then to Next Step button to go to Review Policy section.

In the Policy Review section set the policy name or leave it default as is, the choice is yours.
Add a description to the policy if you want, this is optional.
Do not amend the policy document unless you know what you are doing, your policy should look like below.
{

  "Version": "2012-10-17",

  "Statement": [

  {

     "Sid": "Stmt1481207429000",

     "Effect": "Allow",

     "Action": [

     "route53:ChangeResourceRecordSets",

     "route53:GetChange"

     ],

     "Resource": [

     "*"

    ]

 }]

}
Click on the Create Policy button.

Now go back to the list of the IAM users and click on the user you created earlier and then to Add Persmissions button.
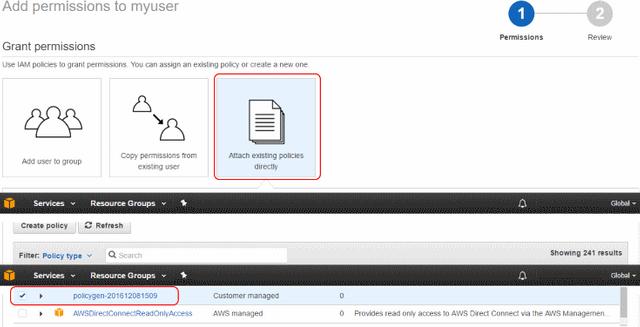
In the Set Permissions screen select the Attach Existing Policies Directly, select the policy you just created from the Available Policies and click on the Next:Review button.
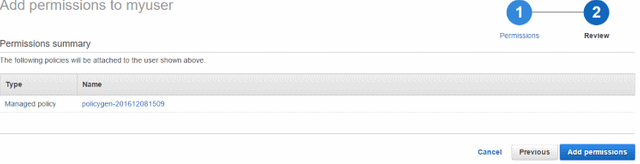
Review the permissions you selected and click on Add Permissions button
Now it is time to get dirty!Open the Visual Studio, create your project and to install the AWS SDK for Route 53 run the following command in the Package Manager
Install-Package AWSSDK.Route53
This statement will add the required references to your project for using the AWSSDK.Next add the below class to your project, the code is very simplistic for the purpose of this article and to understand how the AWS Route53 API works.
using System;

using System.Collections.Generic;

using System.Threading;

using Amazon;

using Amazon.Route53;

using Amazon.Route53.Model;


namespace My.DynDns

{

    public class Recordset

    {

        private string _profile;

        public string Profile { set { _profile = value; } }

        private string _hostedZoneID;

        public string HostedZoneID { set { _hostedZoneID = value; } }

        private string _accessKeyID;

        public string AccessKeyID { set { _accessKeyID = value; } }

        private string _secretKey;

        public string SecretKey { set { _secretKey = value; } }


        public void UpdateIP(string recordName, string ipAddress,

                             RegionEndpoint regionEndPoint, RRType recordsetType,

                             long timeToLiveSeconds = 300)

        {

            try

            {

                //You can eliminate the Profile Manager from the code and simply use

                //the web.config or app.config to store the Access Key and Secret Key

                //Read further at https://goo.gl/KnWMPC

                if (!Amazon.Util.ProfileManager.IsProfileKnown(_profile))

                    Amazon.Util.ProfileManager.RegisterProfile(_profile, _accessKeyID, _secretKey);

                var credentials = new Amazon.Runtime.StoredProfileAWSCredentials(_profile);

                var clientConfig = new AmazonRoute53Config();

                clientConfig.RegionEndpoint = regionEndPoint;


                var route53Client = new AmazonRoute53Client(credentials, clientConfig);

                ChangeResourceRecordSetsRequest crrsr = new ChangeResourceRecordSetsRequest();

                crrsr.HostedZoneId = _hostedZoneID;

                Change change = new Change();

                change.Action = ChangeAction.UPSERT;

                change.ResourceRecordSet = new ResourceRecordSet();

                change.ResourceRecordSet.Name = recordName;

                change.ResourceRecordSet.Type = recordsetType;

                change.ResourceRecordSet.TTL = timeToLiveSeconds;

                change.ResourceRecordSet.ResourceRecords.Add(new ResourceRecord { Value = ipAddress });

                List<Change> changes = new List<Change>();

                changes.Add(change);

                ChangeBatch changeBatch = new ChangeBatch();

                changeBatch.Changes = changes;

                changeBatch.Comment = string.Format("IP Changed at {0} UTC" + DateTime.UtcNow.ToString());

                crrsr.ChangeBatch = changeBatch;

                var recordsetResponse = route53Client.ChangeResourceRecordSets(crrsr);

                var changeRequest = new GetChangeRequest() { Id = recordsetResponse.ChangeInfo.Id };


                while (ChangeStatus.PENDING == route53Client.GetChange(changeRequest).ChangeInfo.Status)

                {

                    //If the change status is pending wait for 15 seconds before checking again.

                    Thread.Sleep(15000);

                }

            }

            catch (AmazonRoute53Exception ex)

            {

                throw ex;

            }

            catch(Exception ex)

            {

                throw ex;

            }

        }

    }

}
To use the above code simply create instance of the class Recordset set the profile name, access key, secret key and call the method UpdateIP passing in the arguments the record name, the new ip address, the region end point where you hosted zone is, the record type and the TTL value in seconds.
try

{

    My.DynDns.Recordset r = new My.DynDns.Recordset();

    r.HostedZoneID = "MyHosteZoneId";

    r.Profile = "myprofilename";

    r.AccessKeyID = "MyAccessID";

    r.SecretKey = "MySecretKey";

    r.UpdateIP("nycname.example.com", "123.123.1.100",

                Amazon.RegionEndpoint.USEast2, Amazon.Route53.RRType.A,

                300);


    Console.WriteLine("Recordset updated successfully");

}

catch(Exception ex)

{

    Console.WriteLine(ex.Message);

}
Now you should be able to update you DNS records in AWS Route53 through you application, service or however you decide to use the code published in this article.
I'd love to here from you, if you are using any of the AWS service and how?
First published at kalomeister.net