Improve your Software Development – Continuous Deployment with Docker – Part 6.2: Setup a NFS-Cluster
Hay Steemers,
finally! Another Saturday that I can spend on steemit – Let's use this time to make our swarm cluster that we've created in the last part (6.1) of this tutorial series.
So far, we have a problem if we want to run statefull services in our Docker Swarm cluster. Statefull services are those, that have to store some data which also needs to be available again when the container gets restarted. We know from earlier parts that Docker supports volumes for this usecase, but in a cluster this is a little bit difficult, as the volume is only available on one node. This is no problem as long as the service runs on the same host, but one of our main reasons for creating this Docker Swarm Cluster was the fact, that Docker automatically restarts the Services on a healthy node if one of the other nodes has a problem (failover), so long story short: We want to be able to have the same data available on all nodes.
One possible solution for this is to create our own NFS (Network File System). The Wikipedia definition describes NFS like this:
>Network File System (NFS) is a distributed file system protocol originally developed by Sun Microsystems in 1984,[1] allowing a user on a client computer to access files over a computer network much like local storage is accessed. NFS, like many other protocols, builds on the Open Network Computing Remote Procedure Call (ONC RPC) system. The NFS is an open standard defined in Request for Comments (RFC), allowing anyone to implement the protocol.
And this is exactly what we need – So lets go for this approach.
GlusterFS
A solution that I've used for some customer projects is GlusterFS (see https://www.gluster.org). This open source software allows us to create a NFS on Linux systems in minutes!

Depending on the operating system you are using, you may have to fit some prerequisites, but if you use Ubuntu like I've done it for this tutorial, you can directly start with the installation. To save some more hardware or Vms, we will install GlusterFS on the same Nodes, that we already use for the Docker Swarm Cluster.
To install GlusterFS on Ubuntu, just execute the following command on both nodes:
sudo apt-get install glusterfs-server -y
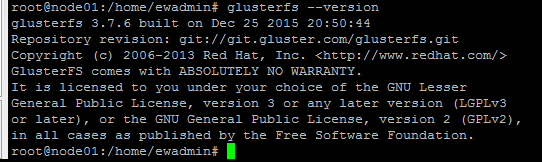
After the installation is done, you can verify that everything is working by executing:
glusterfs --version
Which should return something like this:
That was the installation part, now lets get over to the configuration. We now have to tell the Gluster-Server which machines he should check for a running GlusterFS-System to coonect to. This can be done by executing:
gluster peer probe $HOSTNAME_OF_NODE
(If you do not have DNS-Server in your network and therefore no hostname, you can also use the IP instead of the hostname). So we start on node 01 and let GlusterFS check the connection to node 02 by executing:
gluster peer probe node02.bittrade.local
Which should return:
peer probe: success
After that we can check the status with the command:
gluster peer status
which should now show us one connected peer.
High availability
The current setup would be enough in general, but as we also want our NFS to be pretty robust, we will execute the same commands on our second node to have a second master that knows about all the other nodes we may add in the future.
So on node 02 we execute:
gluster peer probe node01.bittrade.local
Creating a volume
Okay – That was quite easy and we can already start with the cool stuff: Creating our NFS.
To do so we create a folder on both nodes which will be used by GlusterFS to store the volume data. (Attention: This is not the folder that will be synched between the nodes!) I will name mine “nfs”, so I execute:
mkdir -p /mnt/nfs
On both of my nodes. This is the folder that will be synched later between both nodes. The next step we to do is to create the gluster volume. This can be done with the following command:
gluster volume create docker_swarm replica 2 transport tcp node01:/mnt/nfs node02:/mnt/nfs force
While “docker_swarm” is the name of this volume. You can define what ever you like, because this name is just used to identify a volume. The next parameter “replica” is the mode of this volume. As we want to have the data on both nodes, we choose the “replica” mode and tell GlusterFS that he should copy the data on both nodes using the “tcp” as a transport protocol.
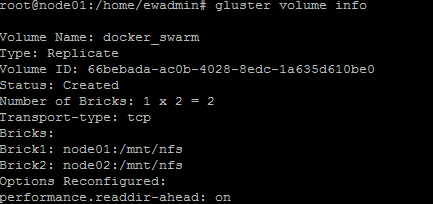
Let's check if the volume has been created successfully be executing:
gluster volume info
Which should return:
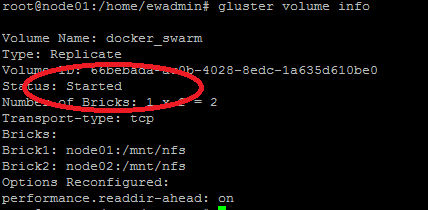
The last step we have to perform is to start the volume. This is also quite easy:
gluster volume start docker_swarm
Which returns:

And if we execute
gluster volume info
again, it shows:
Good job! We've created our first NFS!
Mounting the volume on the nodes
Now we only have to mount the NFS on our Docker Swarm nodes. For this, we need the GlusterFS-Client which can be installed with the following command:
apt-get install glusterfs-client
Please make sure you execute this on both Docker Swarm nodes.
After that create a new folder that you want to store the data in, that should be synched between both nodes. In my case this is “/mnt/swarm01”.
The last step is to mount the NFS-Volume to this new folder. This has to be done on both Docker Swarm nodes and can be done with the following command:
mount -t glusterfs node01:docker_swarm /mnt/swarm01
Warnings during mount
If you get the following warning:
WARNING: getfattr not found, certain checks will be skipped..
Try to install the “attr” package:
apt-get install attr
And try it again.
Make the mount persistent
The mount will only be available until you reboot your system. To make the mount permanent just edit the “/etc/fstab” file and add the following line to it:
node01:/docker_swarm /mnt/swarm01 glusterfs defaults,_netdev 0 0
And that's it – We are done!
Test
Let's do a small test to check if everything is working as expected. We just create a new file and check if it is available on both nodes:
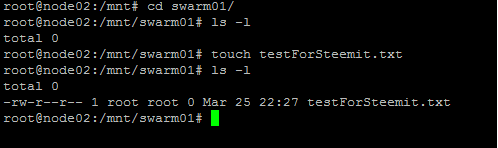
As you can see on the screenshot, I've created a testForSteemit.txt file on node02 in my synched swarm02 folder. Let's check if it is also available for node01 now:

And “wolla” - It is! That was quite easy, wasn't it?
If you like my work here on steemit or just want to make sure to never miss a new part, please press the button below. I will try to provide some more topics for you here on steemit in the future, so stay tuned :)
Thanks for reading and best regards!
Steemians bro, I am not a pile of pooo.