Preserving Fresh Food Naturally for Beginners - Installment #2 Canning
This is a continuation of the Piece: Preserving Fresh Food Naturally for Beginners
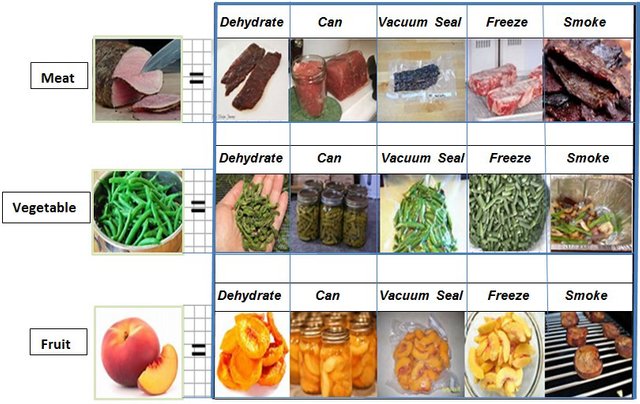
Preserving Method #2 - Canning

Canning is done by boiling food in glass jars that are sealed with a special lid. The high heat kills harmful agents and seals food in a sterile environment for long term storage. The regular canning method is done by boiling your jars in a pot with a regular lid placed over the pot. The pressure canning method uses a “pressure canner” with a lid that twists down and locks in place.
The process to prepare food and fill the jars is the same for either method. Pressure canning builds up pressure to kill more bacteria and is the most common canning method used to preserve food. Canning recipe books will tell you which method to use, but 90 minutes is the minimum acceptable time for both methods in most canning projects. Your time begins after the pot comes to a full boil. After processing time is complete and it is safe to take the jars out of the bath, you will lift jars carefully up with “canning tongs” and place the jars on a towel or rack to prevent the glass from cracking because of a sudden change in temperature. Do not let the jars touch.
Jars
Jars have “regular mouths” or “wide mouths”. Wide mouth jars are much easier to work with. Popular brands of the glass canning jars are Mason and Ball. Jars, lids and bands must be boiled to sterilize and handled carefully so as to not contaminate before filling with food. Boil lids and bands very briefly though (under a minute) because they may warp around the edges.
Pack your jars very firmly with food. Use a funnel to easily fill jars with food. The size of the chunks of food does not matter. After filling your jar, remove excess air by pressing down hard on the food with your fingertips while at the same time slipping a wooden spoon handle up and down along the inside wall of the jar. This will cause trapped air bubbles to escape. You will hear a sucking sound as air bubbles escape, and you can then fill the jar with more food as more space is made. Leave 1 inch of space at the top. Add a tablespoon of canning salt for meat or vegetables or a tablespoon of lemon juice for fruits (per quart sized jars). Canning salt has no iodine which causes food to discolor, and lemon juice prevents discoloring.
Lids and Bands

Tops for jars are made of two pieces: 1) the “lid” - a flat round circle that lays on the opening which can only be used once, and 2) the “band” which has threads and screws down over the lid and can be reused. There are other gadgets available, such as a magnetic stick that lets you pick up lids without your hands. Inspect and dry the rims of the jars with a clean paper towel just before putting the lid on, and then carefully screw the band on. Hand tightened the band snuggly, but don’t over tighten.
Turning the Heat On
- Put all sealed, food-filled jars in the pot of cold water without letting them touch each other.
- There should be at least 2 inches of water above the jars.
- Place the pot’s lid on (either regular or pressure). If you are using a pressure canner, you will lock the lid down according to the manual.
- Turn on the heat and bring the water to a boil. Start your processing time after the water comes to a full boil.
- When the processing time is over, turn the heat off.
a. If you are using the regular canning method you will remove the jars carefully from the bath using tongs as soon as you would like. Set the jars on a towel or rack to prevent the glass from cracking because of a sudden change in temperature, and do not let the jars touch.
b. If you are using the pressure canner DO NOTHING after you turn the heat off.
Pressure Canning
Pressure canners will have a lid that locks down. As long as your machine is functioning properly and there are no the process will be safe. Do not remove the lid when pressure is built up.
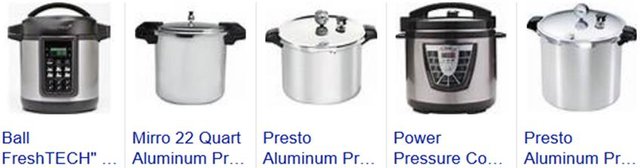
The most common type of pressure canner has a small hole on the top of the lid where steam will escape. A small weight is placed over this hole after steam begins to come out of the hold. This weight will establish “pounds of pressure”, such as 5 lbs., 10lbs., 15lbs., etc. Using 15 lbs. is very common. Follow your pressure cooker manual instructions which should include the following steps:
- Check the inside boarder of the lid and the rubber seal examine it to make sure it is not cracked or broken.
- Check the small hole in the top center of the lid for obstructions. To do this, lift the lid up to the light and look through the hole.
- Start your timer to begin your processing time after the water begins to boil in the case of regular canning, or after the weight is put on and steam has risen up through the hole for at least a full minute.
- When processing time is up, turn off the heat and DO NOTHING. Pressure has to go down before you touch anything, even the small weight! In several hours or longer, you can lift off the pound weight.
- Let the cooker sit for as long as it takes to cool down and pressure drops according to your manual’s instructions. EXTREME DANGER can exist if you twist the lid off too early. Take the time to read your pressure canner manual for complete instructions.
Jars removed from the hot bath are placed on a towel or rack to prevent the glass from cracking because of a sudden change in temperature. Do not let the jars touch. Lids on the jars will snap shut with an affectionate popping sound during cooling which indicates that the jar is sealed and preserved. Twist the bands off any time after you hear the popping sound. The sealed lid will remain on the jar and the band can be re-used. If the lid does not pop, or if the center of the lid is flexible and moves up and down when you press on it then the jar is not sealed and you will need to reprocess it.
What You Need to Know
The Preserving Method of Canning
• Boil jars, lids and bands before use. Boil lids and bands for less than a minute.
• Rinse meat, vegetables and fruit well. Cut out any imperfections and trim fat from meat.
• Pack jars very firmly and press down on the food with finger tips while removing air bubbles by slipping a wooden spoon handle up and down along the inside wall.
• Leave at least 1 inch of space at the top inside the jar.
• Add a tablespoon of canning salt per quart jar for meats and vegetables or a tablespoon of lemon juice for fruits.
• After packing jars with food, wipe the rims dry and inspect for cracks, then lay the lid on the rim and twist on the band snugly, but not too tightly.
• Place prepared and sealed jars in cold water and cover jars with 2 inches of water.
• Each time you use your pressure canner check the rubber seal inside the lid and the lid for cracks, and check that the small hole at the top center of the lid is clear.
• Using 15 pounds of pressure and 90 minutes of processing time is common.
• Boiling time begins after the full boil is reached.
• Follow your Pressure Cooker’s Instruction Manual. EXTREME DANGER can exist if you do not let the pressure go down in your pressure canner before opening the lid.
• Do not let jars touch each other during the bath or cooling time.
• After processing, lift the jars out of the hot water with tongs and set them on a towel or rack to prevent the glass from cracking because of a sudden temperature change.
• Preserving recipes provide information for a variety of flavors and improved techniques.
THE NEXT INSTALLMENT OF THIS SERIES WILL START WITH "VACUUM SEALING"