[PL/ENG] Organizery - DIY/ Organizers - DIY
 Cześć! Ostatnio mówiłam o organizacji i wspomniałam o prostych organizerach na biurko. Teraz chce wam pokazać jak je zrobić.
- Organizery na kredki, flamastry, długopisy i tak dalej.
✨ Co Ci będzie potrzebne ✨
• papier rysunkowy ( kolory zależą od ciebie)
• flamastry ( do narysowania czegoś jeśli chcesz)
• puszka po karmie dla kota lub psa albo po ananasach
• guma
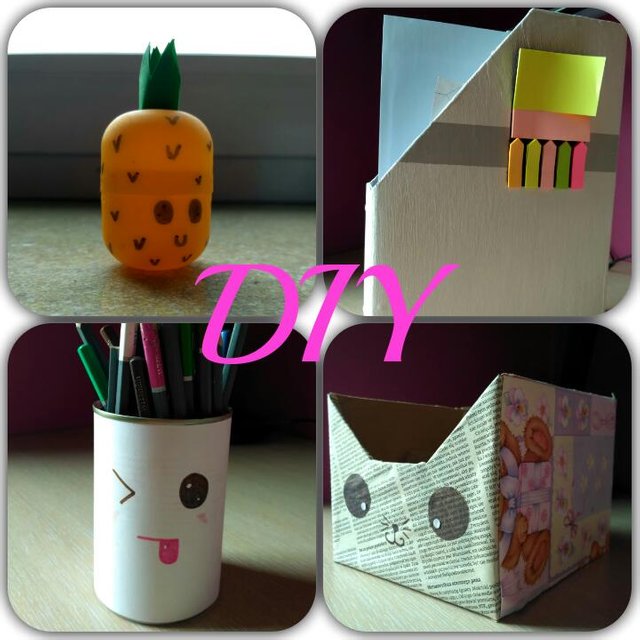
Zacznijmy od tego, że trzeba umyć dokładnie puszkę, aby nic nie śmierdziało. Następnie osusz ją. Gdy będzie już całkowicie sucha możesz nakleić na ostrą krawędź w środku gumę, co pozwoli Ci wkładać rękę i wyjmować przybory. Gdy już to zrobisz, wymierz długość papieru, aby mógł Ci objąć cała puszkę, gdy już to zrobisz, naklej na nią papier i możesz narysować flamastrem śmieszne minki lub inne rzeczy. - Organizer na słuchawki.
✨ Co Ci będzie potrzebne? ✨
• kinder niespodzianka
• flamaster
• papier
Zacznij od zjedzenia kinder niespodzianki i wyjęciu niespodzianki z żółtego pudełeczka ukrytego w środku. Następnie umyj żółte pudełeczko i wysusz. Teraz wystarczy tylko ozdobić, narysuj minke ananasowi i trójkąty bez jednego boku. Wystarczy tylko teraz zrobić z papieru listki i zacząć używać! - Organizer na wszystko
✨ Co Ci będzie potrzebne? ✨
• organizer na dokumenty
• 2 pudełka po butach ( mniejsze i większe
• farby
• organizery na przybory ( opisane w tym poście )
Teraz wystarczy pomalować organizer na dokumenty i dwa pudełka na wybrany kolor ( możesz użyć akryli lub farb do ścian ). Następnie połącz duże pudełko z małym, lecz tak, aby małe pudełko mieściło się w dużym i dotykało dwóch krawędź lub trzech. Następnym punktem jest połączenie organizera na dokumenty z pudełkami i gotowe! - Czasami jest tak, że wiele zbędnych rzeczy jest na naszym biurku i nie mamy do czego ich schować. Czas sobie z tym poradzić!
✨ Co jest Ci potrzebne? ✨
• pudełko kwadratowe
• farby, gazeta, wszystko czym można zakryć boki
• flamaster
• 2 małe, białe kółeczka
Obetnij górną pokrywę pudełka i zajmij się jednym z boków, wytnij tak jak na obrazku 4. Następnie obklej czymś lub pomaluj farbą i narysuj oczy, nos, wąsy i buzię czarnym flamastrem. Teraz na oczach przyklej dwa białe kółeczka i twój kotek na różne rzeczy jest zrobiony!
Myślę że spodobały Ci się te pomysły i zostawisz coś po sobie.
Cześć!
Hey! Recently I talked about the organization and I mentioned simple desk organizers. Now I want to show you how to do it.
- Organizers for pencils, markers, pens and so on.
✨ What you will need ✨
• drawing paper (colors depend on you)
• markers (to draw something if you like)
• a can of cat or dog food or pineapples
• gum
Let's start with the fact that you need to clean the can thoroughly, so that nothing stunk. Then dry it. Once it is completely dry, you can stick the rubber on the sharp edge in the middle, which will allow you to put your hand in and take out the utensils. Once you have done it, measure the length of the paper so that it can cover you with the can, once you have done it, put on the paper and you can draw funny rulers or other things with a felt-tip pen. - Organizer for headphones.
✨ What will you need? ✨
• Kinder Surprise
• flamaster
• paper
Start by eating the kinder surprise and removing the surprise from the yellow box hidden inside. Then wash the yellow box and dry it. Now all you need to do is decorate, draw a pineapple mince and triangles without one side. All you have to do now is make paper from the paper and start using it! - Organizer for everything
✨ What will you need? ✨
• organizer for documents
• 2 shoe boxes (smaller and larger
• paint
• organizers for utensils (described in this post)
Now just paint the organizer for documents and two boxes for the selected color (you can use acrylics or paints for walls). Then connect the large box with the small one, but so that the small box fits in a large one and touches two edges or three. The next point is to connect the organizer to documents with boxes and it's ready! - Sometimes it is so that many unnecessary things are on our desk and we have nothing to hide them. It's time to deal with it!
✨ What do you need? ✨
• square box
• paint, newspaper, everything you can cover the sides
• flamaster
• 2 small, white circles
Cut the top cover of the box and deal with one of the sides, cut as in the picture 4. Then, peel something or paint with paint and draw your eyes, nose, mustache and face with a black felt-tip pen. Now glue two white circles in front of your eyes and your kitty for different things is done!
I think you like these ideas and leave something behind.
Bye!
Congratulations @cookyluna! You have completed the following achievement on Steemit and have been rewarded with new badge(s) :
Click on the badge to view your Board of Honor.
If you no longer want to receive notifications, reply to this comment with the word
STOPTo support your work, I also upvoted your post!
Congratulations @cookyluna! You have completed the following achievement on Steemit and have been rewarded with new badge(s) :
Click on the badge to view your Board of Honor.
If you no longer want to receive notifications, reply to this comment with the word
STOP