HOW TO FADE EDGE OF A PHOTO IN ADOBE PHOTOSHOP CS6
step 1
Create a selection.
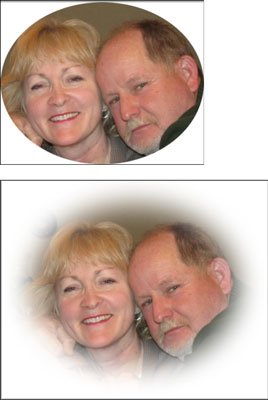
For the non-feathered image shown on top use the Elliptical Marquee tool to make a selection. Then copy the selection; create a new, blank image; and paste the selection into the new image.
To create the feathered image on the bottom, use the Elliptical Marquee tool to select the same area on the original image and went on to Step 2.
step 2
Choose Select→Modify→Feather.
step 3
In the Feather dialog box that appears, type a value in the Feather Radius text field, and then click OK.
For example, enter 20 in the Feather Radius text field. (Then copy the selection, create a new image, and paste the feathered selection into the new image to create the image on the bottom.) The edges of the image are softened over a 20-pixel area. This technique is also referred to as a vignette in the printing industry.
The results of the feathering depend on the resolution
of the image. A feather of 20 pixels in a 72 ppi (pixels per inch) image is a much larger area than a feather of 20 pixels in a 300 ppi image. Typical amounts for a nice vignette on an edge of an image are 20 to 50 pixels. Experiment with images to find what works best for you. you may also find this useful tp re-touch the image to best suite youi
1
Using any selection method, create a selection around the part of an image you want to lighten.2
Choose Select→Modify→Feather; in the Feather dialog box that appears, enter 25 in the Feather Radius text field and click OK.If an error message, say “No pixels are more than 50% selected,” click OK and create a larger selection.
3
Choose Image→Adjustments→Curves.4
a window will show up like the one below
just move the line in any direction till the image attain the best look you like .
thanks for reading my post .kindly upvote my post and i promise more.