Phos Graphis - Drawing with Light (Part 2)
As promised in my previous post, today's post will continue where I left off.
For those of you who did not read my previous post, let me do a very short recap: I started talking about the painting with light technique and then elaborate by making a distinction between "Painting with Light" and "Drawing with Light". I then only talked about the "Painting with "Light" technique and showed some of my examples.
Today's post will, therefore, be about the "Drawing with Light" technique.
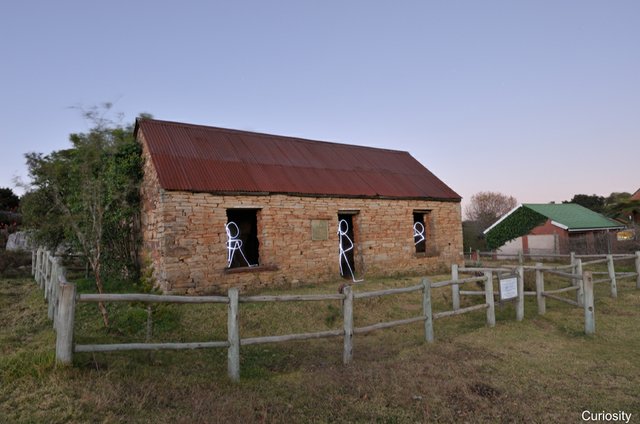
Curiosity
This technique also makes use of a long exposure, but rather than highlighting some features in the scene, it is a technique where you as the artist must add to the scene. You must complete the scene.
At first glance, this scene called "Curiosity", one does not directly realise that it is a long exposure, because the sky is blue - it resembles a daylight scene. But on closer inspection one does find the small detail such as the movement in the tree next to the house and then also the orange/red colour on the horizon. Very few people realised that the figures in the scene were actually created with the light of a torch.
This is, in fact, a photo taking during the blue hour. The blue hour is after daybreak but before sunrise. One started to make out features of the surroundings, but it is still not bright enough to take "normal" photos.
Let me explain the drawing with light technique: The idea is to draw extra features in the scene. I find it the most interesting to add human (stickman) figures to my scenes.
You need to point the torch towards the camera.
You need to draw quite fast to ensure that you do not overexpose the lines you are drawing.
You must also make sure you do not stand still too long at any one point, as this will result in you being visible. Luckily, when you do this in a normal night scene, your exposure will most likely be between 30 seconds and 1 minute, enough time for you to walk around without being captured in the scene. (in the "Curiosity" photo above - which had more ambient light, I had to hide from the scene. I am hiding behind the wall and only use my one hand to draw the figures.
The size of your light source will determine the size of the lines (sounds obvious, but good to remember). In the "Light creatures in the garden" photo, I used a large 3-cell Maglite torch.
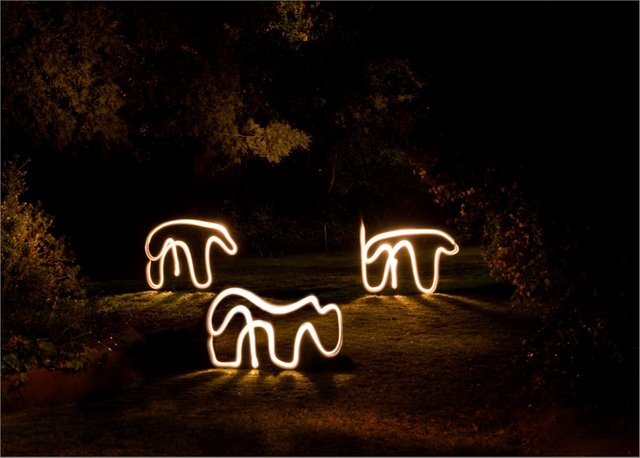
Light creatures in the gardenUse a torch that is easy to switch off and on. In the "Light creatures in the garden" photo, I had to switch off the torch between drawing the creatures to get my next position. (I think it is obvious, but let me just add: I did draw all three creatures in one exposure of about 1 minute, spending about 5 seconds per creature and the rest of the time was getting to the start position, and moving from one creature to the other.)
I want to end this entry with a short story...
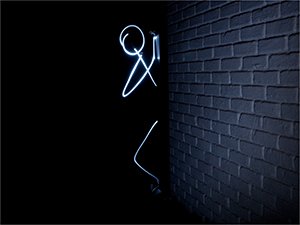
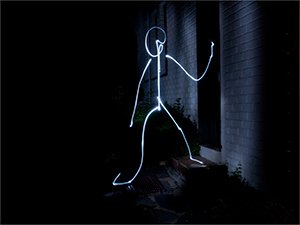
The Lightman and his Friend
Once upon a time, there was a light man. He did not have many friends. In fact, like all lightmen, his light would stop shining if more than one person ever see him at the same time, so he only had one friend. One day he felt very lonely and decided to visit his friend...
 |  |
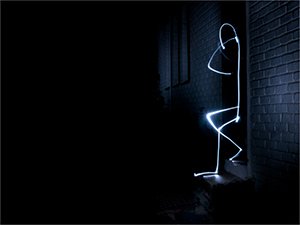 | 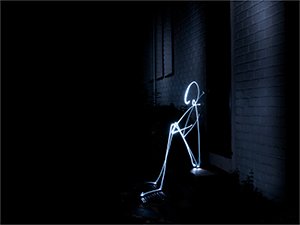 |
He was very happy.
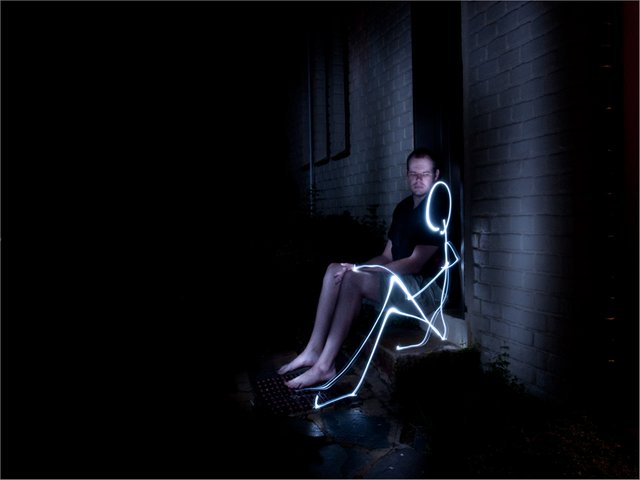
(Yes I know I am not a good storyteller, but if a picture is worth a 1000 words, then 5 pictures could tell a story!)
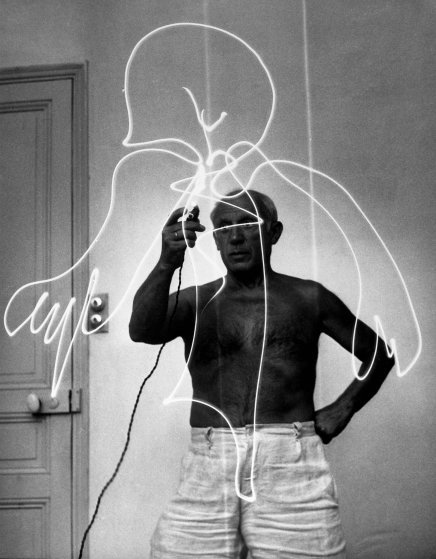
By the way, like most photographic techniques, drawing with light is not new. In 1949, Picasso (with the help of Gjon Mili) created a series of 30 images using a small electric light. Read more about that collaboration in this Time Life article.