Photography : Beginners Mistakes!
5 Beginners Mistakes in Photography
Pay attention when you start photographing!
When you start photographing, there are certainly so many things that you like in the beginning. At least I can still remember so well that in the beginning I certainly focused my camera on everything I saw. And that was a lot! Very much. But now to say that I made top photographs with that? No, not that. That was not only because I cut everything that came in front of my camera, that was also because of a few other things that I had to learn. And as I learned that better, my photos slowly got better. Also of the less interesting objects. Because it does not really matter WHAT you photograph. If you take a GOOD picture. And that can certainly be a very difficult job as a beginner!
Incidentally, it does not matter what kind of camera you photograph. These beginner mistakes have nothing to do with SLR, Telephone camera, Compact camera or Hybrid camera. It is really about mistakes that are made when you just start shooting, and these mistakes are easy to avoid. Just by paying attention to this, be aware of this, can immediately take your photography to a higher level.
What are the 5 most commonly made beginners 'mistakes'?
As you are used to from me, I will try to explain it with a few simple examples.
And as always I use pictures for that I made myself!
1.) A Leaning Horizon!
Without any doubts, on number 1 is the Leaning Horizon in photos. One of the things that immediately stands out for a viewer to a photo, and that looks very annoying is the Leaning Horizon! If you have taken a nice picture and the horizon is skewed, the picture can still be beautiful, the skew horizon will always attract the attention of the viewer. That is not what you want to show. It is not the reality either. A horizon is never skewed! And unfortunately it also looks very sloppy.

So always try to avoid photographing a slanting horizon, you should try to pay attention when photographing, but of course it can happen that you did not keep your camera completely straight during the shooting. And that is punished in the photo by that skewed horizon. That is not bad, but use a program during the viewing of your photos to straighten that horizon. Every photo editing program has a built-in option to easily set that horizon straight, and your photo immediately looks a bit neater. It is a small effort, and a great pleasure for both yourself and the viewers of your photo!
2.) Wrong White Balance!
A very nice second "fail", for most beginners! And this is somewhat logically of course, but they do photograph with an automatic white balance. This is certainly good in 95% of cases. But once in a while you can still face a surprise. And that, if you have no idea what that problem is like, looks very strange. So also as a beginner, it is advisable to learn something about the White Balance. White is really white, and if you set it properly during shooting, or later in your editing program. Then fortunately those strange color casts have disappeared from your photo.
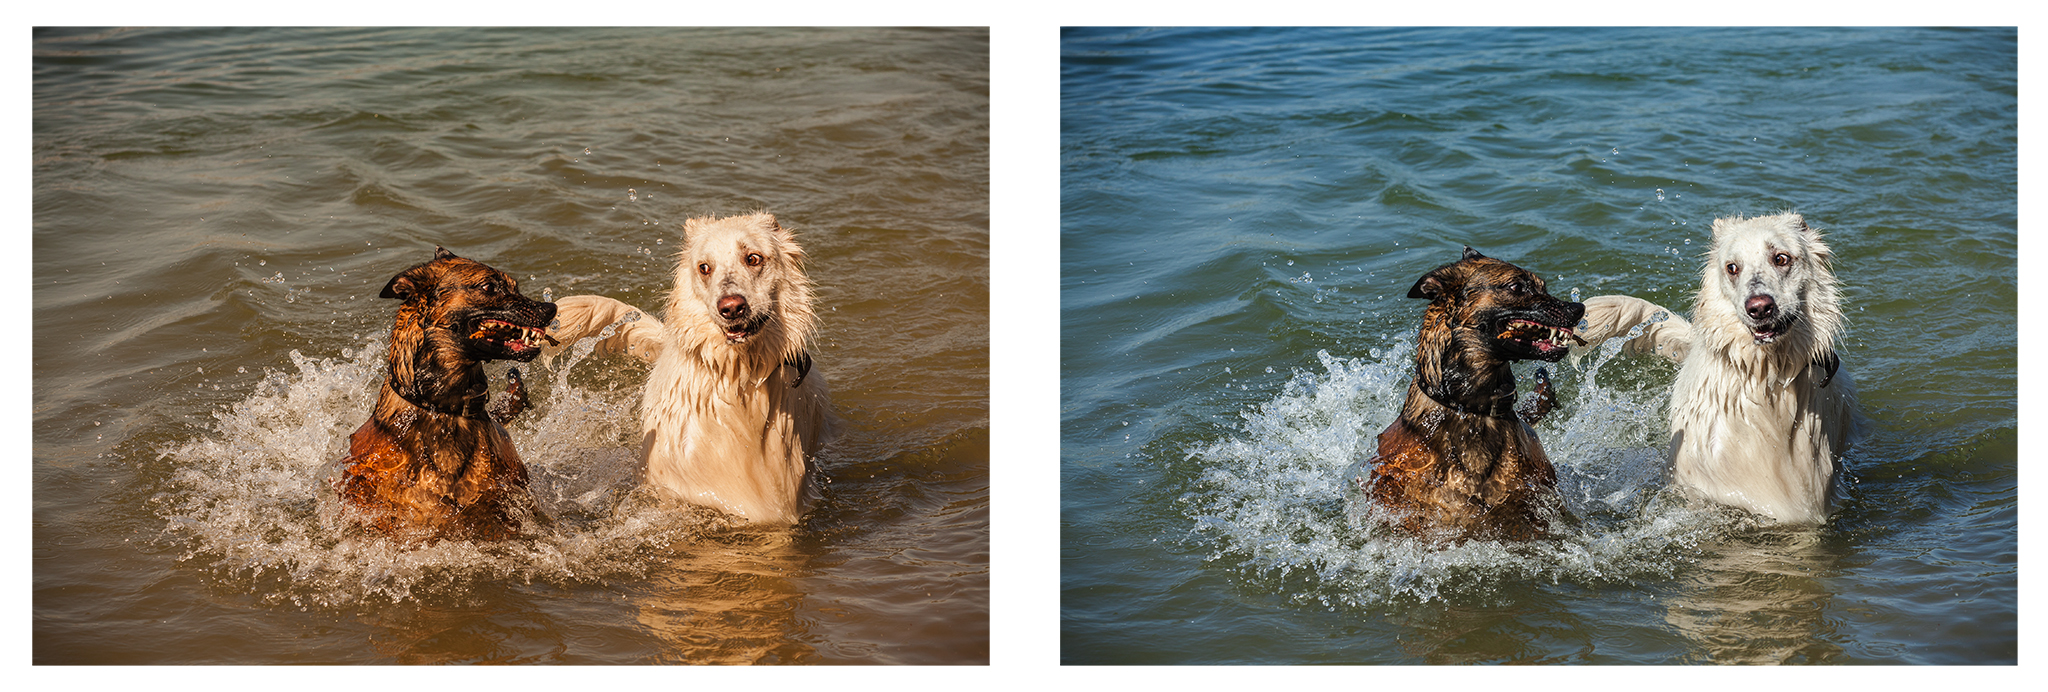
In the left photo, taken with automatic white balance, you see a yellow color cast. Now it was also very sunny that day, and that explains the yellow hint very well. But luckily you can correct your white balance afterwards in an editing program and see the dogs as they should look, and the gray water has changed again to blue, and that is how water should look. With a gray card I could already set this up for photographing, but in this case I always find it easier to correct afterwards. Especially because the white balance can change very quickly during a walk with the dogs. Sometimes they walk in the shade, then back in the sun, and the time of day also brings another white balance. If you are purely on the road to photograph a specific subject, pre-setting the white balance with a gray card can be easier. But in the case of 'not knowing how long you are traveling, and where and what you are going to photograph,' I let the automatic white balance do its job, and correct it afterwards when necessary.
3.) Blurry photos!
Of course it will happen that you take a picture, and damn it, your subject is just not sharp enough, or even not sharp at all. That doesn't matter! Everyone has to learn, and certainly in the beginning you have to learn how to use that autofocus or manual focus. But do not use that kind of pictures to show how good you are with photography ... because the viewers generally do not get a good impression of a blurry photo.
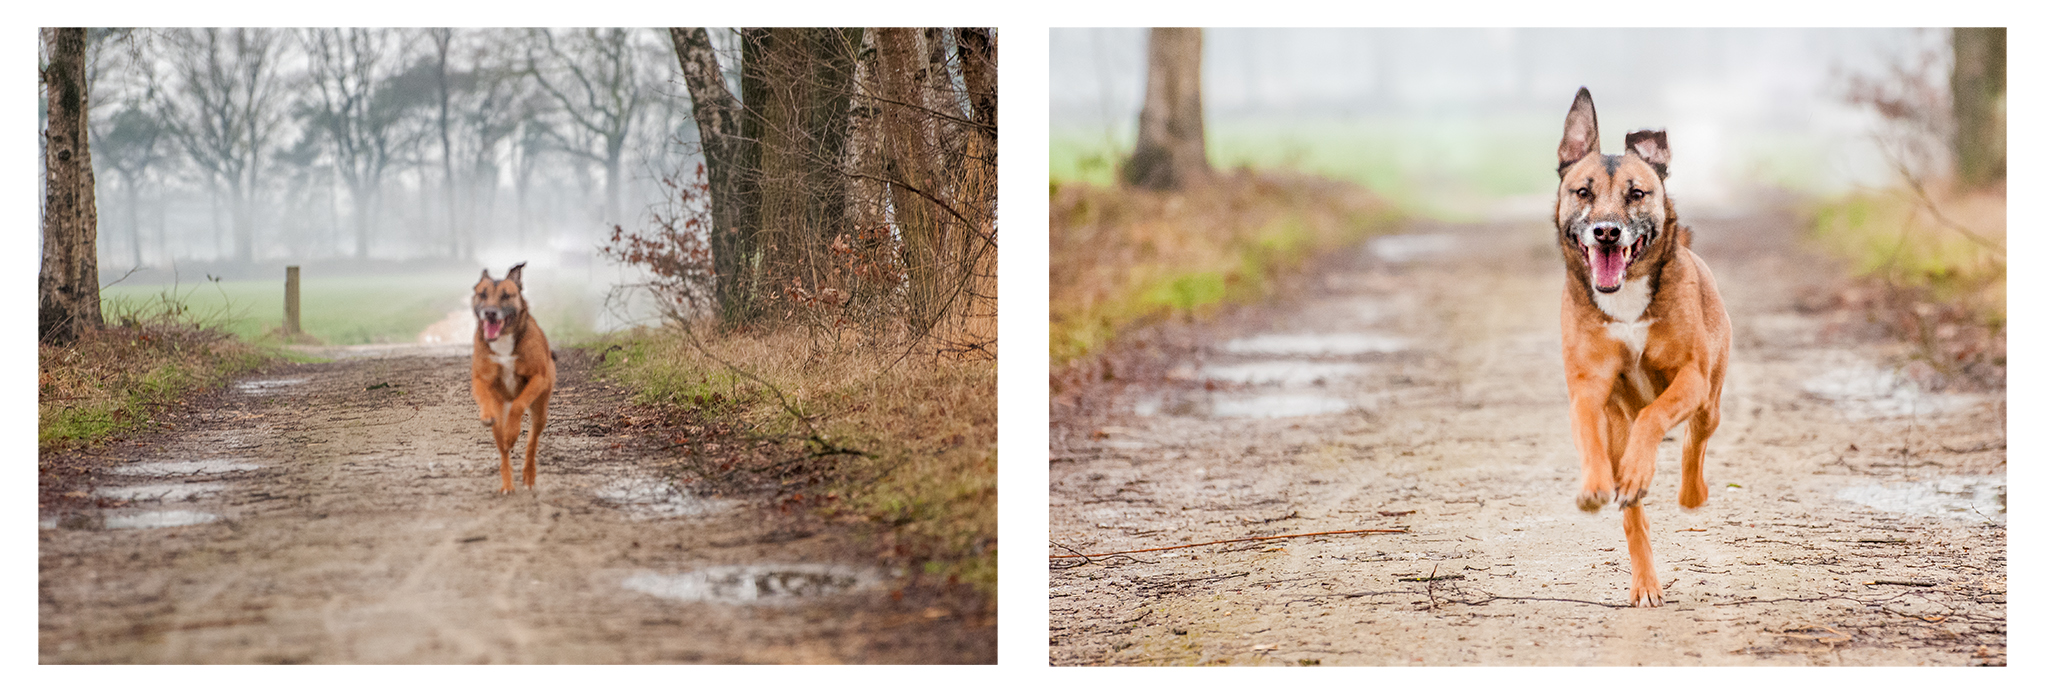
And it happens to everyone that a blurry picture is taken. The annoying thing about this is that such a photo simply always fails. No matter how good editing programs are. You can NOT improve a blurry photo. But do not grieve, try to figure out where it went wrong, have you set too small a depth of field perhaps with too large aperture for the subject you wanted to photograph? Or was your shutter speed too slow because you wanted to photograph a moving subject. The depth of field has a lot of influence on the sharpness in your photo, and shutter speed also has a big influence on the sharpness in your photo. Try to determine for yourself where it went wrong in this blurry photo so you can prevent it in a subsequent photo. And again, everyone happens, even professional photographers sometimes make blurry photos. It's okay, just throw away a photo and try again!
4.) Lack of Spatial Insight in Composition.
This is a difficult issue for many people. And it is also not easy to do that well. The only thing I can say is that you will usually have to learn to do this. But you will have to pay attention to how you build the frame! Especially when you photograph people, animals or buildings, it will happen that you don't want to put them all in the picture, or that you just can't put them all in the picture. Take good care with WHERE you 'cut the frame off'.

In the above example I was pretty close to the subject at the first photo, the older couple, and here the hand of the man around his wife is cut off at the wrist. This looks very strange for anyone who looks at the picture. For the right-hand picture I have taken a few steps back and I could record that he has a hand on the arm that has struck his wife. This photo immediately shows more love while the couple has not changed their attitude or expression. That the people are only half in the picture does not detract from the composition. The photo had not become stronger by fully photographing the couple. But that missing hand does make the photo 'fail'.
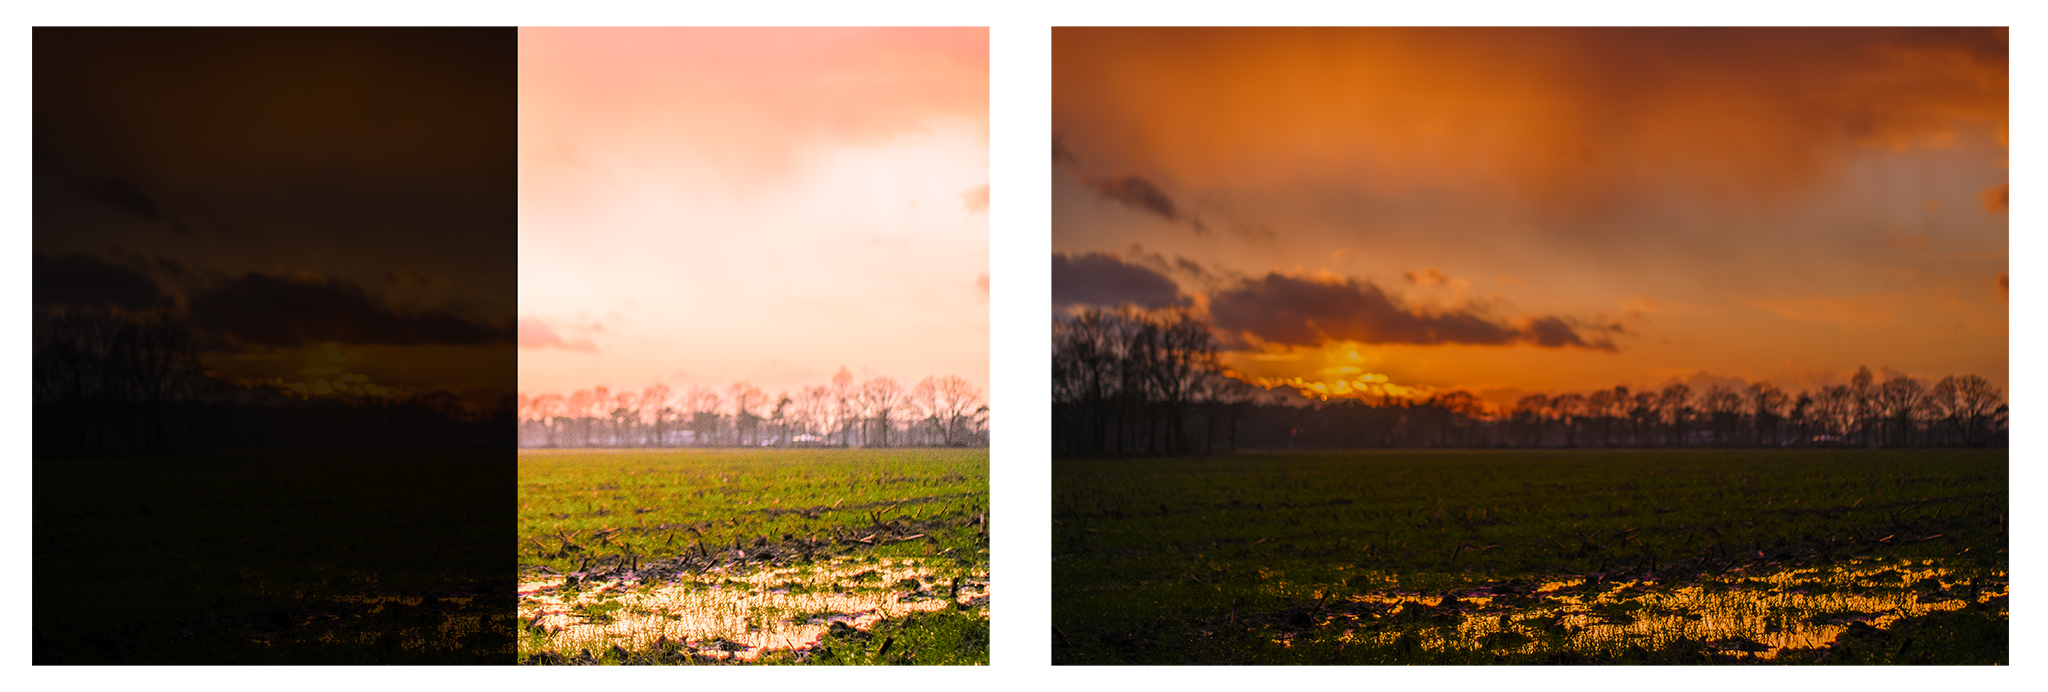
5.) Set up your lighting properly!
The last of the many beginner mistakes is of course a clearly over- or underexposed photograph. Of course there is a lot to tell about this subject. But if you want to know more about it, I advise you to read a previously written blog. This blog about the basis of photography in which I explain the Photography : The Basics can be found here.
Of course it is important to dive into the basics before you start photographing. But never forget that you learn the most by DOING it. So grab your camera, go out. Shoot all you want and enjoy! When you come home you take a close look at your photos and then you really see what you have made. You can learn a lot from this! And are there many photos that have failed? That doesn't matter, you tried and had fun hopefully.
A fantastic post I must say!
This can be very helpfull information for a lot of people indeed!
Luckily a lot of these mistakes ( like the horizon or the white balance ) can be cured afterwards with a tool like Snapseed ( on your smartphone ) or programs like photoshop etcetera. ( on your PC ).
The composition / sharpness issues are way more difficult to correct afterwards, so indeed: pay attention to these when taking the picture in the first place!
Thanks ... and true. There are many things you can improve after taking your shot. But few things you have to pay attention to before taking your shot. They simply can not be corrected afterwards, or are very difficult to correct afterwards.
Relying on your editing program is simply not the best idea you can have. So better to learn paying attention to those things before starting and shooting. They are really not that hard to see before, and sometimes really hard to correct afterwards.
I fully agree,
this is what makes the difference between "just a snapshot" or a well taken photo.
With your tips people who are used to making just snapshots could improve their pictures easily!
Hi hetty-rowan,
Visit curiesteem.com or join the Curie Discord community to learn more.
Wow thank you so much. This is a big surprise!
Hello very interesting post i definitely do all 5 mistakes:( but im trying lol i found the photo example of the old couple pretty powerful.
Well acknowledging you make this mistakes is the beginning of improvement isn't it ;-) And thank you for the compliment. It means a lot!
I hope it is:D
A very good informative post, with good tips especially for beginners I think. And I totally agree a leaning horizon is a big fail haha.. Always hate when that happens, but it's such an easy fix..
It's the most easy fix ... but a fail when you let it. I agree!
I think I learnt a thing or two from this post. Let's hope I will remember the tips the next time I'm taking pictures ^_^.
Of course you understand now ... I'm curious to hear what you have learned. :-) But maybe you can show me ... and remembering when taking pictures is sometimes hard, but will be an automatic process the more you do it. At least that's the way it works for me.
It's the one you said about spatial insight, I still need to learn that skill. When I take pictures, I'm mostly focused on capturing the subject as fast as possible, because most of my friends and families are apprehensive when they stand in front of a camera, but the results usually look amateurish. Let's hope next time I would remember to take more patience and consideration ^_^.
Congratulations! This post has been upvoted from the communal account, @minnowsupport, by Woodzi from the Minnow Support Project. It's a witness project run by aggroed, ausbitbank, teamsteem, someguy123, neoxian, followbtcnews, and netuoso. The goal is to help Steemit grow by supporting Minnows. Please find us at the Peace, Abundance, and Liberty Network (PALnet) Discord Channel. It's a completely public and open space to all members of the Steemit community who voluntarily choose to be there.
If you would like to delegate to the Minnow Support Project you can do so by clicking on the following links: 50SP, 100SP, 250SP, 500SP, 1000SP, 5000SP.
Be sure to leave at least 50SP undelegated on your account.
good job , I am also a photographer and new to join the steemit community. Looking forward to help, follow me and we will exchange frequently
Thank you for your compliment! Welcome on steemit.
This was a very useful tutorial as I used to photograph a lot and have gotten out of the habit and am wanting to start shooting again. I am trying to re-learn my editing program that I've not used in years and am finding it difficult and reading tutorials on that.
I loved how you gave examples of each. Thank you for taking the time to write up such a great tutorial for beginners!
Thanks for your compliment!
The examples must come with such a post. You can't write a good tutorial without giving examples. :D
I agree. Examples are necessary with any good tutorial and this one was great!
Thank you for the very informational post.
As i see others had also replyed and i can only repeat all! :-)
Great work, well deseved the up from @curie - i will also drop a little by. Not much, because im a small fish... but perhaps one day it goes more, because of your cool tutorial, when i improved then my photograpy.
Looking forward to see later more! :-)
Posted using Partiko iOS
Howdy partner, I'm @photocurator, a curation bot; I keep an eye on the photo feeds, I vote random photos of my followers and at the end of the day I publish a post with links to the best photos. Follow @photocurator to get your photos curated in the future!