Tips for Better Black and White Conversion using Lightroom PART1
Ever considered how the expert picture takers get those marvelous high contrast or sepia conditioned pictures? Ask why yours turn out looking dull and level looking? I will give you 3 hints to enable you to improve the situation highly contrasting transformations utilizing Adobe Lightroom, and take care of that issue!
The present cameras are truly brilliant, and a large number of them offer a high contrast setting or shooting mode. I prescribe utilizing those to begin, particularly on the off chance that you've never done any highly contrasting (B&W) or on the off chance that you are not as of now doing any post handling or picture altering on your documents. Be that as it may, on the off chance that you have some involvement with b/w photography, and you are preparing your pictures, I prescribe doing the transformation yourself as you have more control over the look of the last picture. I will demonstrate to you a couple of methods for changing over them into B&W utilizing Lightroom.
Note: generally these tips will work in Photoshop also, utilizing the Adobe Camera Raw highlights and sliders.
Initial a snappy note about my experience. A while ago when I took my photography degree (might I venture to state, in 1987-88, and date myself) I spent the whole first year shooting dark and white just, utilizing a 4×5 view camera no less. I handled my own particular film and made my own particular prints. I invested a considerable measure of energy in a dark and white darkroom, so I'm truly knowledgeable by they way it works and how to control it further bolstering my good fortune.
To get some information from those film days, it's essential to note and comprehend that your camera sees light and hues uniquely in contrast to does the human eye. Highly contrasting film sees blue tones substantially lighter than our eyes, for instance. Shaded channels were utilized to move how the B&W film "saw" and rendered the scene. Utilizing a red channel would help anything red in the picture and obscure blue tones. So on the off chance that you were a scene picture taker you'd regularly utilize a red channel to obscure the sky and make it less washed out. A green channel would help green and blue tones and obscure red and orange. So picture takers utilized the proper channel to catch the scene as they imagined it.
In Lightroom and ACR (Adobe Camera Raw) in Photoshop you have similar instruments available to you! So without the utilization of channels, you can alter how the scene is rendered in B&W. That conveys me to the principal tip.
Tip #1 – utilize the B&W blend to do your changes
In Lightroom's Develop module (and ACR) there are a couple of ways that you can change over your pictures into B&W. You can simply pull the immersion slider the distance to left to - 100. You can likewise do comparative with the Vibrance slider, however it may not give you a 100% B&W picture, contingent upon the picture. Both of those choices will give you a dark and white outcome. Nonetheless, they give you no power over how the hues render into the different shades of dark. A superior decision, as I would like to think, is to utilize the B&W blend, situated on the third board down on the privilege in Develop – see beneath.
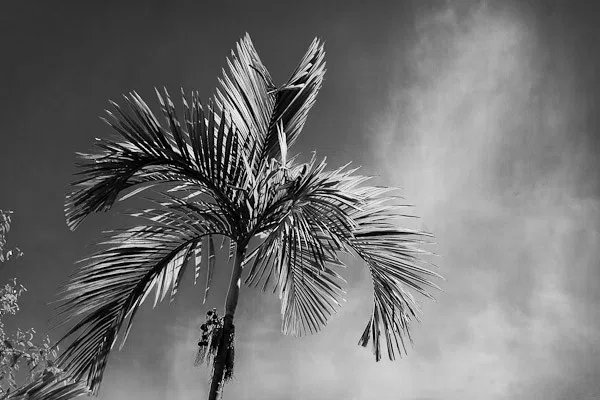
Let’s take a look at an example using the same image
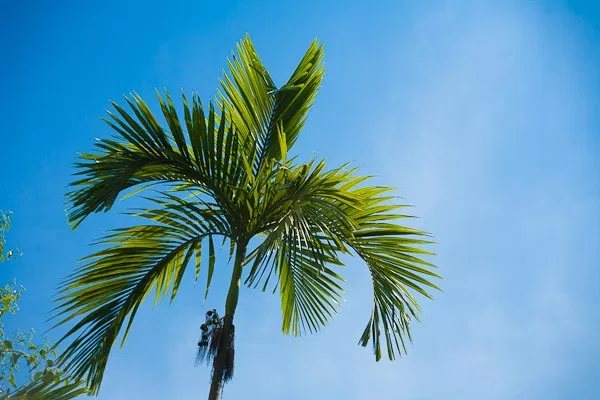
Original colour image
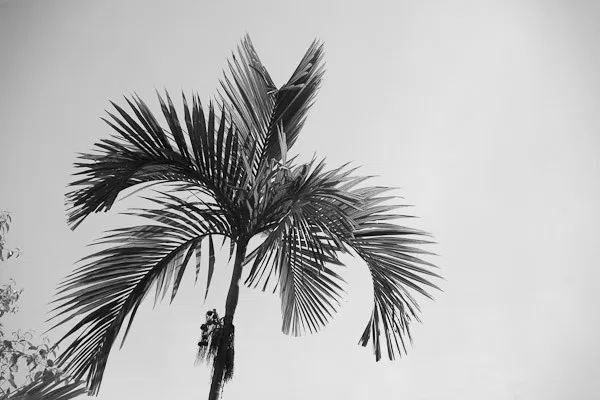
B&W conversion done using the Saturation slider at -100
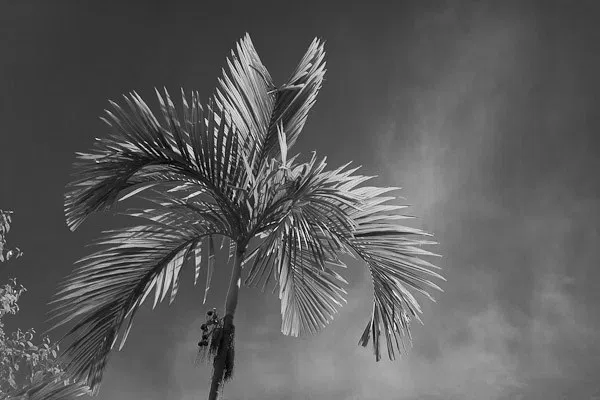
B&W conversion done using the B&W mix in LR
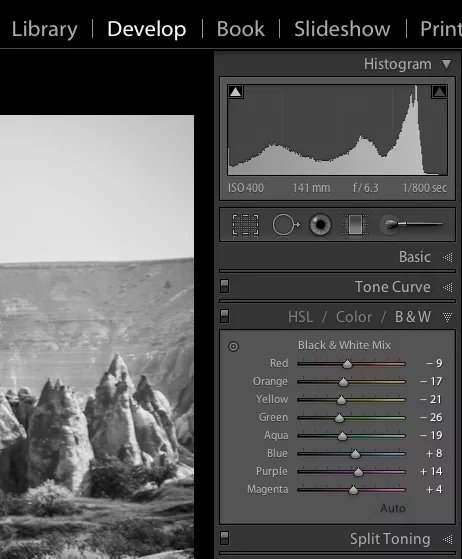
In the images above, notice how the blue sky went really light using the desaturate method? This is often the case when you have a lot of blue sky in an image, as I explained above. Using the B&W mix and pulling a few of the sliders I was able to get very different tones. This is what my sliders in the B&W Mix panel look like on the third image:
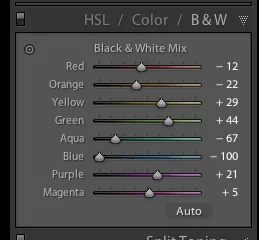
Notice the blue slider is pulled the distance to one side to - 100. That is what is obscuring my sky. Additionally important is the green and yellow sliders are moved in the inverse or in addition to heading. This helps the two yellows and greens (most grass and trees are frequently a blend of green and yellow, at times more yellow than green). I have not done any specific changes in accordance with obscure the sky here, simply the sliders you see to one side! How altogether different this picture is from the desaturated one, thus easy to do utilizing this strategy!
Likewise on this board see there is an "Auto" catch. Clicking it will enable Lightroom to apply a foreordained B&W blend for you. You can likewise set up in your Lightroom inclinations to apply that for you when B&W blend is chosen, at that point you can fine and dandy tune from that point. Generally every one of the sliders will begin at "0".
Another little known trap for utilizing these sliders is the amusing looking minimal twofold hover thing on the upper left. As you move the mouse over it, you will see this:
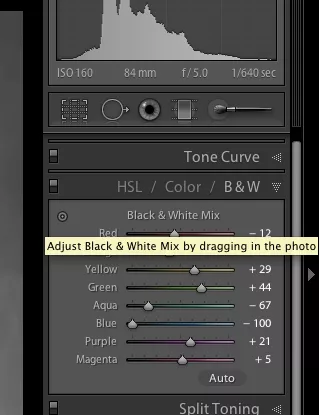
Adjust Black & White Mix by dragging in photo. So what on earth does that mean, you may wonder?! If you click on the little circle your mouse pointer will now have little up and down arrows, as well as your cursor showing the same icon as you hover over the image. Click anywhere on the image, hold and drag, and it will adjust ONLY the colours that you’ve clicked on. Drag up to move the sliders to the right (+) and drag down to move them to the left (-). How cool is that?!
This is very helpful if you do not know which sliders to adjust. Just select the area of your image you’d like to adjust the tones on and drag away!
Tip #2 – don’t just stop there, add some punch
Sometimes even using the B&W mix sliders the resulting image still looks a bit flat and dull looking. Take it up a notch by adding some punch to your image. I do the following to most of my B&W images:
increase the clarity: if it’s a scenic I’ll push it quite far like +60 or higher, if it’s a person I keep it under +30 or they start to look a bit crunchy and overly wrinkled (especially if the photo is of your mom or your spouse, they tend not to be too happy about that)
lower the black slider, until it looks good. Highly scientific, yes! Here’s a little trick for you as well using the Blacks slider: if you click and hold the Opt/Alt button while you slide it, you will get to see exactly where your blacks are clipping (meaning going off the chart on the histogram and having no detail). You can use that information to make sure you have just enough blacks, but make sure you keep all the detail in important areas.
increase the contrast either using the Contrast slider or Curves
Occasionally after making these contrast adjustments it will affect the overall image and you may want to go back and rework the B&W sliders a bit too. It’s a dance, play them back and forth until you get a mix you like. Here’s the final version of the image above, with contrast and punch adjustments applied.
Notice how much more snap it has, while still maintaining that nice rich, dark sky!
source : https://digital-photography-school.com/3-tips-for-better-black-and-white-conversion-using-lightroom/
Goood Job
perfect info
@eladnan payed 0.208 SBD to @minnowbooster to buy a stealth upvote.
transaction-id f3101e4615085fc293f5f11f3b62d33eab0845b9
@stealthgoat
@digiphotography payed 2.019 SBD to @minnowbooster to buy a stealth upvote.

transaction-id 71726aadc77a4a631a042de59cc20f57f8eb0c20
@stealthgoat