Original Photography Tutorial - Metering and Exposure
This is my straightforward and easy to understand guide to the basics of getting the right light metering and exposure settings on the first shot. It applies to film and d-SLR cameras. It will save you film or precious memory card space if you can learn to get the shot right the first time, and you will be more confident knowing what you are doing! All photographs used in this guide are my own work.
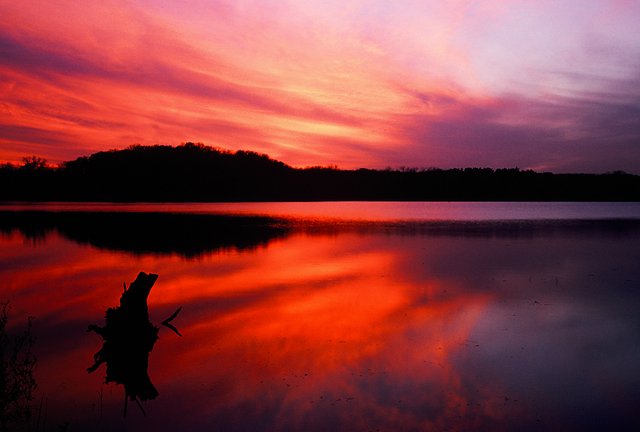
Have you ever been down to just a handful of remaining exposures near the end of a day and still want to take some photos in the setting sun? With little film or memory left, you want to nail the shot in one picture. In my example below, this exposure was the LAST shot left on my roll of slide film (which is even less exposure-flexible than regular negative film). I had only one chance. I quickly metered, spot metered, fine tuned my settings, and took the shot with confidence. I hope you will be able to do the same after reading this and after a little practice!
Click to Enlarge
Taken on a Minolta Maxxum7 with 24mm lens on Fuji Veliva slide film
What is an exposure?
When you take a picture, the light reflected off of your subject is exposed to your film or sensor. This is similar to when light passes through your pupil and is absorbed by your retina.Shutter Speed and Aperture
The shutter speed is the amount of time that light is exposed to the light sensitive medium. When you camera says "90," it means that 1/90th of a second is the exposure time. When you click the shutter release, light is exposed to the medium for 1/90th of a second. "20" means 1/20th, "250" means 1/250th, and so on.The aperture or "f-stop" number is a measure of how much light is being let through the lens. Think of it as equivalent to the diameter of your pupil (technically, it is a ratio of the lens' focal length to the pupil's diameter). Counter-intuitively, the higher the f-stop number, the less light is being let through. An f-stop of f/3.5 lets more light through than one at f/11, and vice versa.
Stop! In the Name of Light!
What's with all this "stop" language? What does it mean? A stop is a doubling or halving of light. It's that simple. A shutter speed of 1/60th is one stop brighter than a shutter speed of 1/120th because twice the light has come through. This is referred to as +1 EV or +1 stop. EV = Exposure Value. A 1/90th setting would thus be half a stop brighter or +0.5 EV or +0.5 stop. 1/30th makes for a -1 EV or -1 stop. A positive (+) value is considered overexposing and negative (-) would be underexposing. With the aperture, the numbers are a little trickier, but the concept is identical. f/5.6 is +1EV from F/8. F/6.7 is +0.5 EV from F/8.The f-stop ratios for 0.5EV increments are as follows:
0.8 | 1.0 | 1.2 |1.4 | 1.7 | 2 | 2.4 | 2.8 | 3.3 | 4 | 4.8 | 5.6 | 6.7 | 8 | 9.5 | 11 | 13 | 16 | 19 | 22 | 27 | 32
So, if you are at a setting of 1/90th and f/4.8 and you would like to underexpose by a full stop (-1.0), you would either have to change your shutter speed to 1/180th or your aperture to f/6.7. Make sense?
The "Correct" Settings
The correct settings are subjective to the viewer of the final work. To the photographer, the correct settings are those which produce an end result that is on par with what he/she had intended when the photo was taken. Your film (assuming it is from the early 1970's or newer) or digital camera has a built-in light sensor which tries to measure a correct EV based on how much light is coming in. Its ultimate aim is to ensure that the subject of the shot is exposed so that it is a medium tone --not too bright and not too dark. This meter will measure the intensity of the amount of light (more advanced systems will take into account the colors as well) reflected from your subject into the camera's light meter. Once it knows how much light is present, it will assign the automatic or "program" settings.When to Trust The Camera
The camera does a fairly good job of exposing for a medium toned scene, such as a brick building, a person, or a dinner table surrounded with people. The pictures will, for the most part, be exposed so they are easy to see and recognize the subject. It does especially well if the subject is in the center of the frame or if an advanced autofocus system accurately detects the subject correctly. The camera is programmed to meter for a scene that reflects about 18% gray light (or the averaged equivalent thereof). You CAN buy an 18% gray card and meter off of it: hold it in front of the camera & in the same lighting as your subject and then manually set your shutter/aperture so that +/- 0 EV is shown on the camera's suggestion meter.Here is the camera's typical built in metering table (assuming ISO 100. For ISO200, simply double all the values. For ISO400, quadruple them... and so on):
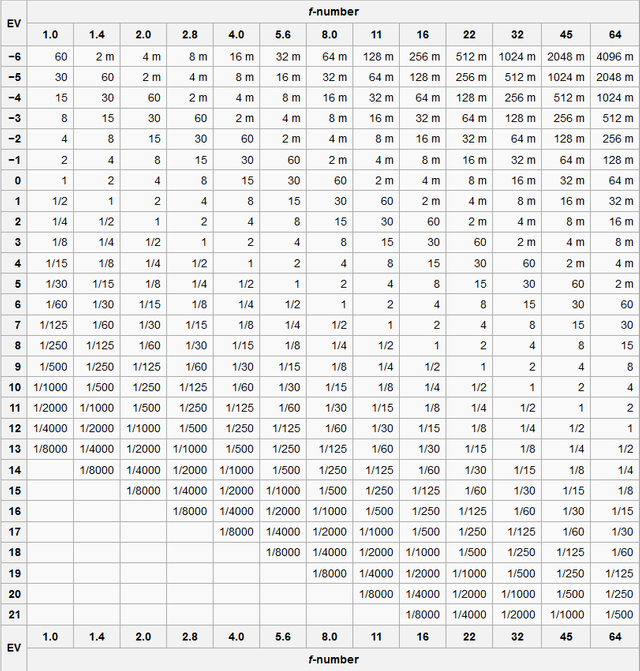
Please not that the "EV" values here in this chart are actually absolute total brightness values and the NOT the same EV values (-3,-2,-1,-0-,+1,+2,+3) shown in your camera's suggestion meter
(Chart courtesy of Wikipedia)
When to Override The Camera's Suggestions
This is when things become fun. Even if you are shooting in manual mode, you are still given suggestions for your shutter speed and aperture settings. When you deviate, you will be shown (+) and (-) steps.For example, if the camera is advising you to be at 1/90th and f/6.7, but you choose to shoot the shot at 1/45th and f/6.7, you will overexpose by +1 stop. If you are in auto, shutter, or aperture priority, you can still under/over expose by a special dial or setting that purposely does so:
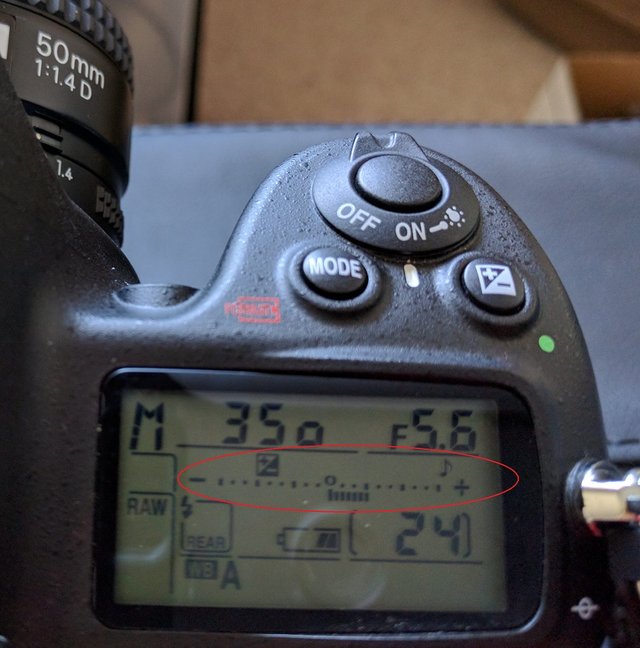
My camera's suggestion meter (Here it is showing a +1 overexposure).
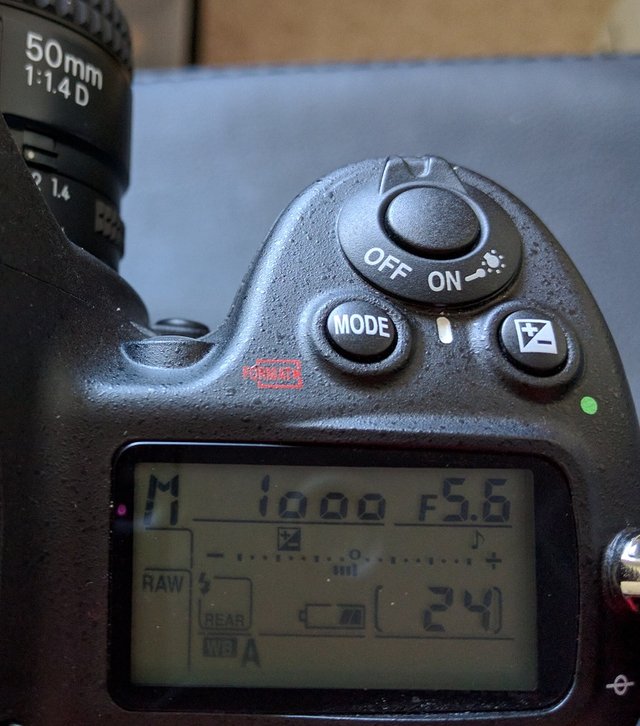
Here is a -0.5 underexposure
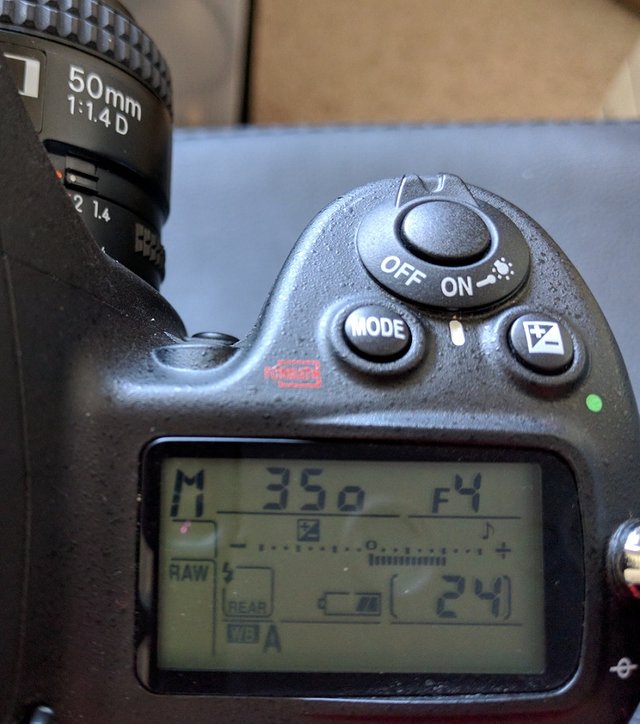
Here is a +2.0 overexposure
Now, when would you want to do this? Whenever your subject is RELATIVELY brighter or darker than average.
Why would you want to do this? This will be counter-intuitive, but a brighter subject will need to have MORE light allowed through than a darker one, and vice versa. Examples would be a snowy tundra or a white fluffy kitten. In these examples, a lot of light is hitting the light meter in the camera. The camera will reference this amount of light to its internal EV table. If you recall, the table above assumes the settings for a MEDIUM toned subject. So, if it was a gray cat or a grassy field, it would be correct. However, since this is a bright subject, the picture would end up being too dark as the camera will try to turn the intense white light input into a medium brightness output. Thus, an automatically exposed white subject will turn out grayer than intened. Therefore, you must OVERexpose this subject to let all the light through and create a bright image. Conversely, a dark subject will thusly need to be underexposed.
Bright, Dark, Or in The Middle?
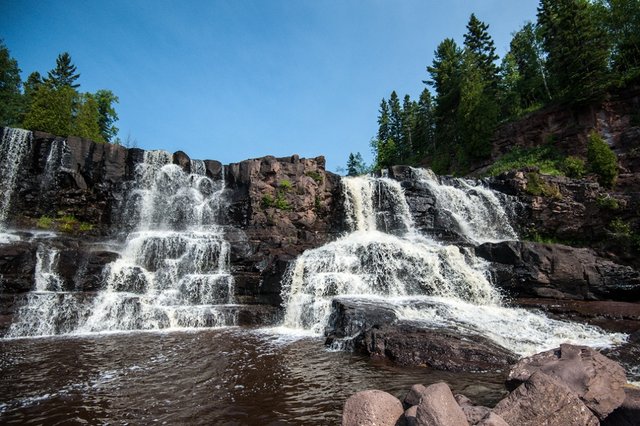
"Correctly" Exposed. Taken with Nikon D700, 35mm lens.
(click for larger)
In my example above, a sunny day in the forest has varying ranges of brightness from the shiny glare off of the rocky water falls to the shadowy dirt underneath roots. When you look upon such a scene, your eyes automatically can see detail in both the bright and dark areas. When you take a photo, the camera's meter may not know which areas of the photo are most critical and which areas aren't. For my "correct" waterfall photo, I first metered the rapids and set my exposure at +2. Then looked at the dark rocks and they registered at -1.0. This seemed pretty accurate, so I took the shot.
Now, if had center metered for the darker rocks in the center of the frame, the shot would have been overexposed.. This would have been because the camera would have tried to make the dark rocks look a little brighter/medium toned.
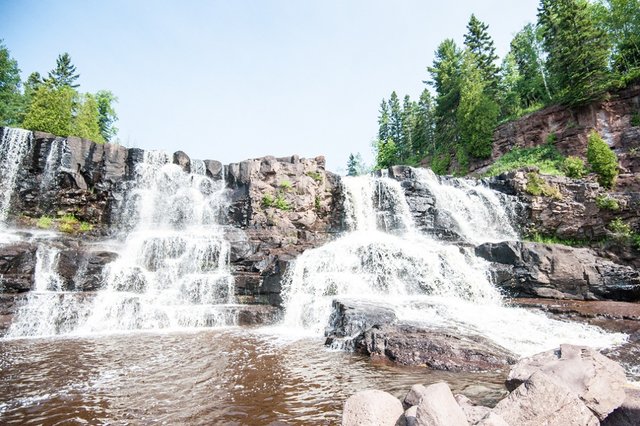
Conversely, exposing for the light areas alone will leave dark areas blackened and underexposed:
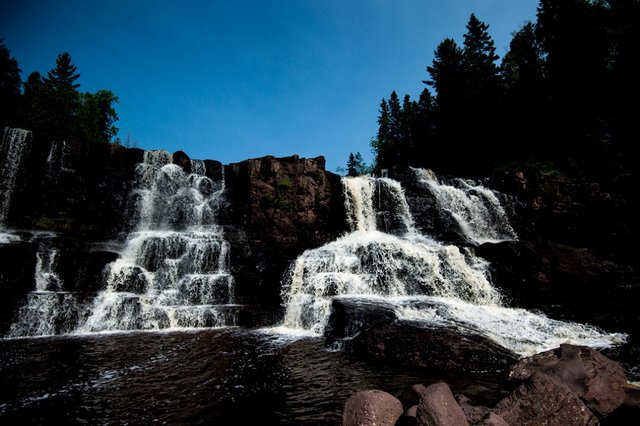
When you point your camera at a scene, the camera will take an AVERAGE of all the light coming in and assign it an EV. So, if you are specifically trying to expose for a brighter or darker than normal subject, you will have to take over.
It is also worth noting here that very modern DSLRs and film cameras have a matrix metering mode that will usually expose accurately for a dynamic scene like this. However, it's good to at least be aware of what is happening inside the camera and it can also be good to double check the automatic metering to ensure you will get your desired results.
How to Expose In One Shot
More often than not, your camera's matrix-metered suggestion is good enough. Yes! You can just point and shoot with your fancy DSLR for most of your shots and be just fine. Done.Err... that is unless your subject is an unevenly lit scene, or if your subject is relatively bright/dark... Or if you don't have or don't choose to use fancy matrix metering.
So, how is one to go about it? Now, that you have the knowledge of what is going on in your camera and how exposure works, you have the power to take advantage of it.
First, know what metering mode you are in BEFORE you meter (often found either in camera menu or on a dial). Common symbols for metering Modes shown on my camera:
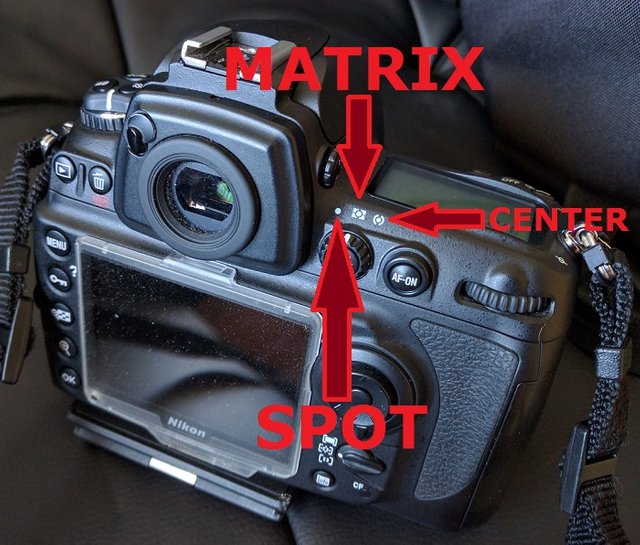
Matrix meters the whole scene and averages the light. Center meters with strong emphasis for exposing the center of the frame "correctly" (assumes you are shooting a normal/medium toned scene). Spot metering is similar to center, but it only meters using a VERY narrow spot in the center of the frame (roughly 2.5-5% of the frame!). Don't forget what metering mode you have selected because you will ruin your next shot if you are not used to changing the metering mode. Why? Because maybe yesterday you spot metered a black lab (dog) at -1.5 stops and, today, a cool marble building in the city catches your eye, but you forgot you are in spot meter mode and your beautiful city scene turns out grossly underexposed.
Anyways, get your metering mode into center weighted (or spot if the subject is small in the frame OR if you will want to be measuring multiple areas of a complex scene). Point your camera at the subject with the subject in the middle of the frame and set your exposure adjusting the f-stop and shutter speed whilst monitoring the camera's suggestion meter. Here is where experience comes in handy and you will gain it by getting out into the world with your camera.
A dark black subject like a black caterpillar or computer case will need to be underexposed down in the -1.5 to -2.5 range. If you go down to -3, you may have a black result but the detail will be lost. A darkish subject like a plot of dirt or a charcoal-colored men's suit may need to be exposed at -.5 to -1.0. Experiment/practice until you have it down.
A very bright subject like a snowy tundra or white painted fence will need to be overexposed to around +1.5 to +2.5. +3 will usually wash out the details and be pure white. A somewhat bright subject like a tan fur coat may need to be in the +.5 to +1.0 range.
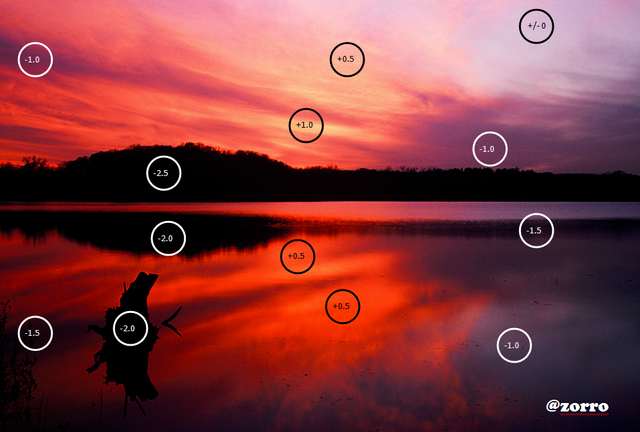
Once you have determined the correct exposure (note: very rarely will you need to go all the way to +/- 2.5, as a maximum of +/-2.0 is usually sufficient for dark/bright subjects), make a mental note of the f-stop and shutter speed. Recompose your photograph as you'd like, focus, ensure the f-stop and shutter speed are unchanged from what you just noted mentally, and take the picture. This is how I spot-metered the example photo for this tutorial. I played with my settings until I could point my spot meter (very small metering zone in the middle of the frame) at the various shown parts of the scene and the EV figures were in line with what I knew (from experience) they should be for my intended result. I hope you enjoyed reading this, learned something, and above all else... will get out there and practice with your camera!
I like it. This is for any camera that has a manual mode, so that's perfect.
I like that chart, too.
In fact, I also like how you're talking about getting exposure correct in the camera on one's own to begin with, rather than relying on the camera's auto function, or trying to fix it in post.
Kudos on a very informative post. :)
Thanks man! I think it's better to learn the craft rather than have the camera try to do everything for you or trying to fix everything later in post. It will save you time, memory/film, and aggravation.
Very nice! How did you meter that one?
Not to alter one's faults is to be faulty indeed.
This is a pretty helpful post. I don't have a dSLR but my camera (a Kodak Easy Share Z8612 IS) does have a manual mode. I've used it a few times, but mostly it's been a lot of trial and error. Set the aperture and shutter, take a picture, check the result, and then adjust from there. After reading this, I might be able to make more efficient use of the manual mode.
Awesome! That's what I was hoping someone would get out of this!
Very good contribution, I like your tutorial. Thank you.
Will you continue with the tutorial?
Absolutely! My goal is help teach what I know to anyone interested in becoming a photographer.
Seal of approval: you have a Nikon.
Damn straight. :D
Loved the pictures and the article! Thanks for sharing!
Thanks for breaking everything down! I really would love to see a collection of photography tutorials evolve here! In this posting, there is one thing that I find a bit confusing for beginners. The part where you overexpose the white kitten and underexpose the black suit is only true when the fluffy kitten is sitting on a snowman at the North Pole or if the man in the black suit fights with a raven in a tunnel. Most of the scenes to be captured in real life are featuring mixed values of brightness: a white kitten on a dark blue blanket or the suit person in front of a white wall. The camera is aiming to find the average amount of 'correct' light for the WHOLE picture and might – depending on your metering method – decide to go for settings that show every crease in the dark blanket but will make the white kitten appear as a plain white spot without any fur...just because there is more blanket than kitty in the picture. In that case you would have to UNDERexpose a little to get a nice cat fur. (You would lose blanket details, but the blanket is less important here.) For digital camera users I would recommend to do a test shot with the camera's exposure suggestion and check, how the most important part of the picture turns out. Then use exposure compensation to improve it.
I would advise beginners to start in aperture priority mode 'A' (you set the aperture and the camera chooses the matching shutter speed). You can still use exposure compensation here, but you don't have to care for everything at once. For ME (and that might of course be different for YOU), photography is all about capturing the right moment. If you have to concentrate on too many things at the same time, the moment will be gone before you have your settings done.
Some photographers recommend to know every function of your camera blindfolded before can concentrate on your motive. That might work for people with a more technical approach. I would always recommend to learn SEEING first. How to choose the right moment. How to recognize a good motive. When NOT to push the button at all. Then get more and more 'manual'. Or don't. :-) Just wanted to add my opinion. Again, thank you!
Thanks for your reply. Yes, the modern matrix metering cameras will usually do a good job. 90% of the time, you can just use the matrix mode and trust the camera.
The light meter averages out the scene and most scenes fall into the average. However, if you want to absolutely ensure that a critical dark/bright subject turns out how you'd like, I would advise center or spot metering specifically on that subject to double check that the suggested values are in line with where you believe the subject should meter.
In challenging lighting situations where the overall scene is not averagely lit, this is where manually metering can save your photos. Sometimes you do need to take a photo of a dark subject in front of a dark background or of your new white Porsche in front of an aluminum (read highly reflective) modern building.
Once a beginner gets out there and learns through experience exactly when and in which situations the camera actually makes mistakes, then he/she will know to meter properly. He/she should ultimately be able to look upon a scene and think, "oh yeah, I can already tell the camera will overexpose the hell out of this shot. I should stop it down to compensate."
And thanks for YOURS! I totally agree. I have a more intuitive approach to photography, but maybe that is BECAUSE I know the basics inside out and don't have to worry about them anymore. Photography has changed a lot. You can take excellent images with nothing but your phone and without thinking twice about parameters of any kind. That makes it easier to concentrate on the moment itself, but as you have your camera with you all the time, there are so, so many moments to choose from. I have just installed my old darkroom again. Let's see where this is leading. Carrying the Mamiya around is like having an overweight pet dog in your purse... :-)
Useful guide helping people understand what goes into problem solving on the fly. Cheers & I invite you to take a lot at a few of my recent cinemagraphs @timelapse
Thank you for this. You've broken it down so well. Very informative.
You are welcome! Thanks for the kind words!