Before & After: The Story of a Maternity Portrait
This was originally posted to our photo website blog this morning. Click here to view on our site (it helps our overall visibility!).
January 11, 2017
Would you believe it if we told you this photo started out with another person in it? Here's how this portrait came to be:
If you hang around long enough, you might see these faces again and again through out our photographs. That's because this beautiful mother-to-be (now, the mother of a gorgeous six month old girl!) is our niece and perpetual photography experiment. Any new ideas or techniques we want to try, Courtney and her husband, Jay, are always willing participants. This particular shoot turned out to be a bit tougher than we had anticipated because we knew our location was going to be a little unpredictable, so we went into it with a very loose plan just to see where the session took us. It was late June, and the river hadn't seen rain in way too long. We hiked around a bit to find a scene that wasn't so wilted by the Summer sun. We found a shady spot on the edge of the riverbed, beneath a mammoth of a bluff. After we had a chance to cool off from the walk, we set up for this shot:
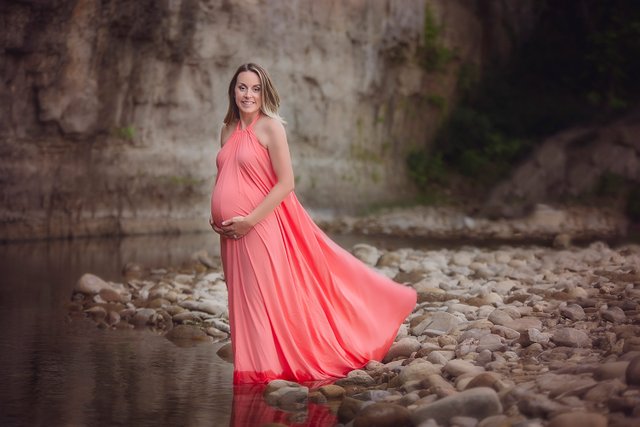
Seriously, one of the favorite images we made in 2016, for more reasons than one. But guess what! What you see here took some teamwork. Here's how it all started:
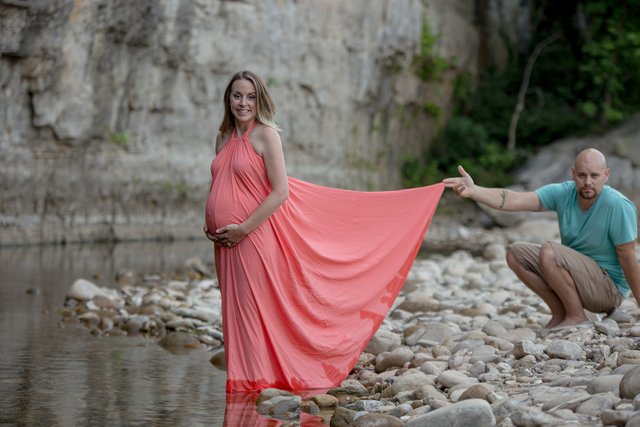
Doesn't Jay look thrilled??
This was shortly after an unfortunate flip-flop blowout on the river rocks. This poor soul hiked barefoot back to the car. You can tell how excited he is to do so. Jay is always so helpful during our shoots, and being shoe-less didn't stop him! On the count of three, he let go of the dress and my shutter snapped away. We only had one or two tries to get it right before the dress was too wet to fall the way we wanted it.
Here's a video to show you how I edited Jay out of the image. I wasn't recording while I was editing it the first time, but this will help give you a general idea of how I accomplished the task. To get the final results just the way I envisioned them, I had to take my time and edit carefully. The easier way to do this would have been to first take a photo of the scene without Jay in it, then composite in Photoshop. However, if you forget this step, like I did, it's good to know how to improvise. Just channel Bob Ross, think "Happy trees, peaceful river", and get to work! ;)
After a bit more clean up and refining of the background scene, I tackled skin tone, make-up application, and the overall tone of the image. I softened Courtney's surroundings and added some depth. The video below shows the before and after comparison:
Like almost everything else in Photoshop, there are a couple of ways and a few different tools that can help with this kind of edit. I started by using the lasso tool and content awareness to remove most of the person. Then, I used the clone stamp tool to paint in details of the rocks and continue the flow of the river by using elements that already existed in the photo. If you're trying this yourself, good luck! All it takes is a bit of practice, and eventually it will become second nature. If you have any questions, I'll be happy to answer them in the comments below!
Thank you for taking the time to read our blog! Please take a look at the Wallace Family's full maternity and newborn session by CLICKING HERE.


Brilliant - you could also have asked photoshop to try filling in the gap using content aware fill. It seems to get more advanced with every new version!