Making background look awesome using Pixrl in a minute
I found a easy and lazy way to manipulate the background of any pic, provided the background has a clear enough space to fill it in.
The Changes can be subtle to huge depends on how you want it to look.
I use the pixlr app because of it features and most importantly its option to select and de select the certain parts of the pics. Which makes it best compared to others.

Double exposure: is the method of merging two layers
Its an option which you will find in every photo editor or photoshop
- So here is my original,i will just tweak it a little bit by using the Brush option which is marked in red
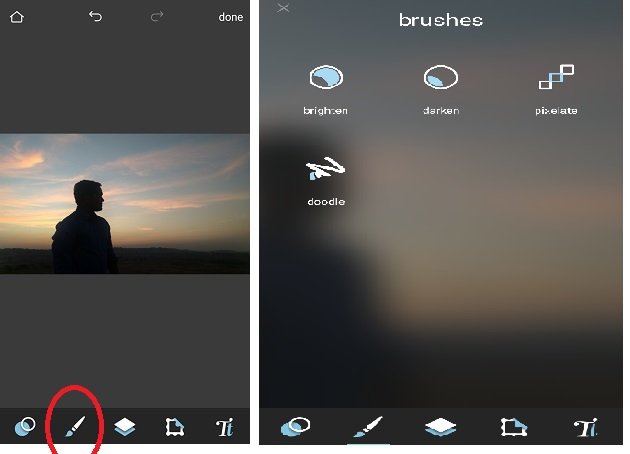
- Use the dark brush to darken the background, which will enhance the background color
Use the brighten brush tool on the skin, or whichever part you want it to be highlight
Using these two tools can improve the lightning condition to a certain extent

Now go to the double exposure option, it will ask for the second pic which is to be merged
Since i want to add more clouds,i will choose an evening twilight sky pic, which you can easily google
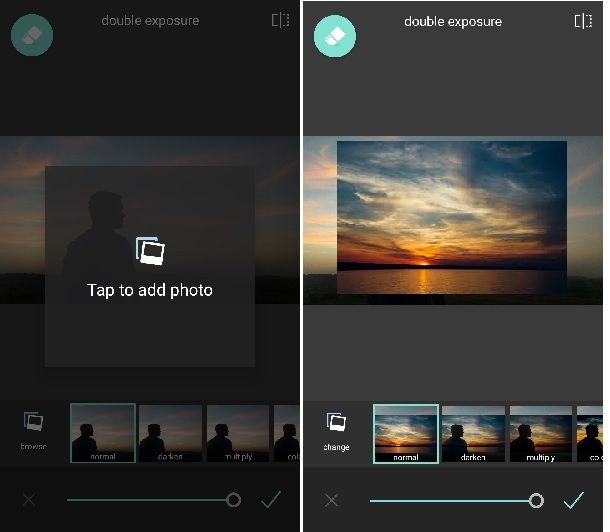
Adjust the second image in a such way that it fits in your pic, you can resize it just by moving the pic in and out
Go through below options to merge in various way, you will find many and most of them doesn't merge in a good way so you have to find the right one, for my pic the darken one suits perfectly
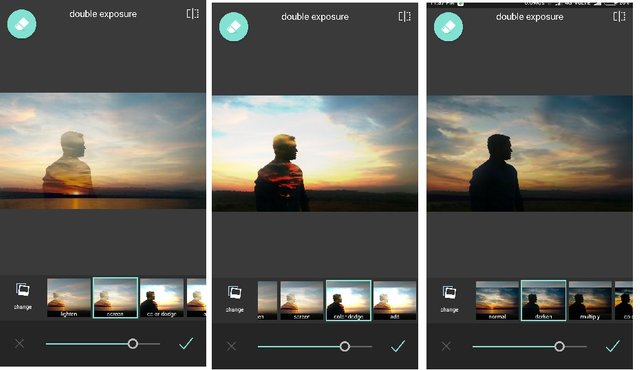
Adjust the downside bar for the deepness of the effect, adjust till it looks believable
and you can erase the merge layer of any part, if it doesn't fits, which is available at the top left corner option


That should make pic look and in final step just make it bit dark and play with subtle filters to make it more colorful
Since i like Astro photography , i merged it with the night sky pic , the result was like this

It's fun to mess with pics, you should try it :)
Thanks for reading ! hope you enjoyed it. Have happy times
Creative work
Thank you @Shilpavarma :)
Nice! It's like manual HDR, in a way. Love the result!
Thank you @shibamo for the nice comment :) and welcome to steemit.
This is a really helpful article, @vishal09! You did a great job with the examples. I will have to give this technique a try. It looks like it could be a lot of fun, and rewarding, too. I found this article from a link in the Unmentionables. I've upvoted and resteemed this post, and am following you now, too.
Cheers!
@mitneb
Thank you so much @mitneb ☺
Yes do try this method , by finding a right pic to merge. Let me know if you need any assist with that, will be glad to help.
Followed you back :)
wow~ the final pic is really nice~
Thank you , glad you liked it aaronli :)
You've received an upvote from #TheUnmentionables - a SteemIt community full of members who like to kick ass, take names, and occasionally do it wearing (or forgetting to wear) our unmentionables...
Please upvote this comment so we can help our members grow faster!
Thank you guys :)
Wow amazing just look like an original one seems no editing
Thank you @aryatituti :D
I have never used any app to change the way my pictures look but hey thanks for sharing this here mate. Maybe with this I might be able to do a little retouch on the ones that had a few flaws and make them look better. :)
Yeah subtle changes does give it a better look :) Thanks for commenting kyrios
Congratulations! - As you follow @fisheggs bot your post has randomly been selected for an upvote.

Thank you :) i appreciate that.
Extremely Creative! Will try it out! :)
Much Love!
Thank you so much @amitsharma :)
You are Welcome! :)
This is really useful.
Glad you found it useful :) Thanks for the comment