Capturing Deliciousness - Food Photography Tips
Most of us have done it. A fancy restaurant, maybe a little wine, and some nice light coming through the window. Your order comes out piping hot and beautifully plated…and BOOM. You pull out your phone and Instagram that bad boy. People have been photographing food more than ever. Some hate it, while some make it a daily ritual. Whichever way you think of it, a properly done food photo can make one’s mouth water. And it has the power to make you get off your phone and into that restaurant’s door, wanting to see and taste that beautifully photographed dish for yourself.
I have been photographing food for a few years now. I started by assisting commercial photographers and working with expert food stylists in Manila, and have brought that experience in my own shoots here in Korea. I love photographing food both from my own
kitchen as well as dishes made by professional chefs. Not only do I love the food, which is art in itself, but also the challenge and rewards of conveying that food’s deliciousness through a two-dimensional image. I’d like to share some of my own approaches andexperiences today, and hopefully it can help you create better food photos.
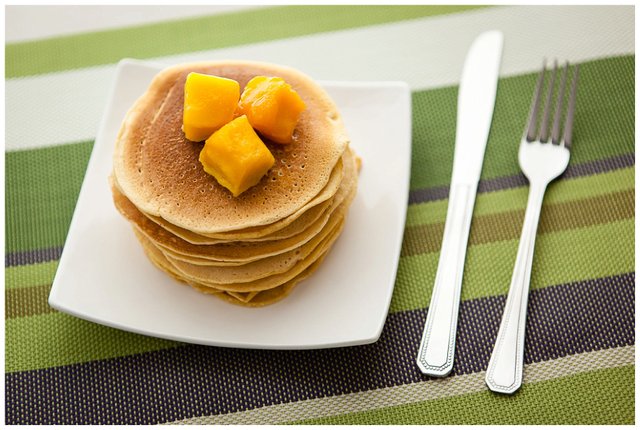
Homemade besan pancakes: Canon 5D Mark II + EF 24-70mm f/2.8L (ISO 400, f/2.8, 1/100sec.), available light
Camera and Lenses
You don’t need a lot of fancy gear to produce good food photography. We’ve all seen some great food shots done with an iPhone. It’s mostly about the light and the food itself. However, a decent camera and lens will definitely help you produce clean, sharp images. I personally use either a Canon full-frame DSLR or a Fuji mirrorless system for my work, but even basic point and shoot cameras or entry-level DSLR’s should be able to produce good quality images. I usually work within the 35mm to 90mm range (full frame equivalent). Shooting too wide may cause distortion and clutter the frame with too many elements. Isolating the subject and necessary elements surrounding it will help you make a stronger image. Longer lenses can also be used, but within typical workspaces, lenses up to 100mm should be sufficient. Lenses that can focus close will also be helpful. In terms of f-stop settings, I’m usually in the f/4 to f/8 range to get the food in nice, sharp focus. Depending on the subject, shooting very wide apertures such as f/1.4 may work for effect, but I usually find that setting blurs out the dishes too much.
Lighting
As I mentioned earlier, light is one of the most important elements of good food photography (and any photography for that matter). A beautiful dish in crappy light is probably not worth photographing at all. I follow a simple approach whenever I photograph food: use a large, soft light coming in from behind and/or side of the subject. Back or side lighting brings out the texture in the food, creates pleasant highlights, and makes the dish look more appealing. It also brings out any steam coming from the food, which is also attractive. I use both natural light and flashes. You could also use continuous lighting, like the ones used in video production. The most important thing is the ability to make a large, diffused light source.
For natural light, use a large window with soft light coming into it. If you get shadows, use a reflector on the opposite side of the subject to bounce some light back in. Something as simple as white foam board will work fine for this. This photo of my wife’s Jajangmyeon was photographed in front of a large sliding door. I placed the bowl on the floor to utilize the wood textures and relied solely on the soft, natural light.

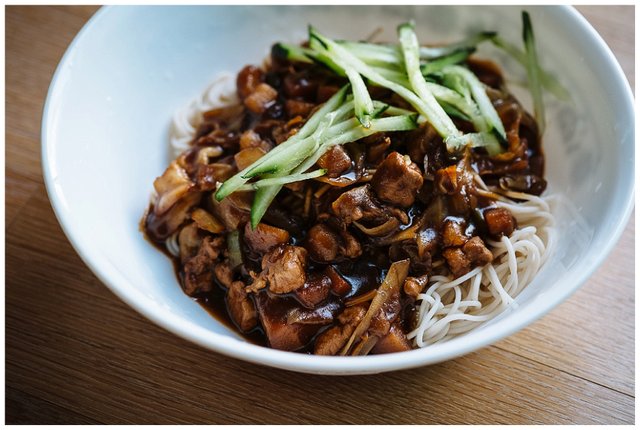
Home-made Jajangmyeon: Fujifilm X-E1 + XF 60mm f/2.4 Macro (ISO 800, f/2.8, 1/90 sec.), available light
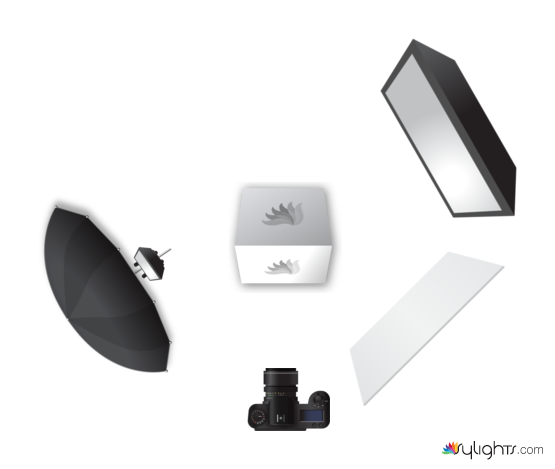
As you can see, the soft light is coming in from the back and slightly to the right, accentuating the textures of the dish and bringing out highlights in the sauce. When I use artificial lighting (usually small hot shoe flashes), I simply try to mimic a large window. I use a speed light in a softbox or umbrella as the main light, positioned at the rear or side of the dish. Then I use a weaker second light and/or reflectors on the opposite side to fill in the shadows. Here is a set up shot and lighting diagram from a recent food shoot I did for Tongdduck Restaurant in Tongyeong.
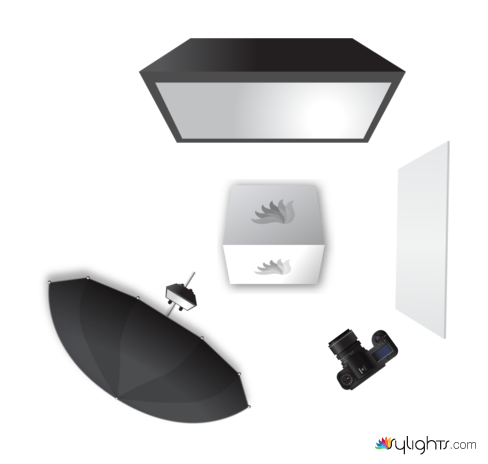
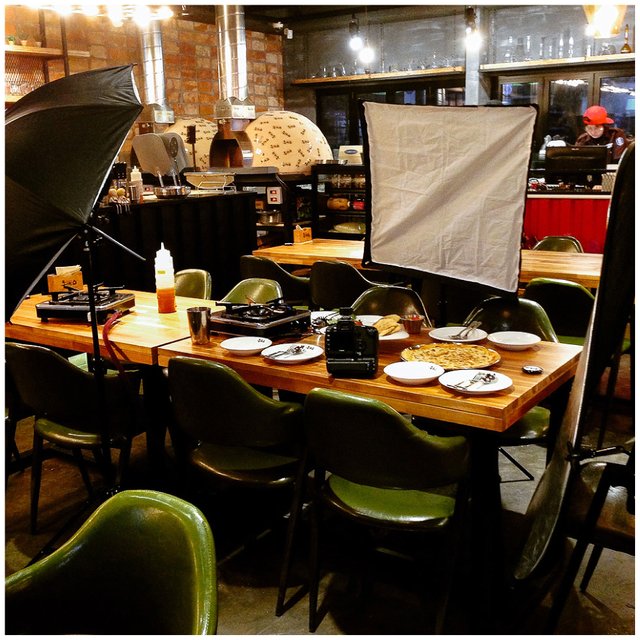
Tongdduck Spread: Canon 5D Mark II + EF 24-70 f/2.8L (ISO 400, f/8, 1/160sec.), 2 speedlight flashes, diffusers and reflectors
And here’s a final image using that setup:
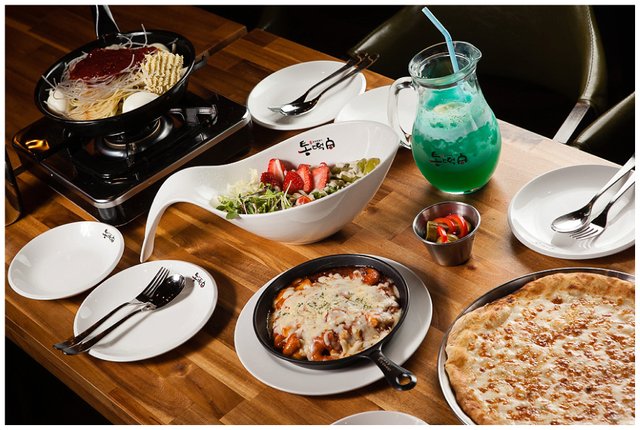
Tongdduck Spread: Canon 5D Mark II + EF 24-70 f/2.8L (ISO 400, f/8, 1/160sec.), 2 speedlight flashes, diffusers and reflectors
Bonus tip: when lighting beverages or bottles, bring the light more to the side to accentuate the glass and add fill light from the front to show the labels.

Tongdduck Drinks: Canon 5D Mark II + EF 24-70 f/2.8L (ISO 400, f/8, 1/160sec.), 2 speedlight flashes, diffusers and reflectors
Food Styling and Props
Aside from great light, the food itself has to look good. Food stylists have lots of tricks like glycerin, spritzes, and fake ice cubes, but I’ll discuss a few simple tricks to get your food looking good for the camera.
Shoot it while it’s hot. Food looks best when it’s fresh out of the kitchen. Have all the lighting and settings dialled in before the first dish comes out, and shoot it as quickly as possible.
Moisturize. In case the food has been out for a while and it starts looking dry. Use a spray bottle or brush some olive oil to put some moisture back on the food’s surface.
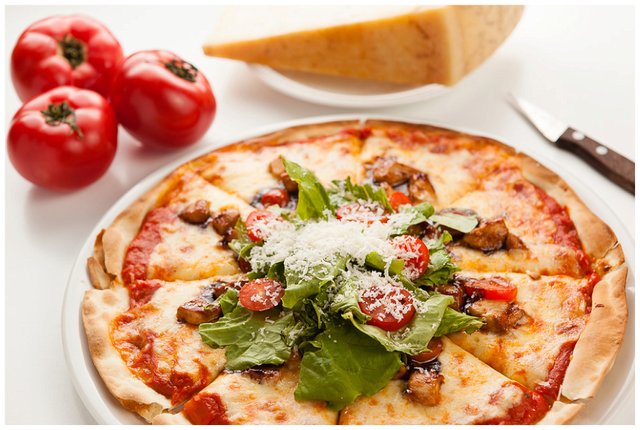
Garnish with fresh, raw ingredients. Fresh green basil, parsley, small salad greens, and fresh fruits work really well to enhance a dish’s appearance. Just make sure the garnish is appropriate for the dish.
Sometimes raw ingredients look better. This is especially true in stews and soups. Photograph the food before cooking to show off the ingredients, before they all blend together into something that may not be as visually attractive.

Tongdduck Seafood Ddeokbokki: Canon 5D Mark II + EF 24-70 f/2.8L (ISO 400, f/8, 1/160sec.), 2 speedlight flashes, diffusers, and reflector
- Enhance the photos with tasteful props and surfaces. Adding utensils, pepper shakers, a glass of wine, and other items appropriate to the dish will help bring variety and add life to the photos. The right table surface or place mat will also help bring together the photo. Just watch your color coordination and don’t clutter up the frame too much. In my own kitchen, I have a collection of place mats, utensils, glasses, and dishes that I use only for food photography. A trip to your local Daiso (a Japanese dollar store) may prove fruitful when you need props and dishes.
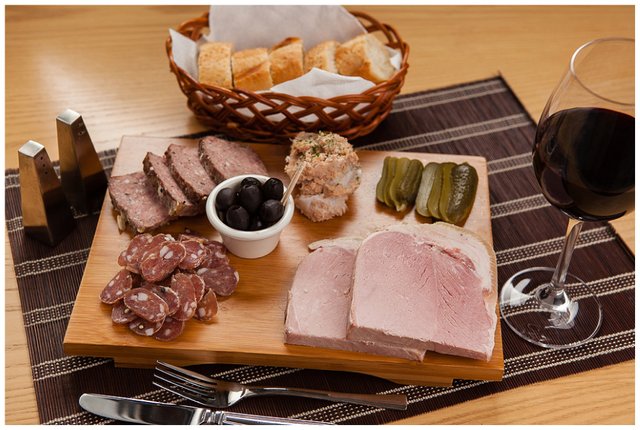
Just Jazz Wine Bar: Canon 5D Mark II + EF 24-70 f/2.8L (ISO 200, f/5.6, 1/60sec.), 2 speedlight flashes, diffusers, and reflector
Angle and Composition
Depending on the dish, you can use a variety of angles and composition to photograph your food. Take wide shots of the entire spread as well as tighter detail shots. I usually like to shoot down at the food at around 45 degrees or so, as that is usually how we look at food. I also enjoy doing top angle shots from time-to-time. I tend to stay away from shooting the food at too low of an angle, as I don’t find it as appealing.
Post Processing
Out of all the genres of photography that I do, I find that I do the least amount of post processing in food photography. The image I get in the camera is usually around 95% done. In Lightroom, I usually apply white balance correction, curves, highlights and shadows, sharpening, maybe a little post-crop vignette and that’s pretty much it. If there are specks or spots that aren’t supposed to be there, the healing brush also comes in handy.
Final Thoughts
I hope you find this information useful for your next food shoot. I know for a fact that a lot of photographers are also great in the kitchen, and it’s always fun to bring two avenues of creativity together. So next time you make a masterpiece in your kitchen or go to the new restaurant in town, don’t hesitate to bring out your camera (or iPhone) and have fun. Just don’t let the food get cold!
See more of my work at www.roycruz.com and on all major social networks.
This article originally appeared on the Photographers in Korea Blog.
Wow great guide. Following :-)
Great stuff Roy, I've actually watched your stuff on Youtube. Nice to see you on Steemit! Followed :)
That's awesome! Thank you for watching! :) I just started here a few days ago and it has been interesting! Followed you as well! :)
Thanks, you have excellent photos, I'm sure you will do well on here :)
Great info here. Thanks for sharing!
Fantastic tutorial @roytc123, you'll have a double feature in the DPS of June 29th!
Wow you are a photography GOD thank you very much
I'd like to focus my blog around food and this post comes VERY handy on how to take my photos.
Awesome @roytc123!!!