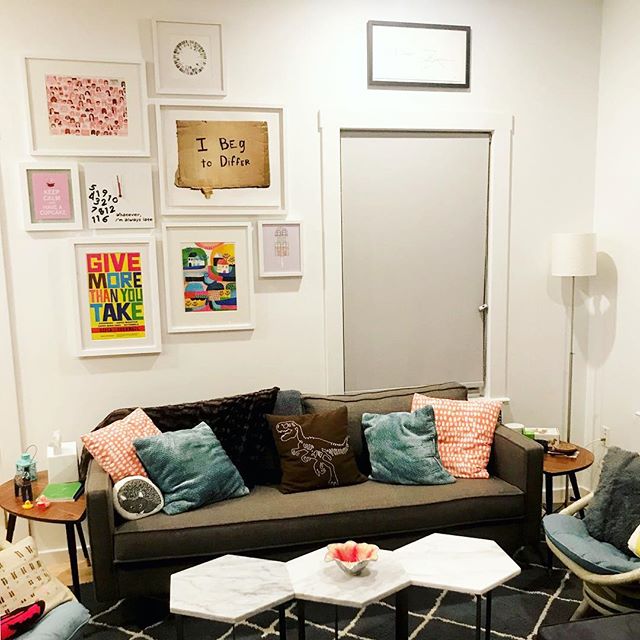
Creating a Gallery Wall!
My roommate and I recently put together a gallery wall in our living room. It has made our living space so much homier!

At first, the thought of creating a gallery wall was pretty daunting. My roommate and I are both perfectionists with zero interior decorating experience, so naturally, we first found all of the Pinterest inspiration we could. I'm pretty pleased with the final product. Here are some of my tips for creating your very own gallery wall!
First of all, figure out your GROUND RULES. Some examples of ground rules include answers to questions like:
- Do you want all of the art to be in black frames? For our gallery wall, we decided to display all of the art in white frames for consistency. Maybe you don't have a preference for frame colors, which is also totally cool, but figure out these ground rules before you select your pieces!
- Do you want to have a theme (e.g. abstract, aquatic, sports)?
- How much space do you have to fill your gallery wall?
- Do you want a certain piece of art that you already have to be the focal point?
Once you have your ground rules figured out, you're ready to proceed!
The second thing you'll need for your gallery wall is ART. You can use local art, prints from your favorite artists, your own artwork, and anything else that makes you happy when you look at it. Nordstrom Rack can have great online art deals if you prefer online shopping. If you already have art, then just make sure it aligns with the vision you created with your ground rules :) .
Thirdly, you need to figure out PLACEMENT. There are so many different ways to arrange art for gallery walls! You could manually decide on an arrangement by rearranging the artwork on the floor (be sure to map out the wall-size using an indicator such as tape so your art fits correctly!). At first, we tried the manual route. It was taking forever. So, instead, we took pictures of each piece of art, measured their dimensions, and uploaded each image to a layer in Adobe Photoshop. Next, we added a layer for the wall space.
Here's an example of one of the digital versions of the gallery wall:

Dragging the pieces of art around and saving different versions was helpful and much more efficient. And if you know someone who likes design, you also have the option to send them the file and see what they come up with ;)
Once you have the art layout figured out, the only step left is hanging your art! Depending on how much art you're hanging, this might involve a lot of measuring and be time intensive. I promise you it is so worth it! Especially if you've already gone through all this effort!
Lastly, sit back and enjoy your gallery wall. You deserve it. :) I hope you found this post helpful!
Some pictures are always good in a room. Great post.
What animal is on that little pillow? :D
It is a dinosaur! :)