CAN YOU GUESS WHAT THIS IS? EVER TRIED LIGHT PAINTING?
Try something new with your camera. Try “Light Painting“.
Light painting is a great way to explore your creativity…and the pictures look cool! The technique is pretty simple and doesn’t require any special set-up. You can “paint” in your room (No, it does not destroy your walls 😉 ) ,park, street or at any other exotic location.
What you need:
1. A Camera which supports long exposures; preferably a digital camera.
2. Flash-light/Torch; try different colours and be creative.
3. Tripod; Don’t have one? use any stable platform to keep your camera, if the location is fixed then it might limit you in terms of creating the composition (especially if the location is exotic!)
4. Cable/Remote release (optional) – This might come handy if you want to have the flexibility of controlling the camera shutter remotely. It saves you from setting a pre-defined long exposure shutter time setting and you can paint freely for as long as you want. (Your camera should support the bulb mode for this to work.)
Shooting Indoors:
1. Make sure that the room you are shooting in is as dark as it can be, unless you want to show your messy room in the final image.
2. Set up the camera on the tripod and decide the composition. Make sure you make it as wide as possible so as to have a wide canvas to paint!
3. Set the focus of your camera to infinity (unless your room is very small) and switch of auto-focus.
4. Switch off the lights in your room and set the exposure time on the camera for as long as you want it to be.
5. Click the shutter and run(don’t trip over!) to the location where you want to paint. (Remote release is helpful here, if shooting alone or else get someone else to operate the shutter!)
6. Use the flash-light to start painting. You may use it just like a paint brush or a pen. Make sure you switch it off and switch it on again to get discontinuity in the image..else everything will just look one continuous mangled line.
Shooting Outdoors:
Everything else remains the same as shooting indoors except switching off the lights!. When shooting outside at a dark exotic location, you can set the exposure for a much longer period, which will provide a nice background for your image.
Get Creative:
Get an everyday object and trace out it’s edges. Keep the object in focus and draw something around it.
Here are some of the pictures which I took.
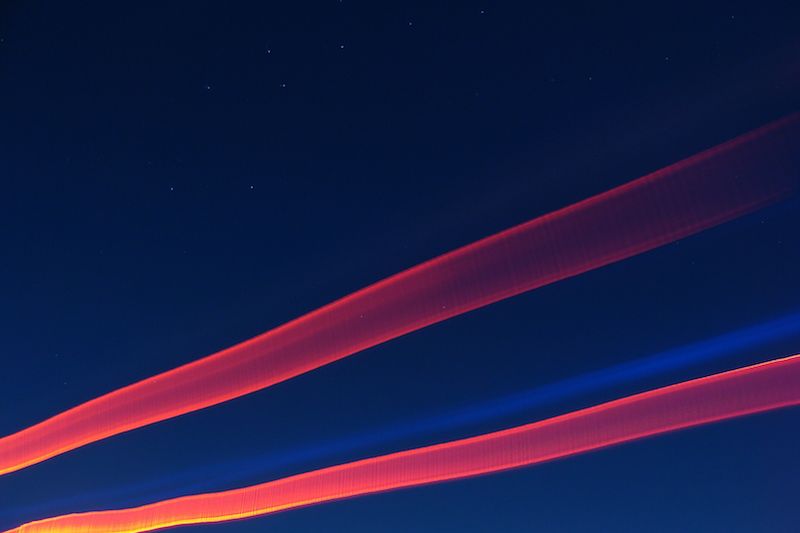
Can you guess what that is? The red light trails that you see are the tail lights of a bus, which crossed my frame when I was trying to capture the beautiful night sky in Iceland!

This is the image which I took when we were camping in one of the remotest places in India. Chitkul, the last village on the Indian Side of the border between India and China.

That's just casper in my room :)
Hope you liked the tutorial and enjoyed the pics. This post was originally posted at my personal blog
Nice! I've always wanted to try this!
Yea, you should It's very entertaining :)
Upvoted ,awesome ,I like night shots ,I have similar post in my blog ,please look for it ,peace ❤
Thanks a lot :) will have a look
this is really trippy, you should see what happens doing it with some fireworks on 4th of july!!!
very interesting. I will try it out this weekend. Anyway thanks
Good to know :)
Congratulations @gyanibilli! You have completed some achievement on Steemit and have been rewarded with new badge(s) :
Click on any badge to view your own Board of Honnor on SteemitBoard.
For more information about SteemitBoard, click here
If you no longer want to receive notifications, reply to this comment with the word
STOPBy upvoting this notification, you can help all Steemit users. Learn how here!