Making of 4K Hyperlapse video
Hello!
Last summer I decided to make a hyperlapse video. A friend who I met in the sauna introduced me to the concept and it gave me the idea to make a whole video of it. Partial reason for the video was my workplace which didn't pay salary according to the contract, so I had to leave them and had more than enough free time to spend.
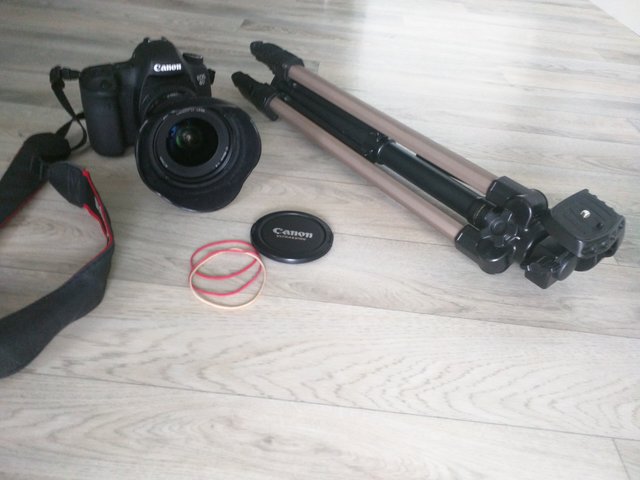
I used a cheap Velbon tripod, Canon 6D and a Canon 14-40mm f4 L lens when shooting this. I decided to use a DSLR to get RAW images, which could be mass-enchanted to look better in post-production.
Let's start with showing off my projects result:
Requirements:
- Something that can take photos with minimum resolution 3840px * 2160px
- A tripod or some kind of steady mount
- Adobe Video Editing Software (I used After Effects and Premiere)
My setup:
The hard work, shooting it
The hardest thing of all is the shooting. The better you get this step done, the easier you will have in post-production.
There's some thing you need to think about before starting to shoot:
- What to shoot
- Focus point
- Angle of photos
- Movement
1. Pick what you want to shoot
To begin, you need to pick what you want to shoot. Often different monuments or building will do fine for this purpose. The magic of hyperlapse videos is that the video looks panned, yet everything in the world is speeded up. You can wonder if something looks good if you take a photo of it, then it'll fit also in a hyperlapse.
2. Choose a focus point
If you look closely on the video, every clip has some little point which doesn't move in the frame at all. It might rotate but it stays all the time in the same spot. Then when moved, the scene kinda of twists making it looks quite cool. I used the cameras own focus points as points which can be seen if you view through the viewfinder. To have some examples of points:
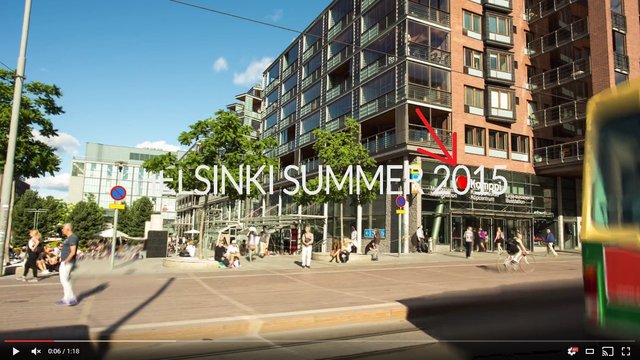
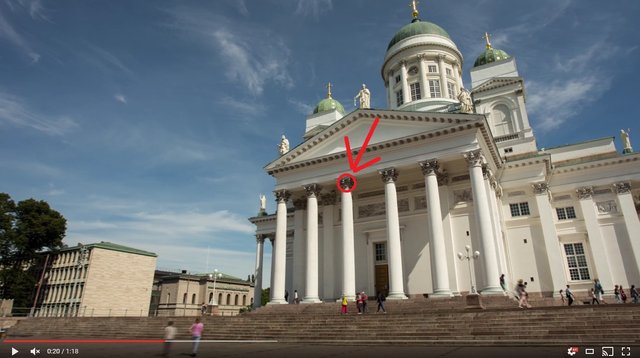
I think you get the point, if not, please comment about it and I'll even make a video if necessary :)
3. Angle as a factor
One thing I noticed when shooting, if you were close to the object, you tend to have the camera angled slightly upwards, but when you walk further away from the object, you need to fix that. Otherwise you'll end up in awkward positions and won't be able to focus on the steadiness of shooting.
4. Movement and tempo
If you shoot still a video with a X amount of time between the frames, it's called a timelapse. Make it into a hyperlapse by picking a path at which you will walk. Go to both beginning and end points to see that the object looks good in both ends. Estimate the amount of photos needed and decided a distance you move the camera between every frame.
If we say the distance is 10m, and you want 3 seconds of video of the whole, with end product at 30fps, you would need 90 photos on the 10m. This then can be calculated 10m / 90frames = 0,11m ~ about 10cm. So between every shot, move your tripods or monopods legs 10cm and you'll get the calculated result.
It's also important to keep a good tempo on when shooting. If you keep a pause halfway, you easily lose how the object looked like in the viewfinder, and also if there are people moving, they will suddenly teleport away and new ones will be visible instead.
Shoot it!
When all things have been considered, do the shooting! You may want to shoot in RAW for best possible result.
Post-production
This is actually where all the magic happens. My own workflow for post-production looked like this:
- Adobe Lightroom RAW to JPEG in Sequence
- Adobe After Effects JPEG to 4K+ video, STABILISATION and render it as .AVI
- Adobe Premiere edit renders to final video
The Lightroom part
Adobe Lightroom is awesome for image processing. I imported each sequence separately, edited one frame to look awesome, copied the setting over to all other frames and then exported the images. This way you get the best possible quality. I tried first by importing the RAW images to Adobe After Effects, but that just became too heavy to work with, as stabilisation in itself requires a lot of computing.
The After Effects part
You have maybe heard of a video effect called "Warp Stabilize". That was the main thing I used in the clips to stabilise them. Some clips weren't becoming good with it so I was also force to use 2-point-tracking stabilise. The idea is that After Effects scans every frame and estimates where a picked point is in every frame. Then it smooths out the end result by moving and scaling the frames. Wrap Stabilize does some kind of Warp, which can be seen if you pause the video I made at any point. It looks kinda stretched. But it's often only on small details so working in a 4K video, it's okay that those happen.
The Premiere part
You mostly want to have a nice song to play in the background. I chose a song called "Who Got The Funk" by SoDrumatic. I picked it because it wasn't too popular yet it sounded really nice. Often video like these are easier to make with songs that have less singing and more sound clips instead. It doesn't then force you to think about the lyrics.
I just cut the clips ti fit with the tempo of the music and tried to have clips cut when a beat hit.
Render it!
Finally the only thing left to do is to render the whole video. I rendered mine with some custom settings due to the lack of 4K presets in Adobes software. If you are going for something not 4K, you could use the web-presets. Compression is a good thing in the end of the day as it makes the footage more easily accessible to others. I'm happy tho that youtube supports today 4K videos.
Share!
I can't emphasise this enough. Just sharing the video on your Facebook and a few subreddits will gain it about 1 000 views if even that. I did it, and I got a few thousand which felt kinda sad when thinking about the effort put into it. Well eventually a Facebook page saw my video and posted it on their page. It gave the video 47 000 views with many many shares and likes. That felt quite good :)
https://www.facebook.com/veryFinnishproblems/videos/725127564294500/
what a very good job continue like this!!
Congratulations @firesstream! You have completed some achievement on Steemit and have been rewarded with new badge(s) :
Happy Birthday - 1 Year on Steemit
Click on any badge to view your own Board of Honor on SteemitBoard.
For more information about SteemitBoard, click here
If you no longer want to receive notifications, reply to this comment with the word
STOPCongratulations @firesstream! You have received a personal award!
Click on the badge to view your Board of Honor.
Congratulations @firesstream! You received a personal award!
You can view your badges on your Steem Board and compare to others on the Steem Ranking
Vote for @Steemitboard as a witness to get one more award and increased upvotes!