Photography techniques, tips and tricks for taking pictures of anything
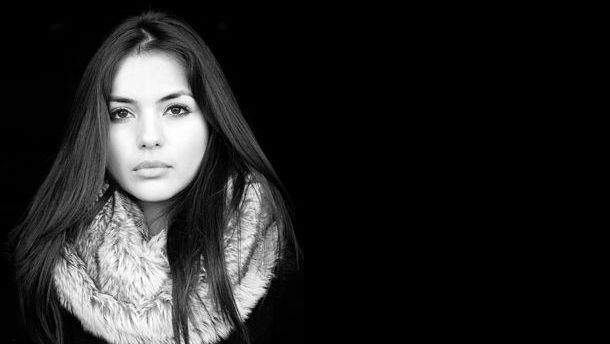
PORTRAIT PHOTOGRAPHY TECHNIQUES
Tip 1. Focus on the eyes
While eye contact is not always desirable in a portrait, sharp eyes certainly are. Manually select an AF point that's positioned over one of your model's eyes, or use the central focus point to lock focus on their eye.
Then, with the shutter release half-pressed to keep the setting locked, recompose your picture before taking the shot.
Tip 2. Using a standard or telephoto lens
Wide-angle lenses are a great choice for photographing environmental portraits, where you want to show a person within a specific context. However, wide-angle lenses used close-up will distort facial features and creative unflattering pictures.
A better choice for portraits is either a standard lens or a short telephoto lens. The classic portrait focal lengths for a full-frame camera are 50mm, 85mm prime lenses and a 70-200mm zoom.
These will help to compress features and provide a more natural-looking result.
Tip 3. Use Aperture Priority mode
Aperture Priority gives you direct control over the aperture, and as a result the depth of field (DOF).
Fast prime lenses, such as 50mm f/1.4 and 85mm f/1.2 enable you to choose very large apertures for a shallow depth of field. This can help you create those creamy-smooth, out of focus backgrounds that give portraits a professional quality.
Working with such a narrow band of sharpness means that you need to be accurate with focusing - the entire portrait will look soft if you don't focus accurately on the eyes.
Tip 4. Using window light
You don't need an expensive home studio lighting kit to take amazing portraits - a window and a reflector can help you achieve stunning natural results without spending too much.
Position your model at an angle to the window and use a white or silver reflector to open up any shadows across their face. A silver reflector will give a crisper quality of light than a white one, although the effect won't be as subtle.
Be aware of any color casts that may be introduced by features on the other side of the glass as well - a lush green lawn can give skin tones a sickly quality, while late evening sunlight on a patio will reflect lots of warm light.
Tip 5. High-key portraits
Deliberately choosing to over-expose a photo to create a 'high-key' effect results in a light and delicate look that can enhance feminine portraits and pictures of children.
The trick is not to blow the highlights in-camera, but rather brighten up the shot later in software such as Photoshop.
Shooting RAW files will give you the most editing head-room, as you'll be able to extract more detail across the tonal range in raw compared to JPEGs.
Tip 6. Baby portraits
When it comes to lighting baby portraits, natural light is the best choice. Flash will just end up spooking them. Try and position them near to a window and use a reflector to bounce light into any shadows.
The more light you can get onto your subject, the lower ISO sensitivity you can use for the best quality photos.
To catch a baby at their best, photograph them just after a feed or when they've woken up first thing in the morning.
They'll be more active and alert than at other times of the day, and you're more likely to get the kind of cooing baby portraits that parents will love.
Tip 7. Photographing children
Taking photos of children is fun but challenging. Keep a kids' portrait session short and entertaining. Play games with them: ask them of they can see their reflection in the front element of the lens is a good way to get some eye contact.
Fit a wide-angle lens and shoot without looking, poking the camera into their face. Get them used to the shutter sound and not having to look down the lens and smile.
Make the most of opportunities when they're still for a moment, such as when they're concentrating on a toy. Chat to them as you would with adults and once you've taken a few photos show them the results on the LCD screen, so that they feel involved.
Tip 8. Shooting in burst mode
Whether you're taking a child's portrait or a group portrait, set your camera in its fastest drive setting. You don't need to machine gun the shutter release, but shooting in short bursts will ensure you capture a fleeting range of expressions.
It also improves your chances of getting a shot where everyone's eyes are open in a group portrait.
Even if you don't capture everyone's eyes open or their beaming smiles, having a range of shots taken fractions of a second apart means you can easily swap faces in Photoshop.
Tip 9. Posing group portraits
When you're arranging a group portrait, the first thing you'll probably consider is height, putting taller people at the back and shorter people at the front.
However, keep a close eye on clothing too. It's easy to miss clashing colors while you're focusing on everyone's height, and that will be more noticeable in the final picture.
To ensure everyone appears sharp, you need to use an aperture of at least f/8 with a wide-angle lens. But if you're taking an indoor group portrait, you'll need to use a high ISO in order to shoot at that aperture and get sharp handheld photos.
Photos may end up full of noise, and even then the shutter speed may not be fast enough for sharp images. A trick here is to arrange everyone in a line along the same focal plane, then the aperture doesn't have to be so narrow.
Tip 10. Family photo posing ideas
Think about how your arrangement of people in a group family portrait can tell a story about the relationship between the different members.
A simple idea is to place the emphasis on the patriarch or matriarch of the family, or the newest arrival. By grouping the rest of the family around them, you'll be able to create a clear focal point.
For larger family group photos, use furniture - whether that's a sofa for indoor shots or a gate for outdoor portraits - to break the group up. Sit the children in front of it and have the adults standing behind it.
Tip 11. Candlelight portraits
When you're taking photos by candlelight, you'll need to push the ISO to 1600 and beyond and work with large apertures if you're to get a fast enough shutter speed to freeze any motion in your model, the camera or the candle flames.
Turn your camera's flash off and use Manual exposure mode. Switch off any lights, take a meter reading from your portrait-sitter's face and let the rest of the room slip into darkness.
If you're planning a candlelit portrait shoot, use more than one candle. Not only will it increase the amount of light available to make the exposure, but it will allow you to spread the illumination for softer shadows.
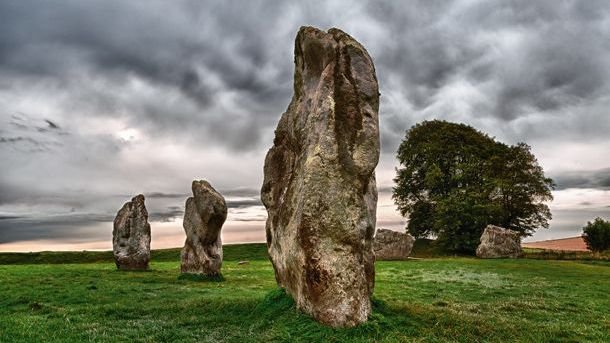
Landscape photography techniques
Tip 1. Using ND grads, strong Neutral Density filters and polarizers
Landscape photographers often carry a range of filters to help them solve exposure problems or achieve an effect that's difficult to recreate in photo editing software.
Although HDR photography and exposure blending in Photoshop have reduced the need for ND grads in the field, solid ND filters and polarising filters still have their place in the landscape pro's camera bag.
Solid Neutral Density filters reduce the amount of light entering the lens, extending shutter speeds for long-exposure landscape photography.
Polarizer filters remove reflections from the surface of water and shiny leaves, and boost the contrast between blue skies and white clouds.
Both of these effects are tough to pull off authentically in Photoshop. They're also more fun to do in-camera…
Tip 2. Level horizons
Most of the time you'll want the horizon in a picture to be level. This is especially true if you're shooting seascapes, otherwise the water will appear to be running out of the frame.
Your camera's Live View screen has a grid overlay that can be activated in the menu to ensure horizons are level, and it may also have an electronic level display that can be superimposed over the image.
If your camera lacks these features, use the rows of autofocus points you can see in the viewfinder as a rough guide to keeping the horizon straight.
Tip 3. Hyperfocal focusing technique
Depth of field is an important consideration when photographing landscapes. It's often desirable to get as much of a view - from foreground details to the distant horizon - to appear as sharp as possible.
To increase the depth of field, choose smaller apertures and then manually focus at the hyperfocal distance. This is the point at which the depth of field will stretch from approximately half the hyperfocal distance to infinity.
The hyperfocal distance changes according to the focal length and aperture being used, so we'd advise using one of the many useful hyperfocal smartphone apps available to do the calculations for you.
Tip 4. Long lens landscapes
It's instinctive to reach for a wide-angle lens when photographing landscapes, but a telephoto lens is also an essential part of the creative landscape photographer's camera kit.
A telephoto lens enables you to compress the elements of a scene, making the foreground and background appear closer together than in a photo taken with an ultra-wide lens.
Zoom in with a long lens and mountain ranges will seem more tightly packed, trees in a forests more densely populated.
Telephoto lenses can also make it easier to compose landscape photos as they capture a narrower angle of view compared to wide-angle lenses. Being able to simplify a scenic often makes for stronger pictures.
Tip 5. HDR landscape photos
High Dynamic Range (HDR) photography enables you to capture detail in all areas of a picture - from shadows through to highlights - that you normally couldn't squeeze into a single picture.
HDR photography essentially involves taking a number of photos at different exposures - either manually or using your DSLR's autoexposure bracketing function - and then blending the best bits of each exposure into a single image.
Enthusiast and semi-pro DSLRs like the Canon EOS 5D Mark III and the Nikon D800 have built-in HDR photography modes that do the blending for you in-camera. However, for more control and flexibility, do it later in specialist software like HDRsoft's Photomatix.
Tip 6. Long-exposure landscapes
Using a long exposure to photograph a landscape will cause any moving elements to be recorded as motion blur.
Waterfalls, waves and trees on windy days will all add interesting movement to landscape photos if you use a shutter speed of several seconds to photograph them.
Getting a slow enough exposure usually requires a small aperture, low ISO and low light. However, you can also achieve this in bright daylight by attaching a Neutral Density filter to the lens.
ND filters come in a range of strengths, each blocking the amount of light that enters the lens by a different amount.
Strong ND filters, such as the Lee Filters Big Stopper, will allow you to use extremely long exposures on even the brightest days, creating long exposure photos that stretch for many minutes rather than being over in seconds.
A 10-stop ND filter like the Big Stopper or the B+W ND110 can enable you to turn a crashing sea into a milk-smooth millpond.
Tip 7. Tilt-shift landscapes
Tilt-shift photography enables you to combine the sharpness of large lens apertures with the extensive depth of field you normally associate with small apertures.
This is achieved by using a tilt-shift lens, which can be both tilted (to control the plane of focus) and shifted (to correct any converging verticals).
However, by tilting the lens to give an ultra-shallow plane of focus and, you can make landscapes look like miniature models.
The most convincing tilt-shift landscapes combine an element of hardware (trains, boats, cars) and a raised shooting position to mimic the view of looking down at toys on a bedroom floor.
Tilt-shift lenses are expensive though, so why not create a fake tilt-shift miniature photo in Photoshop? The results can be just as effective.
Tip 8. Black and white landscapes
If you want to take great black and white landscape photos, shoot in color. By using your digital camera's raw picture quality setting rather than JPEG, you'll record a color image that you can convert to black and white later in photo editing software such as Lightroom or Photoshop.
Doing it this way means that you have full control over the black and white conversion, such as using dodging and burning techniques to make specific areas of the photo brighter or darker, split-toning the image or adding a color-popping effect.
Even though you're shooting in raw format, select the Monochrome picture style on your DSLR. This will give you a useful black and white preview of the image on the rear screen, even though you're recording a color image.
Tip 9. Panoramas
Instead of using an ultra-wide angle lens to try and squeeze an entire view into a single frame, why not try shooting a panoramic landscape photo instead?
To build a panorama, first take a series of overlapping shots with the camera positioned vertically - this will give you much larger panoramic image than if you use the camera horizontally.
Although specialist panoramic tripod heads are available, they're not always necessary, particularly if you're using software that stitches a panorama automatically. The latest version of Photoshop's Photomerge app is particularly adept at this process.
When you take the pictures that will be combined to make the panorama, use manual settings - manual exposure, manual focus and a manual white balance preset - to ensure consistency across every picture.
Tip 10. Infrared photos
Although you can create a fake infrared effect in Photoshop, nothing beats the thrill of doing it in-camera. Infrared landscapes can be in black or white or color, with both offering a very different look and feel.
For the best photos, it's worth considering getting an old DSLR converted to infrared. You won't be able to use it for regular color photography once the IR conversion has been carried out, but it's much more convenient than having to mess around with IR filters on an unconverted camera.
Tip 11. Minimalist landscapes
Usually black and white, often square and frequently realized with the help of Neutral Density filters, minimalist landscape photographs are more about what you leave out than what you leave in.
Telephoto zooms will help you to frame interesting details that would make for a great minimalist landscape. Look for single trees, lone clouds and isolated rocks. Fog, snow and featureless skies will provide a suitable blank canvas for this type of picture too.
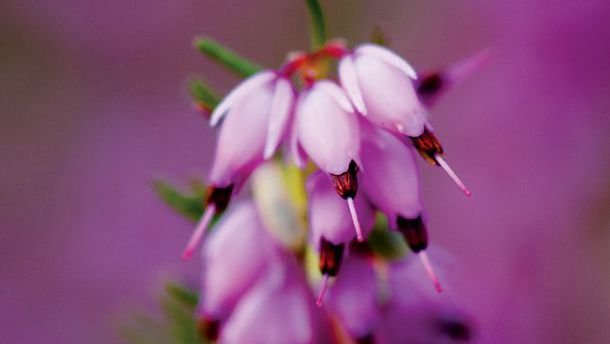
MACRO PHOTOGRAPHY TECHNIQUES
ip 1. Manual focus
Switch off autofocus when you're taking macro photos. Depth of field (DOF) can be measured in millimetres when you're shooting close-up details, so accurate focusing is critical.
Manual focusing is made easy with your DSLR's Live View. By magnifying the area you want to focus on on the Live View screen and turning the lens's focus ring, you can position the point of focus precisely.
Go easy with the focus ring though, as the difference between razor-sharp and just sharp enough is slight. You'll also need to use a tripod, as even small movements of the camera can throw the focus completely off.
Tip 2. Choosing the best aperture
To increase the depth of field - the area in front of and behind the subject that you're focusing on that appears acceptably sharp - you'll need to use small apertures.
Switch to Aperture Priority mode, as this will enable you to manually set a specific aperture. For small apertures, dial in large f-numbers, such as f/16 and f/22.
Avoid the highest f-numbers that your lens offers though, as this will lead to soft pictures as a result of diffraction (where the light is bent out of shape by the aperture blades in the lens).
If you can't get everything you want sharp at a single aperture setting, try using the focus stacking technique in Photoshop to increase the depth of field.
Tip 3. Using depth of field preview
The image you see through an optical viewfinder is always shown at the largest aperture available on the lens. Although this gives the brightest available picture, it makes it impossible to judge the depth of field at smaller aperture settings.
To be able to see what will look sharp and what will look blurred, press your camera's depth of field preview button.
This will stop down the lens to what's known as the working aperture. The image will get darker, so you'll need to let your eyes become accustomed to the change.
Depth of field preview also works in Live View. When combined with the Live View magnification control that allows you to zoom in and check focus on specific areas of the image, it becomes even more useful than checking DOF through the viewfinder.
Tip 4. Parallel camera trick
To make the most of what little depth of field there is, position your DSLR so that the back of the camera is parallel with the subject.
This is especially important when you're shooting frame-filling shots of flat subjects with strong patterns, such as leaf or feather. If part of the image is blurred it will ruin the impact of the photo.
Tip 5. Break the rules
You don't have to use small apertures to make an impact with macro photography - using the largest apertures available on your lens is just as an effective technique.
You'll need to be spot-on with your focusing though, as the wafer-thin depth of field leaves little room for error.
Using wide apertures and selective focusing to sandwich a sharp subject between a blurred foreground and background is a popular food photography technique, while completely defocusing a lens can lead to abstract blurs and beautiful bokeh - a trick that's often used in contemporary flower photography.
Tip 6. Sharper photos
Small apertures reduce the amount of light passing through the lens, and this can lead to slow shutter speeds and long exposure times.
Any slight movement - even the vibration caused by the mirror moving inside the camera - will increase the risk of blurred pictures.
To combat this, activate your camera's Mirror Lock-up function, or shoot using Live View (where the mirror is automatically locked up) and trigger the shutter using a remote release or the camera's self-timer.
Increase the ISO to get a faster shutter speed if necessary, although you'll get the cleanest looking shots below ISO 1600.
Tip 7. Make a DIY a reflector
It can be challenging to ensure a small subject is evenly lit, particularly if you're using a shorter macro lens to take life-size images - the camera will need to be very close to the subject and this can limit your creative lighting options.
A simple reflector goes a long way to solving this problem. You can make your own DIY reflector using a piece of aluminium foil: screw into into a ball and then flatten it out again to create a more diffuse quality of light.
Position it on the shadow side of a subject to reveal previously hidden details.
Tip 8. Using longer macro lenses
Macro lenses with longer focal lengths offer the same 1:1 magnification as those with shorter focal lengths, but do so at a greater distance from the subject.
Because you don't need to be as close, you get more room to position a flashgun or other light source near to the subject.
The extended working room also makes longer macro lenses a better choice for bug and insect photography, as you're less likely to disturb them.
Tip 9. Start early
If you're planning on doing some outdoor macro photography, set your alarm clock. It's worth getting up early, not just because that's when the light is invariably at is best, but because wind is usually at its weakest at this time of day.
Wind is the enemy of the garden photographer, as the combination of a slight breeze and the slow shutter speeds typically required for close-ups can lead to blurred images of flowers, plants, spider webs and other delicate objects.
For long-stemmed flowers and plants try using a specialist macro support . These are essentially clamps on the end of a small stand that can be used to hold a subject in place.
A DIY solution is to tie the stem to a cane that you've wedged into the ground next to the plant.
Tip 10. Create your own macro backgrounds
The quality of the background can make or break a macro photo. Macro lenses with longer focal lengths will enable you to restrict what makes it into the background of a picture, but distracting colors and out-of-focus highlights might still be unavoidable.
Build up your own collection of backgrounds that you can substitute when necessary.
Sheets of colored card, matte prints of blurred natural backgrounds you've previously taken - hell, even an item of clothing could provide a soft, even background that helps the subject stand out.
Tip 11. Make a macro home studio
One of the (many) appealing things about indoor macro photography is that it doesn't require a great deal of space. All you really need is a small area of table, kitchen worktop or floor, plus a tripod that can get you close to that surface.
#tipsandtricks #photography #takepicture
This post is great. My suggestion would be in the future to focus on one thing in photography, portraits, macro, or whatever and do one post on that. I would think you would get paid more for breaking up the content. But still great post.
Upvoted :)
thanks
Have an upvote ;)
love photography, still at basics but learning
lets learn togethere
This is directly plagiarized via copy/paste from a techradar.com article, originally written by Jeff Meyer last month. Unless you are the original author, this is not cool! Please consider in the future either properly attributing your sources in the future or curating original content of your own. #doyourpart
whats matter with you !!! i post what i like...