[How to master photography in 7 minutes] - Lesson #1 : Fundamental triangle
How to master photography in 7 minutes - Lesson #1 : Fundamental triangle

 - If you are lucky enough to be
 french, you can find this article that I translated especially for you there : https://steemit.com/fr/@blakscorpion/comment-maitriser-la-photographie-en-7-minutes-lecon-1-triangle-fondamental
Goal :
Welcome to this first lesson of photography. The goal of this post, and the following ones, will be to teach you the basics and essential things about photography, whatever your equipment, and whatever your skill. Moreover, to avoid boring you, I'll try to make everytime, a 7 minutes content (approximately), in order to let you assimilate data in an optimal way. The goal is to have fun learning things so I'll try to illustrate what i'm writing as much as I can.
If you are a master of photography, you won't learn a lot in the first courses (but you'll learn how to pronounce ISO !). Anyway, don't worry, we will increase in complexity step by step.
I have talked enough about this project. Let's start this first course.
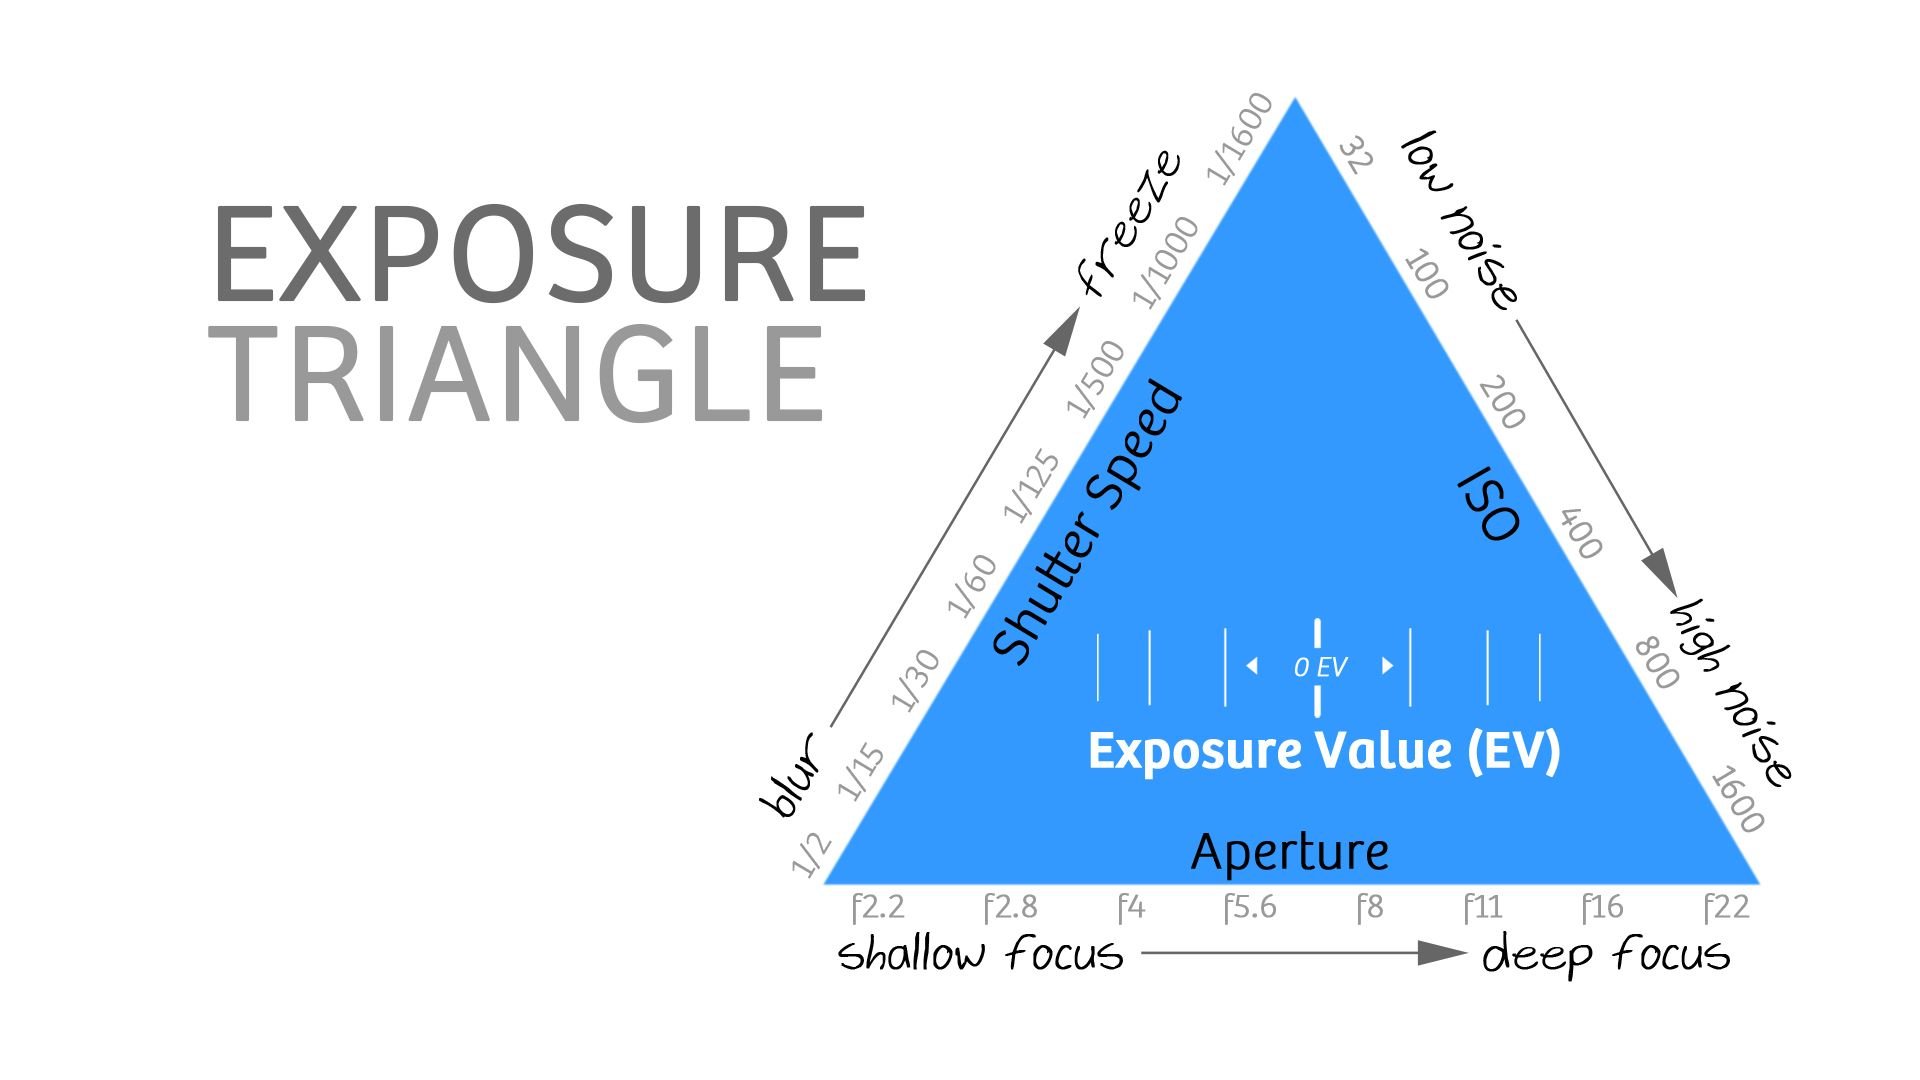
Lesson 1 : Fundamental triangle
Today as mentionned by the title, we are dealing with the fundamentals of photography. To understand them, you have to understand really quicky how is made a photograph.
Today, most of you are using a DSLR (Digital camera), or phones. When you open the camera app of your phone, or you clic on your DSLR's button to take a picture, your camera is opened for a short time, letting light entering and hitting the sensor.

Image of a sensor inside the camera
During the time when you are taking the photo (It generally is a short time, for example 0.05s), your camera will store data according to the amount of light that hit each part of the sensor, and then will be able to build the image of your subject as faithfully as it could be.
At this step, your image is not visible, it's just data ; a serie of 0 and 1 in your memory card. You'll be able to see it when the image will be processed (generally automaticly made by the camera if you shoot in JPG). Anyway, we will talk about the "processing" subject in another post of "How to master photography in 7 minutes".
- You just understood that light is everything, for a photographer. Without light the sensor can't build a picture...
And then, Jean-Michel start asking himself :
"What happen if there is not enough light for the sensor ??"
That's a really good question Jean-Michel ! And that's one of the main problems for a photographer, especially sport and wildlife. The shutter need to stay opened longer. It's the Speed parameter of the triangle.
(Shutter) SPEED :
If your camera is in automatic mode, or if you use the phone's camera, it will gather light untill there is enough to feed the sensor correctly, and build a decent picture.
And to do so, the sensor stay "opened" a longer time, to gather enough light. Unfortunately, if it stays open 1 second, your subject might have moved during this time. That's why when you take a picture in low light situation, like a pub, or your favorite wine cellar, it might end with a blurry image. I hope you are reassured now, it's not because you were drunk as hell that the picture was blurry, but just because of the low light area, that forced your camera to stay open longer.

Example of shutter speed too slow.
- If your shutter speed is too slow, you might end with blurry images.
Jean-Michel might ask :
"How to fix that ?!?!"
And that would also be a very convenient question, leading to the next part of my post : ISO (prononced "eye-so" and not "eye-ess-oh", because it's not a bloody initialism/acronym).
ISO :
ISO is a complex subject, that we will tacle in another post of "How to master photography in 7 minutes".
Basically, ISO is associated with a number (ISO 100 for example). The higher the number is, the higher the sensitivity of the sensor is.
To illustrate this easily, here is a metaphor : When you sleep, your eyes are adapted to the darkness, so you see easily the small amount of light. Your eyes are now, about 6400 ISO.
If I switch on the light right now, like a bloody bastard, you'll be dazzled, because there is too much light for your eyes, that are at this moment very sensitive. If you could be able to take a picture with your eyes, it would be completely white, and you'll yell to the coward who did that.

So it's exactly the same for the sensor of your camera. If you pump the ISO value, your sensor will be very sensitive, and will see more light. But if you shoot in a sunny day with a high ISO, it would be so bright that you wouldn't see anything.
And now, Jean-Michel might ask :
"That's great !! Let's put 6400 ISO instead of 100, for every low light situation !!"
That's a valid point, but unfortunately, there is the other side of the coin... The higher the ISO is, the grainier your picture will be...

Example of high ISO which leads to grainy images
- The more you increase the ISO value, the more noise you'll have on your image.
Hey Jean-Michel ! Don't leave !! I have a solution for you ! You won't have blurry or grainy image anymore :) I promise !
You remember the title of this lesson ? "Fundamental triangle". The triangle is composed of 3 sides which represents the 3 parameters to build a correct photograph.
We saw the ISO, which is one of the three.
We tacled the SPEED (speed during the time when the sensor open up and close)
And now the last one, the APERTURE !
Aperture :
In a camera, there is an aperture ring, which works like a dam. The more you open it, the more light you let go through.

Diaphragm, from "wide open", to really closed
I'm already earing what Jean-Michel is gonna say...
"It's perfect ! Let's open wide the aperture everytime, I won't have lack of light anymore, and no need to pump the ISO and have grainy images !!"
Well well well... You understood correctly the concept. But in photography, there is always the other side of the coin, as you start to understand... And aperture is no exception...
The more you open the diaphragm, the more you have light quickly, but the less you have depth of field.
Sometimes you don't need depth of field, for portrait for example, because you want the face in focus but not the tree 15m behind. But sometimes you need all the frame in focus, so you can't have the diaphragm wide open.
Here is an example with my cat : "Grisou". I shot this image at f1.4 (wide open) with a 50mm.

You can see on this image that the depth of field is very tiny, so 10cm behind the focus point is blurry.
- The more the diaphragm is opened, the shorter the depth of field will be.
That's it ! You have your fundamental triangle to understand how to build correctly a photograph !
As you saw, you can play with one or two of those settings to improve your shot, but it'll impact the third one. That's why it's called a triangle, because like a triangle, you can choose the size of 2 sides, but if you do so, you won't be able to choose the third side's size.
Example 1 : I want to photograph a fast bird. In that case I need to put my shutter speed at 1/1000s minimum. But when I do this, I won't have anymore light for my shot. So I open my diaphragm (aperture) at the maximum. And if it's not enough, I have to pump up my ISO. It'll be a bit noisy, but the shot will be sharp and not blurry.
Example 2 : I want to take a nice landscape with my camera. Unfortunately, I need the mountain (far away) in focus, but also the bush just in front of me (really beautifull bush, you know...). I have to close my diaphragm (aperture), but I won't have so much light, so I need to make long time shot. I take my tripod, and I make my picture. Fortunately, the mountain doesn't move, so I can let the sensor open as much as I want, it won't be blurry :)
With this first episode of "How to master photography in 7 minutes", you won't be instantly a better photographer, but you will understand why your photos are blurry or noisy.
Now you have the understanding, of the basic variables to create the photo that you want.
By the way, on dslr, you can set the values that you want for those parameters.
For example for Nikon you can configure with the buttons :
- Aperture with the button A.
- Speed of obturation with the button S.
- ISO value with the button ISO.
Even if it's something new for you, I invite you to try playing with those buttons step by step to improve.
We will anyway tacle with some more photography topcis in the next episodes :)
I hope you learned some things, and it wasn't too long.
Feel free to comment and suggest improvements, or any asking. I answer 100% of the questions.
Have a nice day !
Images sources :
https//www.pexels.com/photo/camera-photography-technology-lens-42066/
http//static.snapsnapsnap.photos/wp-content/uploads/2014/10/exposure-triangle.jpg
http//www.photographymad.com/files/images/shutter-speed-motion-blur.jpg
https//static.pexels.com/photos/74472/night-portrait-canon-flash-74472.jpeg
https//www.anyline.io/wp-content/uploads/2016/01/Versatile-School-of-Photography-Aperture-f-stops.jpg
https//www.flickr.com/photos/131351478@N07/20254109858/in/dateposted/
Fantastic article, thank you so much for the nice explanation. I love photography but this always confused me so much in the past. For the most part I take nice clear shots, but there is always room for improvement.
Thank you, I really appreciate :)
I hope you learned some stuff
@eileenbeach has voted on behalf of @minnowpond. If you would like to recieve upvotes from minnowponds team on all your posts, simply FOLLOW @minnowpond.
Thanks for this very useful article! Resteemed and upvoted of course.
Thank you, I really appreciate :)
Photography has really contributed positively many aspects.
woooow so helpful @blakscorpion even for me that I am worse than a beginner! ahahahahahah!!!
All the photos, and quote photos in my blog are taken by me, and I try to get better!!!
You can check my blog if you want, and any resteem, upvote, comment is welcome, as I plan to do steemIt part time! :D
thanks a lot!!!
have a great weekend!! :D
Well, the high iso explains why pictures I took several years ago on my small digital camera are always grainy at night.