(Tutorial con Imagenes) Piel de Porcelana o retoques en Photoshop! (Tutorial with Images) Porcelain Skin or retouching in Photoshop!
Hola chichos de la comunidad STEEMIT
espero que se encuentren bien por que les traigo
un tutorial de photoshop BUENÍSIMO que es para hacer perfecta la piel y que parezca de porcelana o tambien se le llama retoque facial, al principio puede parecer complicado, , así que vamos a comenzar!
traducion in inglish
Hello guys from the STEEMIT community
I hope you are well because I bring you
a GOOD photoshop tutorial that is to make the skin perfect and look like porcelain or it is also called facial retouching, at first it may seem complicated,, so let's start!
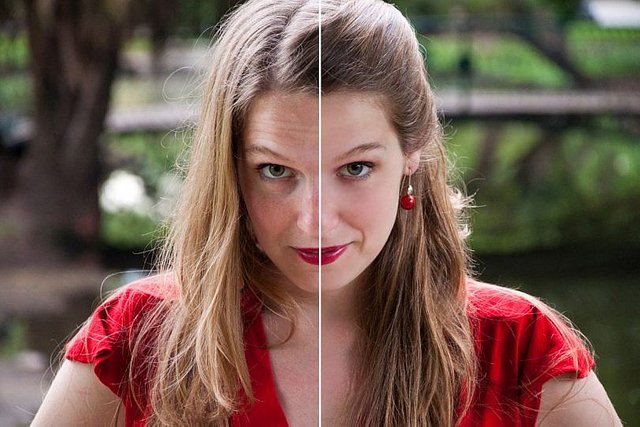
ANTES Y DESPUES
Paso 1: Eliminar lo más Importante con el Pincel Corrector
En primer lugar vamos a eliminar los accidentes más importantes (pliegues, arrugas, granitos, etc) con la Herramienta Pincel Corrector (y sólo los más importantes). Se trata de una utilidad que utiliza zonas de muestra para replicarlas en otra zona que queramos ocultar. Así que, con Alt presionado, selecciona una parte de la piel que apenas tenga imperfecciones, y luego suelta Alt y pinta sobre la zona que pretendes arreglar.
Step 1: Remove the Most Important with the Concealer Brush
First we will eliminate the most important accidents (folds, wrinkles, pimples, etc.) with the Concealer Brush Tool (and only the most important ones). It is a utility that uses sample zones to replicate them in another area that we want to hide. So, with Alt pressed, select a part of the skin that has hardly any imperfections, and then release Alt and paint over the area you intend to fix.
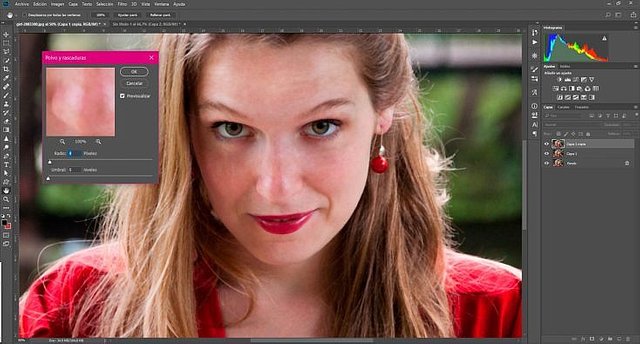
Paso 2: Filtro Polvo y Rascaduras
Duplica la capa (Capa > Duplicar Capa). Selecciona la capa que acabas de crear y sobre ella aplicas el Filtro de Polvo y Rascaduras (Filtro > Ruido > Polvo y Rascaduras). Los valores de radio y umbral variarán en función del tamaño de la imagen. El objetivo es que la apariencia de la imagen tras aplicar el filtro sea - más o menos - como aparece en la siguiente imagen. A modo de indicación, yo usé radio 4 y umbral 0 en una imagen de 4200px de lado.
Step 2: Dust and Scratch Filter
Duplicate the layer (Layer> Duplicate Layer). Select the layer you just created and on it you apply the Dust and Scratch Filter (Filter> Noise> Dust and Scratches). The radius and threshold values will vary depending on the size of the image. The objective is that the appearance of the image after applying the filter is - more or less - as it appears in the following image. As an indication, I used radius 4 and threshold 0 in a 4200px side
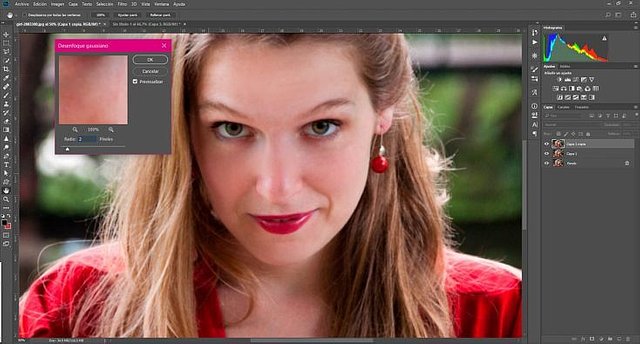
Paso 3: Filtro Desenfoque Gaussiano
Sobre la misma capa, aplicamos un filtro de Desenfoque Gaussiano (Filtro > Desenfocar > Desenfoque Gaussiano). No abuses con el radio. Yo, en este caso, elegí un radio 2.
Step 3: Gaussian Defocus Filter
On the same layer, we apply a Gaussian defocus filter (Filter> Blur> Gaussian Blur). Do not abuse with the radio. I, in this case, chose a radio 2.
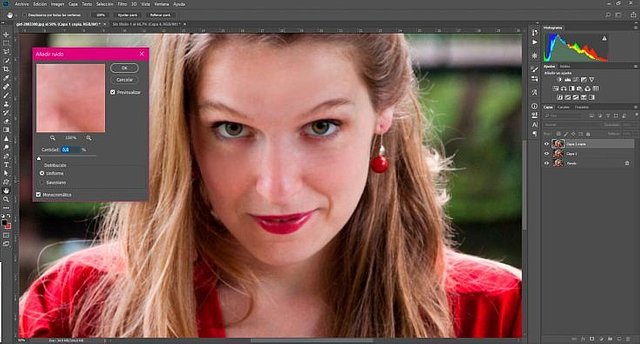
Paso 4: Filtro Añadir Ruido
Y como la piel, incluso la más perfecta que podamos imaginar tiene su textura, vamos a añadir un poquito de ruido (Filtro > Ruido > Añadir Ruido). En este caso, hemos usado unos valores de 0,8% de cantidad y de distribución uniforme. El efecto obtenido ha sido más o menos el siguiente.
Step 4: Filter Add Noise
And as the skin, even the most perfect we can imagine has its texture, let's add a little noise (Filter> Noise> Add Noise). In this case, we used values of 0.8% of quantity and uniform distribution. The effect obtained has been more or less the following.
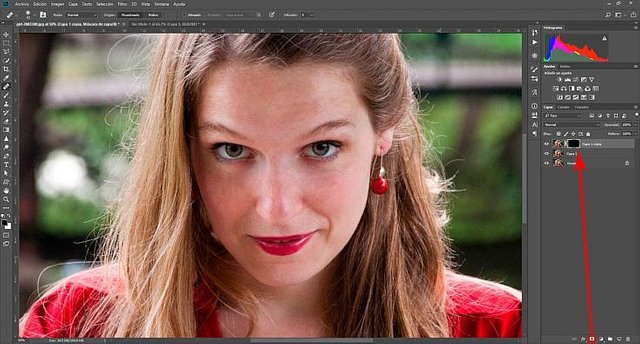
Paso 5: Máscara de Capa
Ya tenemos la nueva piel lista. Ahora nos las tenemos que ingeniar para aplicarla sólo en determinadas zonas, preservando el detalle original en otras. Para ello, Añadimos una Máscara de Capa (segundo mini botón por la izquierda en la ventana de Capas). Seleccionamos la máscara (es el rectángulo blanco que ha aparecido en la Ventana de Capas) y pulsaremos Contro (o Cmd en Mac) + I para invertir su color y que se quede completamente en negro.
Como sabes, en las máscaras de capa la zona negra es transparente y solo la zona blanca es la que se muestra. Por eso, en el siguiente paso pintaremos en blanco solamente las zonas que nos interese mostrar.
Step 5: Layer Mask
We already have the new skin ready. Now we have to engineer them to apply it only in certain areas, preserving the original detail in others. To do this, we add a Layer Mask (second mini button on the left in the Layers window). We select the mask (it is the white rectangle that has appeared in the Layers Window) and we will press Contro (or Cmd in Mac) + I to invert its color and to remain completely black.
As you know, in the layer masks the black zone is transparent and only the white zone is the one that is shown. Therefore, in the next step we will paint in white only the areas that we are interested in showing.
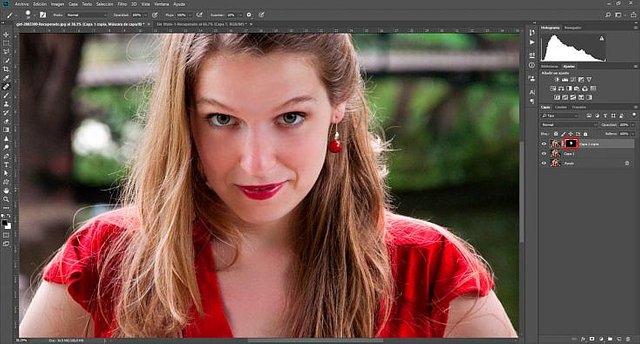
Paso 6: "Pintar" la Nueva Piel
La máscara de capa nos permitirá decidir qué partes de la capa en la que tenemos la nueva piel se aplican y cuales no. Para ello, teniendo seleccionada la máscara de capa debemos elegir la Herramienta Pincel y seleccionar el color blanco. Aquellas partes que pintemos de blanco tendrán la nueva piel. Las que no, mantendrán la antigua. Evita poner la piel nueva en detalles como pliegues naturales de la piel, cejas, contorno de la nariz, etc.
Step 6: "Paint" the New Skin
The layer mask will allow us to decide which parts of the layer in which we have the new skin are applied and which ones are not. For this, having the layer mask selected, we must choose the Brush Tool and select the white color. Those parts that we paint white will have the new skin. Those that do not, will keep the old one. Avoid putting new skin on details such as natural skin folds, eyebrows, contour of the nose, etc.
El Resultado
The result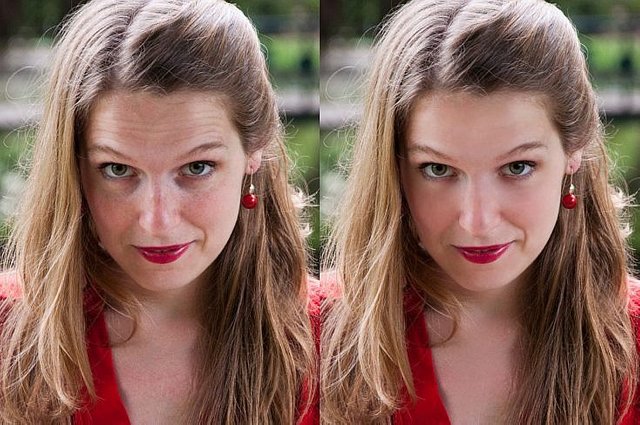
espero que se encuentren bien por que les traigo
un tutorial de photoshop BUENÍSIMO que es para hacer perfecta la piel y que parezca de porcelana o tambien se le llama retoque facial, al principio puede parecer complicado, , así que vamos a comenzar!
traducion in inglish
Hello guys from the STEEMIT community
I hope you are well because I bring you
a GOOD photoshop tutorial that is to make the skin perfect and look like porcelain or it is also called facial retouching, at first it may seem complicated,, so let's start!
ANTES Y DESPUES

Paso 1: Eliminar lo más Importante con el Pincel Corrector
En primer lugar vamos a eliminar los accidentes más importantes (pliegues, arrugas, granitos, etc) con la Herramienta Pincel Corrector (y sólo los más importantes). Se trata de una utilidad que utiliza zonas de muestra para replicarlas en otra zona que queramos ocultar. Así que, con Alt presionado, selecciona una parte de la piel que apenas tenga imperfecciones, y luego suelta Alt y pinta sobre la zona que pretendes arreglar.
Step 1: Remove the Most Important with the Concealer Brush
First we will eliminate the most important accidents (folds, wrinkles, pimples, etc.) with the Concealer Brush Tool (and only the most important ones). It is a utility that uses sample zones to replicate them in another area that we want to hide. So, with Alt pressed, select a part of the skin that has hardly any imperfections, and then release Alt and paint over the area you intend to fix.

Paso 2: Filtro Polvo y Rascaduras
Duplica la capa (Capa > Duplicar Capa). Selecciona la capa que acabas de crear y sobre ella aplicas el Filtro de Polvo y Rascaduras (Filtro > Ruido > Polvo y Rascaduras). Los valores de radio y umbral variarán en función del tamaño de la imagen. El objetivo es que la apariencia de la imagen tras aplicar el filtro sea - más o menos - como aparece en la siguiente imagen. A modo de indicación, yo usé radio 4 y umbral 0 en una imagen de 4200px de lado.
Step 2: Dust and Scratch Filter
Duplicate the layer (Layer> Duplicate Layer). Select the layer you just created and on it you apply the Dust and Scratch Filter (Filter> Noise> Dust and Scratches). The radius and threshold values will vary depending on the size of the image. The objective is that the appearance of the image after applying the filter is - more or less - as it appears in the following image. As an indication, I used radius 4 and threshold 0 in a 4200px side

Paso 3: Filtro Desenfoque Gaussiano
Sobre la misma capa, aplicamos un filtro de Desenfoque Gaussiano (Filtro > Desenfocar > Desenfoque Gaussiano). No abuses con el radio. Yo, en este caso, elegí un radio 2.
Step 3: Gaussian Defocus Filter
On the same layer, we apply a Gaussian defocus filter (Filter> Blur> Gaussian Blur). Do not abuse with the radio. I, in this case, chose a radio 2.

Paso 4: Filtro Añadir Ruido
Y como la piel, incluso la más perfecta que podamos imaginar tiene su textura, vamos a añadir un poquito de ruido (Filtro > Ruido > Añadir Ruido). En este caso, hemos usado unos valores de 0,8% de cantidad y de distribución uniforme. El efecto obtenido ha sido más o menos el siguiente.
Step 4: Filter Add Noise
And as the skin, even the most perfect we can imagine has its texture, let's add a little noise (Filter> Noise> Add Noise). In this case, we used values of 0.8% of quantity and uniform distribution. The effect obtained has been more or less the following.

Paso 5: Máscara de Capa
Ya tenemos la nueva piel lista. Ahora nos las tenemos que ingeniar para aplicarla sólo en determinadas zonas, preservando el detalle original en otras. Para ello, Añadimos una Máscara de Capa (segundo mini botón por la izquierda en la ventana de Capas). Seleccionamos la máscara (es el rectángulo blanco que ha aparecido en la Ventana de Capas) y pulsaremos Contro (o Cmd en Mac) + I para invertir su color y que se quede completamente en negro.
Como sabes, en las máscaras de capa la zona negra es transparente y solo la zona blanca es la que se muestra. Por eso, en el siguiente paso pintaremos en blanco solamente las zonas que nos interese mostrar.
Step 5: Layer Mask
We already have the new skin ready. Now we have to engineer them to apply it only in certain areas, preserving the original detail in others. To do this, we add a Layer Mask (second mini button on the left in the Layers window). We select the mask (it is the white rectangle that has appeared in the Layers Window) and we will press Contro (or Cmd in Mac) + I to invert its color and to remain completely black.
As you know, in the layer masks the black zone is transparent and only the white zone is the one that is shown. Therefore, in the next step we will paint in white only the areas that we are interested in showing.

Paso 6: "Pintar" la Nueva Piel
La máscara de capa nos permitirá decidir qué partes de la capa en la que tenemos la nueva piel se aplican y cuales no. Para ello, teniendo seleccionada la máscara de capa debemos elegir la Herramienta Pincel y seleccionar el color blanco. Aquellas partes que pintemos de blanco tendrán la nueva piel. Las que no, mantendrán la antigua. Evita poner la piel nueva en detalles como pliegues naturales de la piel, cejas, contorno de la nariz, etc.
Step 6: "Paint" the New Skin
The layer mask will allow us to decide which parts of the layer in which we have the new skin are applied and which ones are not. For this, having the layer mask selected, we must choose the Brush Tool and select the white color. Those parts that we paint white will have the new skin. Those that do not, will keep the old one. Avoid putting new skin on details such as natural skin folds, eyebrows, contour of the nose, etc.

El Resultado
The result
In the fight of Humans vs Bots, @megabot defended you with 14.08% upvote courtesy of @elemc!
Support @Megabot by delegating SP to the bot and get a part of 98% of @Megabot's profit.
Direct delegation links : 10 SP || 50 SP || 100 SP || 500 SP || 1000 SP || Any other amount of SP
Join our discord group here.
Thank You !
If you donate 1 SBD or STEEM to @a-0-0 I will resteem your last post to over 72,500 followers on my 2 accounts @a-0-0 and @a-a-a
Siempre me han gustado los tutoriales de photoshop, me gusto la manera en que lo explicaste, genial!