Easy Step-by-Step Image Editing - Re-Angle & Fill-In Tricks for Steemit Posts

Have you ever come across an image to use for your post and thought to yourself 'Ah - yes! That looks cool but I only need part of it - and the angle is a bit off...'?
Well here is a quick editing guide that will save you a fair bit of time searching for the 'perfect' image.
I shall be covering the following:
- Determining suitability of an image
- Editing with Paint.NET
- The Select Box Tool
- The Move Selection Tool
- The Move Pixels Selected Tool
- The Clone Tool
- And a cool time-saving hint or two along the way.
If you ever wanted to know why the US presently imprisons over 2.15 million people - here is your explanation! Your resteem would help me spread the word - thanks!

With that done and mentioned - lets get to it!
Oh... yes... I'd recommend that you download Paint.NET (free), although if you already use other equivalent applications then you may still find the tricks mentioned below to be useful.
Choosing an Appropriate Image
When one is deciding whether its appropriate to manipulate an image one needs to take a few things into consideration.
Is the image section that one is interested in large enough? If it is not then editing the image down to it may result in a poor-quality final result. Likewise if the image is very complex in its boundaries (particularly the part that you want to retain) then such might also prove more of a headache than its worth.
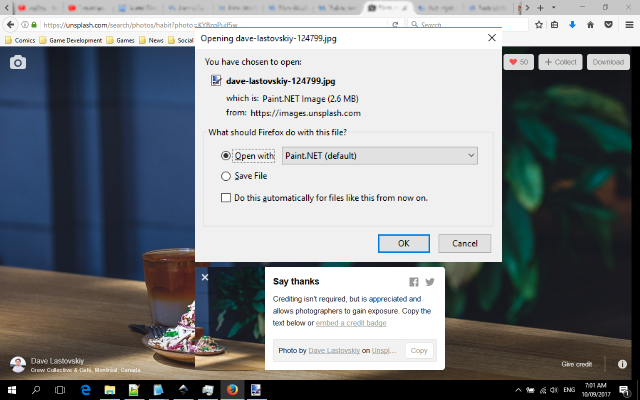
The following image has simple boundary areas and is large.
Its hosted on Unsplash.com - which is a very good source for high quality photographs, free of charge and with optional attribution.

Once you see an interesting image, just click on the image link concerned - and you'll be taken to the larger preview screen - where you can not only download or open the image but also get handy scripts to credit the photographer (always a nice thing to do).
Keep in mind that the 'badge' attribution html is not fully compatible with Steemit - so copy-paste the simplified text further down.

Eh... this image was way too good! While the plate was slanting the lines of the wall were perfectly vertical - meaning that to straighten the plate I'd have had to throw the rest of the image out of alignment.
More trouble than its worth. I'll swap it out for another image.
Once you do find a suitable image click the download button to start a process to either save to disk or open in your default art program assigned to the file type being opened.
Since I plan on editing it anyway - I just went ahead and opened it.
Welcome to Paint.NET
Arguably one of the easier options out there, Paint.NET is a rather powerful raster (pixel-based) graphics application.
- It is free of charge
- It is quite full-featured without plugins
- can feature expanded capabilities with plugins
- has a relatively light footprint on the system's memory
- and, most importantly, is quite easy to use
Which suits our purposes!
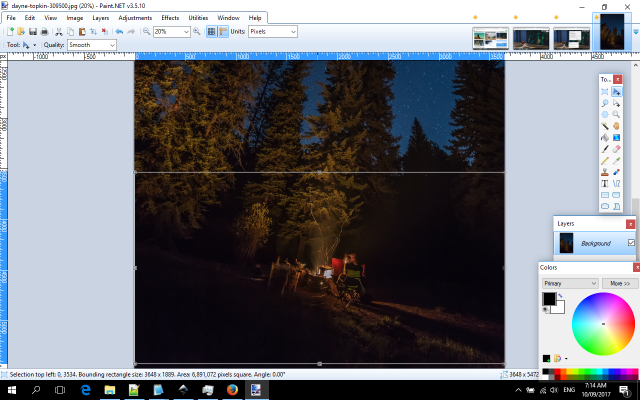
Selecting & Soft-Editing Selection Areas
By 'soft-editing' a selection area, I refer to creating and manipulating a selection area without manipulating the actual image itself.
To create a selection area one can select the  'Selection Box' Tool from the tools panel.
There are other ways to select an area (ovals, manual and "magic-wand") - but lets keep things simple.
Then one left-clicks, and holds, one extremity of the area that one is interested in keeping, and drags to the other extremity that one desires, releasing the mouse button when satisfied.
One can adjust an area selected through use of the  'Move Selection' Tool.
One can adjust the length or breadth of a selection by left-clicking and dragging the various points at the boundaries of the selection area.
However what we really want to do here is to rotate the selection - the focus point of my image is leaning to the right and I think would look better straightened out - for the purposes of my new image.
To rotate one can right-click, and hold , a boundary point, and use one's mouse to drag and rotate the area of selection as desired.
Side-note: One can hold the 'Shift' keyboard button to have rotation limited to gradients of 15 degrees.

Hard-Editing - Selection Area Pixels
OK. They don't really call it 'hard-editing'.
By 'hard-editing' I refer to processes that will modify the image that you are working on.
One tool that we shall be using to this effect is the  'Move Selected Pixels' Tool.
This, like the previous tool, manipulates the selection area (or the entire image area if no selection is active), with the difference that it also moves around the pixels within that area.
One can expand or move around selections - but for our purposes what we really want is to rotate the contents of the selection area, so that the image is level with the horizontal plane.
To rotate a selection you need to change to the 'Move Selected Pixels' Tool - and then right-click, and hold, one of the boundary points of the selection while moving your mouse to adjust the rotation.
Rotate until the selection is oriented to satisfaction.

Short-Cut Option
If one wants a simple quick image then there is an easy way to skip a lot of work here. By creating a new selection box that encompasses all the details needed while leaving out any blank areas, one can simply have 'that' be the image.
Once you change to the 'Selection' tool, and select your desired area, go to the 'Image' drop-down menu. Select the 'Crop to Selection' option.
There! You have an image ready to save (or copy-and-paste directly to your post) and use.
Of course - you might want to keep more of the image but are unable to avoid including blank areas in the picture. Very well. Let talk about the "long" way.

Fine - The Long Way it Is
You will notice that there are several blank areas that need to be addressed.
Lets address the top-right corner first.
Select the 'Selection Box' Tool from the tools panel. We can click and drag to create an elongated selection box of sufficient size.
Switching to the 'Move Selection' Tool, we can now rotate and adjust the length and breadth of the selection to align with the gap to be patched.

Now that the selection box is aligned, 'copy' the current selection.
Switch to the 'Move Selected Pixels' Tool.
Select the 'left-middle point of the selection box.
Why the left-middle point? We are going to 'peel' the area over itself such that it creates a mirror image of itself in the section being covered. This has the advantage of being assured a perfect blend of old and new sections (although often less suitable for complex borders).
Now pull towards the right until it completely covers up the blank area in the corner.
Notice that by copying an area width roughly consistent with the width that needs to be covered I have also ensured that little details like picture grain-width will also be consistent - and therefore show even less - if at all.

Excellent!
Now 'paste' the patch.
Its a perfect fit, this time around. No further adjustment needed. Hurray!

Now lets deal with the bottom-right corner.
Repeat the process used for the other section. Select, move the selection (and rotate and adjust as necessary), and move it to be close to the gap to be patched.
Select the 'top-middle point of the selection box and pull downwards until it completely covers up the blank area in the corner - just as last time.
Then 'paste' the patch.
Oops! It looks like there might have been a pixel or two's imperfection this time. I 'could' undo and retry - but lets take care of it.

Touching Up the Flaws
While it is not strictly necessary here, lets talk about the  Clone Tool.
This tool is very important for smoothing over imperfections following an edit.
To use it, look at the area that you want to correct. Now, look at the vicinity for a section that makes you ask yourself "Wouldn't it be great if I could move 'this' there?".
In essence, the clone tool is a serial 'copy here to there' tool - and where 'here' and 'there' are, respective to each other, is something that you can decide on-the-go.
When you first select the Clone Tool you should notice that your pointer has become a circle. If this doesn't appear clear then adjust the Brush Width option (just a little down from (but not in) the 'View' menu) accordingly - try brush width 50 unless you have a smaller image.
Now - hover over the 'source area' you would like the imperfect 'destination area' to look like.
Holding down the 'Ctrl' button and left-clicking the area you will notice that the location is selected. You can release the 'Ctrl' button. Now that you have selected your point of origin you will need to select (and clone to) your 'destination' area with care - as once you simply left-click another area, both source area and destination area will move around respective to your mouse pointer.
Should you wish to change the location of the source and destination areas - simply repeat the process of pressing 'Ctrl' with the left-click while hovering on the desired 'source' area - and then find a suitable 'destination area'
In the below I took advantage of the low definition of that part of the image and aligned it with the line of imperfection. Then I simply 'munched the line up 'Pacman-style', and also munched a tiny bit of the corner section too.
I could have instead used the above trick with selection areas - but such is not always optimal. You will find cases when cloning makes more sense.
One more thing: You can set the transparency level of your cloning by adjusting the transparency level of the current color selected in the color palette. Useful for subtle cloning.

Now.. switching to the
'Move Selection' Tool...
Select a nice long strip of area, then right-click and drag upon a corner point to rotate the selection such that it runs parallel to the offending gap - and adjust to bring it very close to (but not necessarily at) the edge of the gap. You may need to re-adjust rotation once or twice.

And.. switching to the
'Move Selected Pixels' Tool...
Just drag the box down from the middle-bottom point - just enough to cover the offending gap - and its done!

And Resizing

I am a bit of a stickler when it comes to evening out numbers. Using the 'Canvas Size' option from the 'Image' menu I am able to just slightly trim the image down to the size that I want - in this case 3800 x 1800.
Result!

And there you have it! An image that has been successfully converted from horizontal to vertical orientation without unsightly obvious editing at the edges. Of course - some images are easier to edit than others and practice and experimentation makes perfect.
Now I'd just resize to something I'd use... like 600x300 pixels.

Perfect for my kind of title image - though I'd personally opt for smaller (400x200 pixels) - since that is more suitable for text blocks that I don't want to be swallowed by overly large images - but for that I'd probably use the 'canvas size' rather than 'resize' tool - so as not to lose too much of the important central detail.
Experiment away!
Well! There are a couple of tricks that should help people interested in image editing to do so with relative ease, especially if the person concerned has had very little experience.
If you found this post interesting and would like to share this with your friends and followers then a resteem couldn't hurt and would be appreciated.
And if you have feedback for me then feel free to share your views in comments.
Lets have a discussion down below. A civil conversation 'can' go a long way.
Sincerely,
Previous Post: How the War on Drugs is Fundamentally Flawed