The Benefits and Practice of Sight Size
The Benefits and Practice of Sight Size
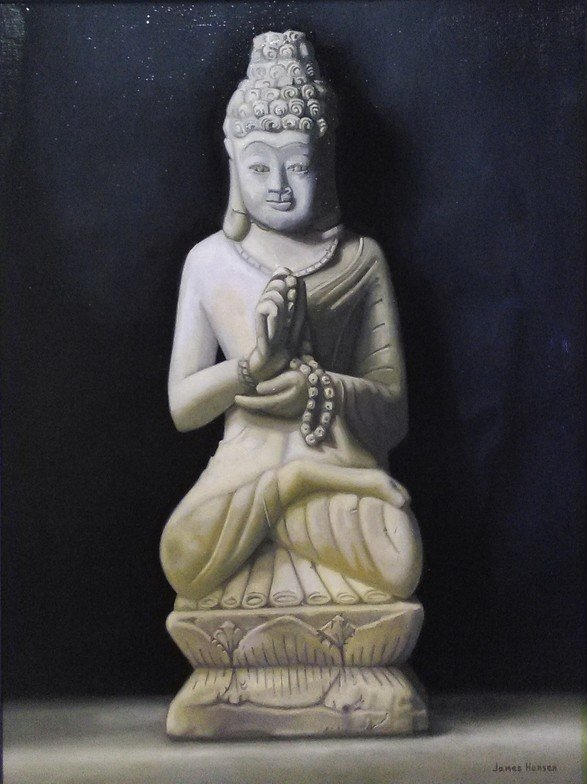
Namu Myoho Renge Kyo
18" x 24"
- oil on linen
Greetings Everyone!
In this post I thought it would be a great idea and wonderful addition to some of my previous classical academic posts to discuss the benefits of using the sight size method and how to go about incorporating the practice into your work.
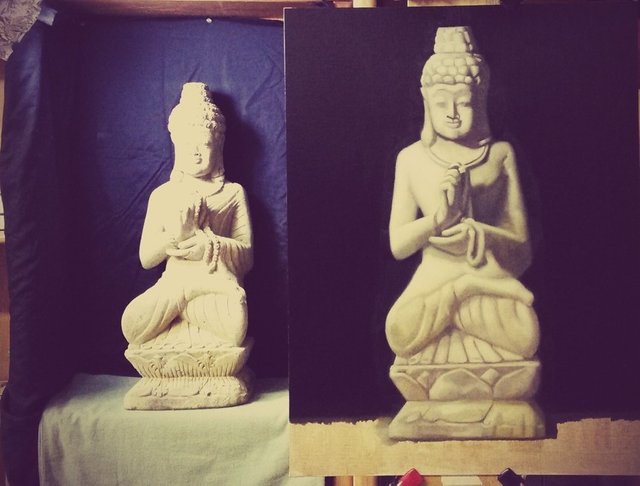
So in the efforts of illustrating its practice, strengths, and even potential weaknesses, I thought it would be best to use this buddha statue painting I finished a couple of years ago using the sight size method.
First off, before I begin describing the technical application of sight size, I feel that I must point out the differences between sight size and the method I was primarily taught while attending The Aristides Atelier which is known as “comparative measuring”.
While some schools of thought find sight size to be a superior reliable form of measurement and drawing, I have found that in studying in the atelier, these meritable aspects of sight size can only truly be appreciated and executed with maximum effectiveness when the principles of comparative measuring are thoroughly understood.
I have found that in drawing and painting when the skills of comparative measuring are predominantly practiced, when one decides to work in sight size a deeper understanding and appreciation occurs.
When working with comparative measuring, I do admit that there will be a lengthy learning curve in the beginning, but in the long term I can promise you that in mastering this working practice you will achieve a stronger perception in spatial relationships and create more qualitative work founded in strong draftsmanship.
Comparative measuring does have its freedom. Say for example when working on a still life or figure, the success of the picture isn’t entirely dependent upon the distance between the subject and the easel.
When working sight size, in order to achieve accuracy and success, the subject and the easel have to remain in the exact spot until its completion is achieved. When working comparatively, you do have a relative window of choice in deciding how small or large you want your drawing or painting to be as your constantly comparing everything to everything else within the picture.
When working in sight size, you are “locked” into a particular size, but the advantage here is that mistakes are seen quicker and corrections can be made faster and more efficiently.
However, if the possible and unfortunate event were to occur where your easel or subject were to have moved, you would have to use your painting or drawing as the anchor of comparison to readjust. Believe me..that is no fun at all.
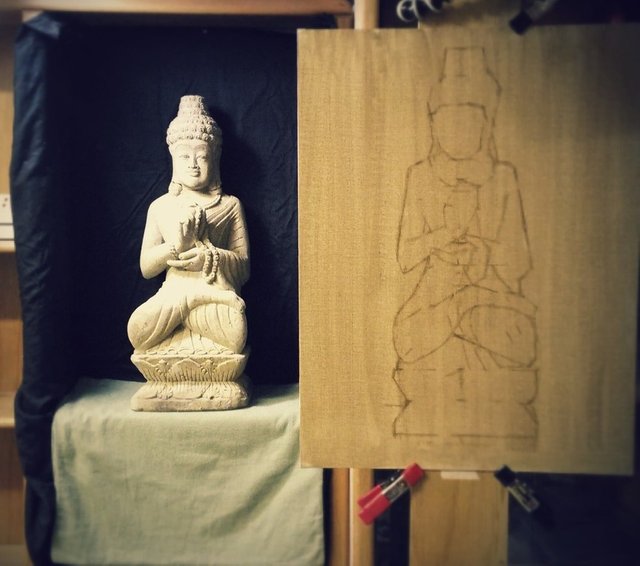
As you can see here, I began the painting with a toned linen panel with raw umber and started the armature drawing in paint.
Upon setting up the statue and lighting, I had to initially decide how large the final painting was going to be and how far back I was going to be standing from my easel in order to take measurements. The beginning steps in sight size are absolutely important in order for this to work.
As far as my easel was concerned, I ended up having to push it back as far as possible which basically made its place side by side the buddha. This is very good way of working. I then decided on a spot where to stand that was several feet back. I marked this spot with a piece of tape as well as the easel. These spots marked on the floor are COMPLETELY crucial!
At this point I’d like to add that you’ll be getting quite an amount of exercise walking back and forth from this spot to your easel! Throughout the entirety of the painting, I constantly referred to this spot before making any adjustments.
Under no circumstances should you change the distance between you and your easel. You have to make sure you’re going to commit to this distance all the way through the work. ALWAYS remember this!
So upon making my initial measurements, I stood behind the tape I marked on the floor, and with my arm extended and locked with my skewer held horizontally(don’t forget to close your non-dominant eye), I slowly moved my arm in a perfect straight line to the right, took note of where the skewer landed in my line of sight, and then walked up to the easel marking my top, bottom, and mid points of the buddha statue onto my painting with horizontal reference lines.
In the beginning yes this may seem tedious, but take note in that you’re establishing the foundation of the painting for which the rest of your efforts will rely upon. I can promise you in that the more accurate these measurements are in the beginning, the least amount of problems you’ll be facing in the long term.
While creating these initial tick marks, I also paid special attention to certain “key points”, like the edges of the feet, or the bottom of the right elbow, or the bottom of the chin for example. I repeatedly made these reference marks in the same fashion.
In the midst of all of this...don’t forget your centerline! In establishing your centerline in the beginning will help you easily transfer these abstract shapes directly onto your working surface. REMEMBER; always go back to your previously decided spot before deciding to make any marks.
Continuing to establish the drawing with more horizontal, vertical, and various diagonal straight lines are done essentially the same way with the end of your skewer, your thumb, and your arm extended and locked. So basically what you’re doing is taking these abstract and simplified shapes, and immediately transferring them over directly to your painting surface.
When moving your eyes back and forth from your subject to your painting, I can imagine by now you can see how any mistakes just pop right out without any second guessing huh?
As of now you’re probably getting the gist of how all of this works right? I know it might take a little while for our brains to adjust working in this way, but I can assure you it can become a faithful tool on your proverbial drawing belt.
As I continued to develop my block in of the buddha statue, I was constantly aware in that I want to keep it simple, just like when you’re creating a block in with comparative measuring. You always want to keep in mind that the smaller shapes are subordinate to the larger shapes.
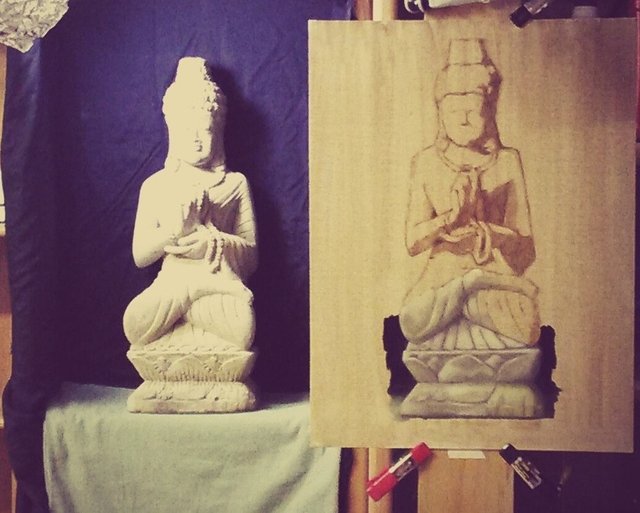
After I finished the armature drawing, I then began massing in the shadow shapes with thinned raw umber and let that dry before I began form painting in color which I began the next day. The palette I used for this painting was a simplified one consisting of titanium white, yellow ochre, venetian red, and ivory black.
When I began the form painting stage, of course I started at the bottom, and like a sort of like a human Xerox machine I methodically worked across and upwards connecting and breaking down the forms into progressively smaller forms.
As you probably could imagine, it’s all too easy to get carried away and lose sight of the bigger picture. Just like those initial block in measurements, I still had to walk back and forth, a couple of brush strokes at a time making sure that all of my preceding steps are maintaining their accuracy.
After finishing the statue, I then began massing in the cloth in the background and then finishing it off with the rest of the surrounding ground plane.
ǝɹǝɥ sɐʍ ɹoʇɐɹnƆ pɐW ǝɥ┴
Congratulations! This post has been upvoted from the communal account, @minnowsupport, by jameszenartist from the Minnow Support Project. It's a witness project run by aggroed, ausbitbank, teamsteem, someguy123, neoxian, followbtcnews, and netuoso. The goal is to help Steemit grow by supporting Minnows. Please find us at the Peace, Abundance, and Liberty Network (PALnet) Discord Channel. It's a completely public and open space to all members of the Steemit community who voluntarily choose to be there.
If you would like to delegate to the Minnow Support Project you can do so by clicking on the following links: 50SP, 100SP, 250SP, 500SP, 1000SP, 5000SP.
Be sure to leave at least 50SP undelegated on your account.
Congratulations! Your post has been selected as a daily Steemit truffle! It is listed on rank 3 of all contributions awarded today. You can find the TOP DAILY TRUFFLE PICKS HERE.
I upvoted your contribution because to my mind your post is at least 6 SBD worth and should receive 213 votes. It's now up to the lovely Steemit community to make this come true.
I am
TrufflePig, an Artificial Intelligence Bot that helps minnows and content curators using Machine Learning. If you are curious how I select content, you can find an explanation here!Have a nice day and sincerely yours,

TrufflePigYour post was upvoted by the @art-venture account after manual review and included in Art-Venture magazine. The upvote and support of Art-venture magazine would greatly appreciated!