How to Make 1 Gallon of Mead Like a Modern Viking – Part 1

Mead is the traditional alcoholic beverage of the Norse and Germanic folk during the so called “Viking age”. It's often used as a ritual drink in Germanic heathen rites. Coincidentally, coming up we have midsummer celebrations and we had no mead, so given we have a little time we've got started on our brew and want to show you how to make it.
First, please note that this is the cheap way of doing it with store bought materials. There are much deeper and better ways of making mead... such as getting your yeast from the wild, and adding other things to taste. This method is our quick and cheap method, since we're running a bit behind and only have about a month.
Materials
Here is what our 1 gallon brew looks like after about a week. It's a very basic concept, and easy to use.
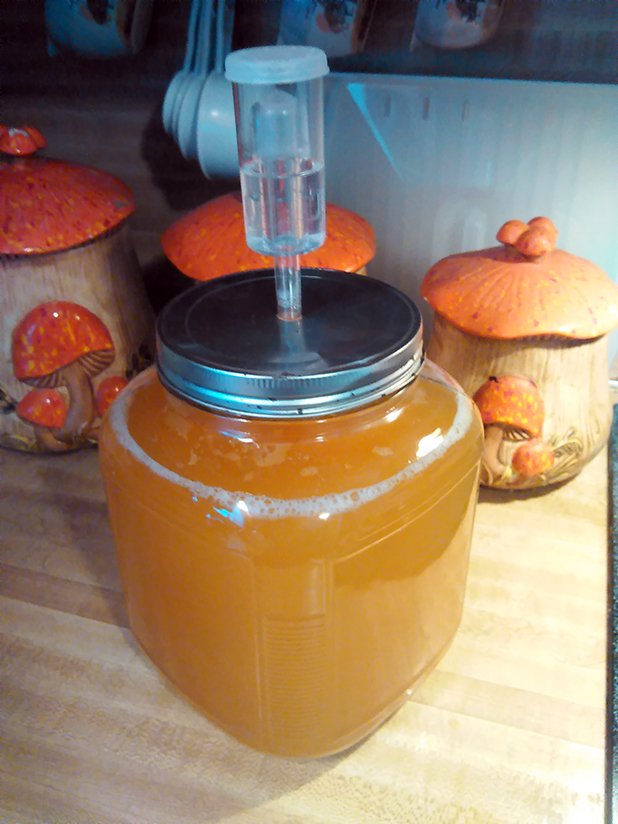
This contraption is more than enough... In fact, at the end I'll tell you how to make an even cheaper set up.
For my set up I'm using to make one gallon of mead:
-
1 gallon glass container – The one I'm using is a cracker jar I had around not being used. If you google “1 Gallon Brewing” you will see you can use all kinds of things to brew in. Glass is the best. Using something else may change the taste.
-
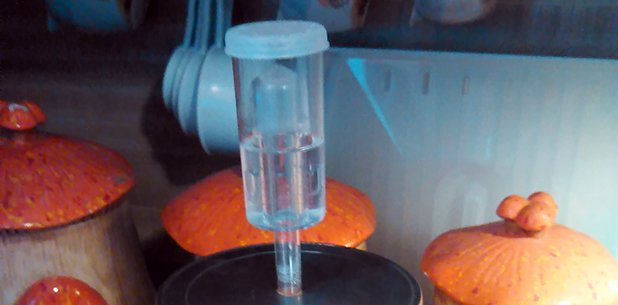
1 airlock – there are all kinds of airlocks. They only cost a dollar or two on Ebay.
-
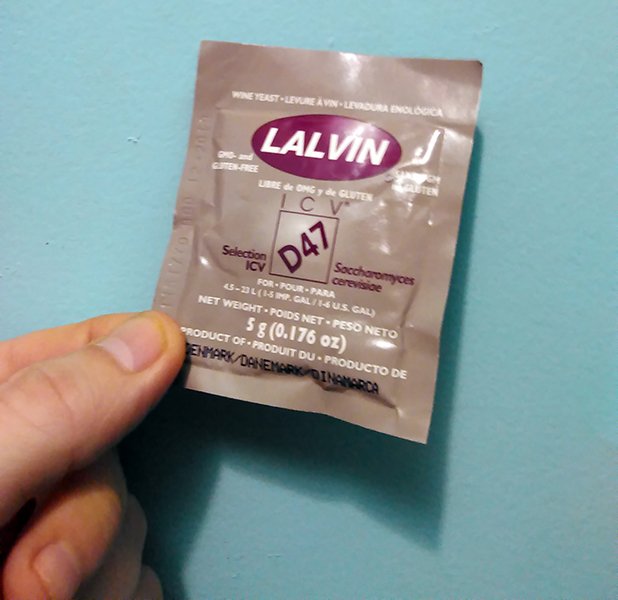
1/3 packet of Lalvin Yeast ICV D-47 – Buy packets of it for a few dollars on Ebay.
-
1 quart of organic honey
Instructions
-
Install the airlock to your gallon container. In my case I had to drill a hole into the lid for the airlock tube to fit snug into. If you have a gallon jug you may just need to screw on the cap that airlocks come with. Learn the basic of the airlock is to allow gases to escape without letting anything get into the container. Take the lid off to add brew ingredients.
-
Empty all of your honey into the clean container as well as your 1/3 packet of yeast. If you add more than 1/3 of yeast, this is ok as you can't really add too much.
-
Add clean water to about an inch below the lip. Stir up the mixture till all mixed up.
-
Seal up the lid. Sit in a dark place.
That's it! After two weeks the brew will be alcoholic, but to get it to a decent time waiting to a month is best to rack off the brew. If we REALLY wanted this brew to be it's best we would wait 6 plus months which can involve a hand full of racks. We'll just do one on this brew to use it for midsummer celebrations.
After you've mixed everything up, and it's stored away after a day or so it'll start to bubble from the yeast. That yeast gas will need to escape. A few days before this photo the bubbles were to the brim... so after a week it gets to this point. At the bottom you'll see dead yeast, and next time we'll rack the mead to get rid of that.
That's what we'll do in about a month from now to finalize this tutorial. So, stay tuned for that.
A cheaper option for your gallon brew kit
Just to give you an even cheaper way to brew – instead of a glass gallon container you could simply use a clean plastic milk jug. The only thing is I've always noticed the taste is not as good. And instead of buying a brewing airlock, you can simply get a balloon and poke holes in the tip then strap that onto the lid. The balloon will fill up, and you can burp it to release the gasses.
Part two we'll show you how to rack your mead after a month of fermentation, and also bottle them up.
Thanks for reading, and again this is just one way of making mead. We'll explore other ways later. Hope you get something out of this, and Skal!!!
Hail the gods, and hail the folk!! - Heathen Howl
You may also want to read: How to Drink Hallucinogenic Beer Like a Viking Shaman
Go back to: http://odinseye.media.

-
I wonder how it taste like
Thank you for your comment. Skal!
It's delicious. You'll never want to drink anything else once you have it. haha
Other folks took a ship, we got here by row, set the sail on the dragonship and off to sea we go! Mead to keep you warmer and stroke the water fine. Just a bunch of Vikings beating strokes in time.
Great post @dailybitcoinnews I always wanted to now how to make Mead and this looks good. does rack mean to distill, or does one just filter it? Can't wait to find out
Its the term for filter, mead is not distilled. Basically you want to get rid of the yeast sediment. Some people filter through a cloth or something, others just let it settle ( optionally using finings like isinglass or similar to help) and siphon the liquid to a new container.
The hardest part about making mead is the patience required for the ageing process. I still have bottles at a friends house that are now 4 years old. The longer it is left, the better it gets - and yes, you can "bottle age" mead as opposed to leaving it in a demijohn or similar :)
I only rack once usually, and then I drink it. I want the herbs and spices in my mead for the health benefits, so I do not clarify it as so many other people seem to want. The dead yeast isn't going to hurt us. ;-)
I thought so, I did make a really cheap still once out of a deep pot with a funnel and a tube coming out of it. The pot was covered with saran wrap with a weight over the funnel and it worked well.
Thank you for your comment. Skal!
Thank you for your comment. Skal!
Skal!
Just a note on D47 yeast, it's temperature tolerance caps at 68 Fahrenheit. Any temperature above that and you risk producing off flavors. A more tolerant wine yeast is 71b-1122 which has a tolerance up to 86 Fahrenheit.
That said, I prefer D47.
Skål!