( )
)

 Using courses in video tutorials.
Good Day to All Those digital and traditional artists of the steemit community, after a long period of time disconnected from the matrix, (Hahaha old movie) for obvious technical reasons, I prepared mainly to publish a little of the exercises and learned throughout what I have been able to assimilate from the Blender courses that I have been doing. For this I have used 2 versions of Blender relatively close (because my computers are mostly quite obsolete), after several tested versions the closest I managed to run was version 2.76b, which runs on old Intel Dual Core with Graphical integrated Intel Graphis quite old also, With this I managed to enable for my practices to an even older equipment an old compaq presario 352 intel celeron D + 32Bits .ATI Radeon 200 integrated. That I extended the RAM to 2 gigabytes although I could not do the same with his old 80GB hard drive and Windows XP.
At the moment my intention is to learn again what I was doing in an older version of Blender, because it was very radical change of the user interface that existed in which I learned before version 2.49b and the versions from the 2.59 onwards forcing me to search from "0" for new tutorial videos of this new version and start over.
After this, not everything is bad news and although I remained at the beginning of the national blackout 36 hours without electricity and then a short period with this 6 hours service to again stay in darkness for 37 hours more again, the service and although from time to time there are new shorter blackouts that are annoying (in fact I lost in its entirety what I was writing on the first attempt for this post) one of the things that I appreciate is that the new tutorial videos that I am studying and practicing, they turn out to be much more complete and detailed, explaining in a very profound way each one of the functions, modifiers and operations of Blender, which makes me very happy to learn it in such a detailed and profound way as I never thought that this could be done. way on the internet.
In spite of that I disciplined myself to see 2 and 3 times each lesson to assimilate it well and every certain amount of lessons to do a marathon of refreshing memory to be sure (sometimes I remember things that I already forgot or I mix what I learned in 2 or more lessons and things that I rediscovered on my own how to do, which I was doing in the previous version) although it could be said that I am barely at an abc level as far as what I have learned from Blender these mixtures have given me surprising results for the little I'm supposed to know, in this new world for me.
Of these mixes will be the majority of my post, of how 2 or 3 exercises and a little trial and error and guess who? they give me results that to be so beginner I find amazing, at my level I should not be able to do it yet, this makes me feel happy about the new world that opens up to me with the 3D universe that at first I considered out of reach, due to the antiquated of the equipment that I have in my possession, but thanks to Blender and the free software community that contributes with this incredible project, opens this huge, exciting and incredible world of 3D design and why not dream a bit beyond , after having scratched a bit of that wonderful universe with the old version of Blender and now I try again with the new version, the fascinating world of 3D animation.
Blender, happily and gratefully allows me even with my pre-historic computers more than 10 years old, my first PC that I still have features similar to the Compaq described above only that is already 16 years old from the moment that the I bought, after mentioning all this, I set out to expose what I have learned.
In this exercise I was explained how to use a modifier called wave.
Which later in my review varies the parameters experimenting until obtaining these results.
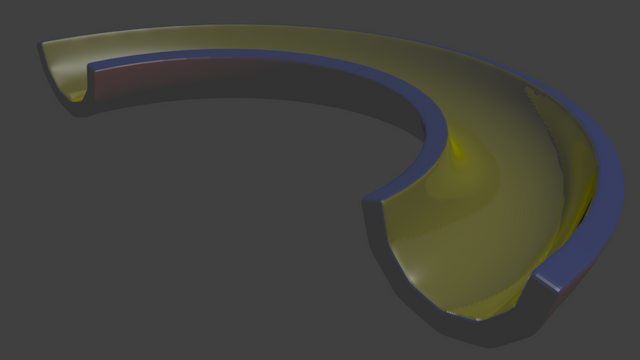
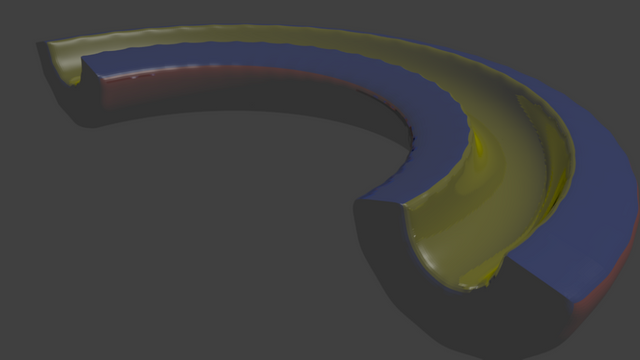
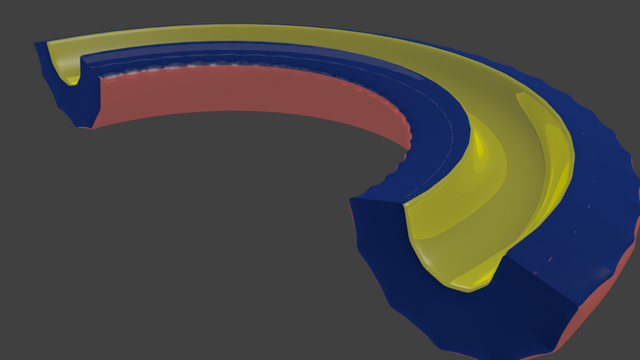
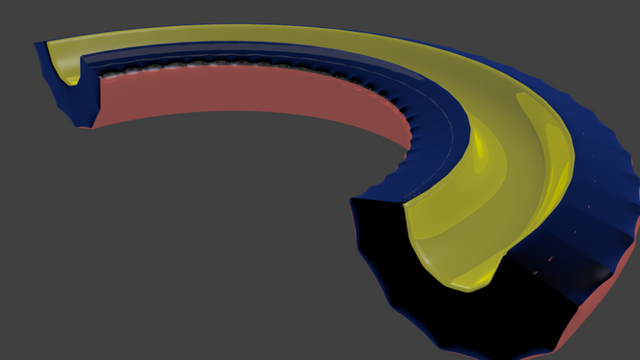
 In this other exercise I was taught how to use another modifier called solidify, which applies an increase in the thickness of the primitive and allows 2 or 3 colors to be assigned to the different parts of the geometry added by this modifier.
In this exercise after doing it at the beginning I tried unsuccessfully that the filler that adds the modifier had a translucent appearance as if it were a slide whose painted metal walls were filled with translucent glass with a slight shade of blue that could be seen through and It will mix with the different colors of the walls to obtain a prism effect.
In this exercise after doing it at the beginning I tried unsuccessfully that the filler that adds the modifier had a translucent appearance as if it were a slide whose painted metal walls were filled with translucent glass with a slight shade of blue that could be seen through and It will mix with the different colors of the walls to obtain a prism effect.
In this other exercise I was taught how to use another modifier called solidify, which applies an increase in the thickness of the primitive and allows 2 or 3 colors to be assigned to the different parts of the geometry added by this modifier.
In this exercise after doing it at the beginning I tried unsuccessfully that the filler that adds the modifier had a translucent appearance as if it were a slide whose painted metal walls were filled with translucent glass with a slight shade of blue that could be seen through and It will mix with the different colors of the walls to obtain a prism effect.
In this exercise after doing it at the beginning I tried unsuccessfully that the filler that adds the modifier had a translucent appearance as if it were a slide whose painted metal walls were filled with translucent glass with a slight shade of blue that could be seen through and It will mix with the different colors of the walls to obtain a prism effect.
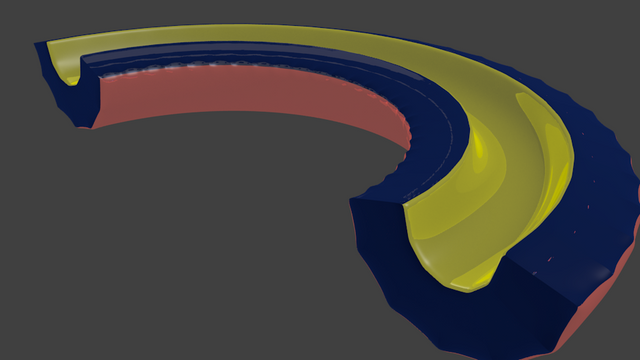 Everything was quite frustrating at the beginning after several attempts because the filler glass became very dark and little translucent due to the poor lighting of the scene, the glass-like translucency had experienced it in the old version of Blender, and in another video tutorial in which the lesson taught how to make a magnifying glass (but leave that course because who taught was doing with a powerful computer with a powerful graphics card thanks to which "the teacher" had access to the parameters of CYCLES and all the options and effects of such a powerful team were missing from my old and lacking equipment, but soon I was able to find in the material options the parameters to achieve something similar after so much trial and error, this glass effect even a little and then Several trials and errors achieved the effect but dark and almost nothing was noticed, I came to think that I was wrong.
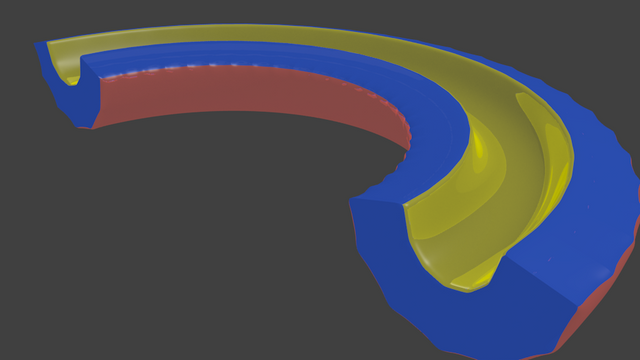
I tested with occlusion environment and sun lighting and did not achieve satisfactory results until I tried to return to spot lighting and duplicated that lamp and then introduce it into the geometry and place it inside the glass filler. In this way I happily managed to obtain the effect I was looking for so much.
I was so happy that I immediately went to Inu-Jim's workshop to show him my progress, it took me an hour walking to get there (as a joke I asked him to take a photo to place in the publication next to him), but he forgot and I decided today to go again before publishing this post (anyway at this time I do not have internet) to take that photo already overdue to include the evidence of that anecdote with a little delay.
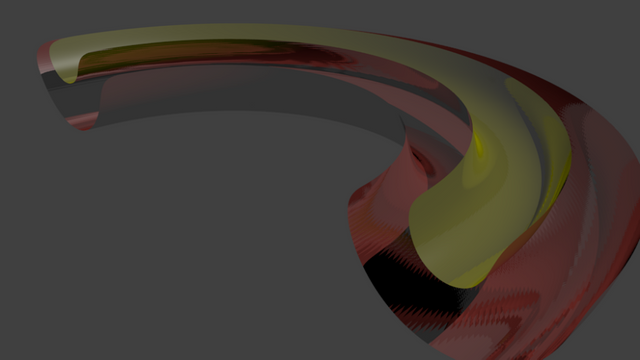
 Inu-Jim was very impressed with what he achieved with a few lessons and tools learned in what I have from those tutorial videos, I mention this because it was in his workshop using his computer, that I came up with the great idea of adding the wave modifier to this slide of glass illuminated, to animate it obtaining the effect of undulating gelatin, (although its aspect resembled more to an air mattress on inflated to the point of breaking by its unions), first I made proofs of rendering and decided to eliminate the environment occlusion for speed up the rendering, after spending 5 minutes and a bit more per frame at 1 minute and 7 seconds per frame on my friend Inu-Jim's computer, after obtaining 101 animation frames in Inu-Jim's workshop, I decided not to Take more of your time and projects return to my home to continue with the rendering. (I also wanted to check how long it took per frame and in general on my computers). Use for that task 2 computers 1 with intel processor Celeron D Dual core of 2.8 Ghz, 2 gigs of Ram and integrated card Intel 946GZ Express Graphics (in this I run Blender until version 2.76b newer versions do not start) and an AMD Sempron Dual Core 2200 to 2.0 Ghz, 2 Gigabytes of RAM and Integrated Graphic Card GeForce 6150SE nForce 430 which supports Blender 2.79b.
The performance I got was 2 minutes 47 seconds per frame on the Intel Celeron and 3 minutes and 13 seconds on the AMD Sempron, fluctuating those times almost always up.
Inu-Jim was very impressed with what he achieved with a few lessons and tools learned in what I have from those tutorial videos, I mention this because it was in his workshop using his computer, that I came up with the great idea of adding the wave modifier to this slide of glass illuminated, to animate it obtaining the effect of undulating gelatin, (although its aspect resembled more to an air mattress on inflated to the point of breaking by its unions), first I made proofs of rendering and decided to eliminate the environment occlusion for speed up the rendering, after spending 5 minutes and a bit more per frame at 1 minute and 7 seconds per frame on my friend Inu-Jim's computer, after obtaining 101 animation frames in Inu-Jim's workshop, I decided not to Take more of your time and projects return to my home to continue with the rendering. (I also wanted to check how long it took per frame and in general on my computers). Use for that task 2 computers 1 with intel processor Celeron D Dual core of 2.8 Ghz, 2 gigs of Ram and integrated card Intel 946GZ Express Graphics (in this I run Blender until version 2.76b newer versions do not start) and an AMD Sempron Dual Core 2200 to 2.0 Ghz, 2 Gigabytes of RAM and Integrated Graphic Card GeForce 6150SE nForce 430 which supports Blender 2.79b.
The performance I got was 2 minutes 47 seconds per frame on the Intel Celeron and 3 minutes and 13 seconds on the AMD Sempron, fluctuating those times almost always up.
#
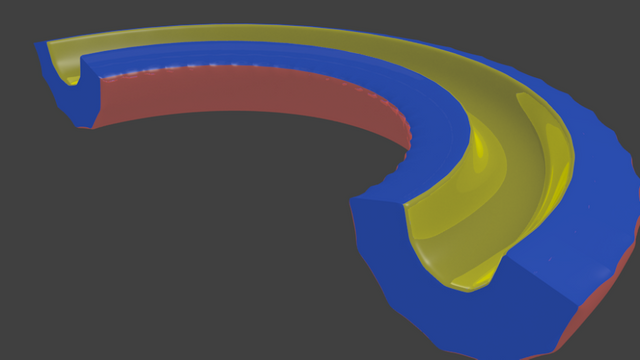
During another exercise I decided to correct the mattress aspect of the slide and then decided after rendering again the 250 frames of the wave modifier animation to change the parameters and place a progressive decrease of the wave until its disappearance to the animation.
As I had already delayed more than 2 hours in the rendering of those 250 frames using the 2 computers mentioned above (so that the process will be accelerated a bit I decided to decrease the pre-determined resolution of the render of 960x540 Pixels to 720x576 Pixels "resolution PAL-TV ")
The idea that the wave progressively lost strength came after finishing the render and not to lose the work previously done, I continued to add 50 frames to place the new parameters in them and thus produce the new finish. But the changed parameters were not the correct ones, I tried again until I got it.
 When finar, I ended up obtaining an animation of about 400 frames with the effect at the end of the wave decrease until I came to rest.
After a lot of trial and error I ended up with my experimental mix of 3 lessons basically, (wave, solidify and the glass of the magnifying glass of the first lesson of the other video tutorial course that at the end of the one that I am carrying out I will return without fail in the extent possible).
Unfortunately last Sunday March 24, trying to publish this post a week ago, after a brief blackout my ever faithful computer died being a big setback being this the only one with open gl support v2.1. the main loss is the inability to continue using Blender 2.79b unfortunately from now on I am forced to use only blender 2.76b since this version is the maximum that my old remaining PC’s support.
Several blackouts later, here they have me still struggling. Always grateful to all of you @yushirogowa
When finar, I ended up obtaining an animation of about 400 frames with the effect at the end of the wave decrease until I came to rest.
After a lot of trial and error I ended up with my experimental mix of 3 lessons basically, (wave, solidify and the glass of the magnifying glass of the first lesson of the other video tutorial course that at the end of the one that I am carrying out I will return without fail in the extent possible).
Unfortunately last Sunday March 24, trying to publish this post a week ago, after a brief blackout my ever faithful computer died being a big setback being this the only one with open gl support v2.1. the main loss is the inability to continue using Blender 2.79b unfortunately from now on I am forced to use only blender 2.76b since this version is the maximum that my old remaining PC’s support.
Several blackouts later, here they have me still struggling. Always grateful to all of you @yushirogowa
I do not know much about the program but i am amazed by the result and i hope to learn a bit while i am following your artistic journey. Welcome back to the Matrix,lol.
[nTopaz Curator]
The comments from curators are for information and encouragement. The upvotes from nTopaz and rankings are based on the popularity of your art work when posted to the nTopaz platform. Join nTopaz Discord ChannelCongratulations @yushirogowa! You received a personal award!
You can view your badges on your Steem Board and compare to others on the Steem Ranking
Vote for @Steemitboard as a witness to get one more award and increased upvotes!
Thank you very much for all the support, I hope I can develop more in the wonderful world of 3D art