Mindless | Inktober Day #2
(English version)
Hi guys! ♥

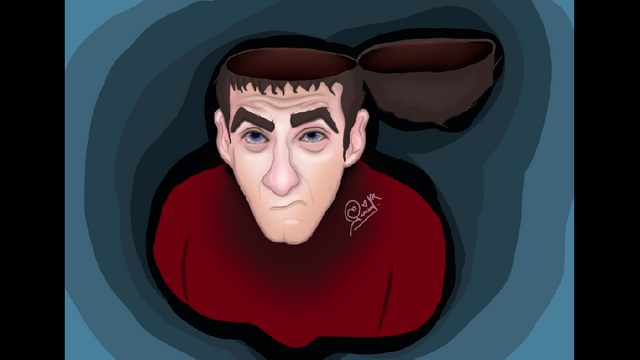
I must confess that when I came across the subject for the second day, I felt a little worried because I had no idea what I was going to do. I took a deep breath and went to Pinteres to look for some references. When I started to see the images, I could get an idea of what they referred to as 'mindless' and in that I found this image of a subject that could easily adapt to my style for day # 2.
I liked the general idea, but its expression not so much, so it underwent some changes in the creative process. If we start thinking, that is the main idea of the challenge, that we leave our styles and tastes in each entry.
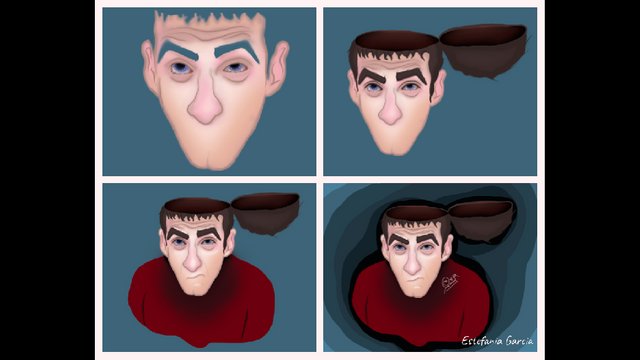
Sometimes, I focus so much on what I do that I overlook the capture of my work progress. Those images are the ones that I then use for the step by step that always accompanies my illustration. It has happened to me with this illustration and I don't have as many steps as I would like, but I have managed to capture the 3 most important steps.
As usual I used the Medibang Paint program, in its Android version. Here is a brief explanation of how I achieved this result. I hope you enjoy ♥.
1.- First I have loaded the image to Medibang and traced the contours. I have omitted making his mouth and then dedicate myself to it, I still had no idea what expression I wanted to give it.
2.- With the help of the magic wand I selected the inside of his face to work more comfortably. I used a light skin tone for the base and then gave a touch of pink in the area of the eyes, nose and ears. I also began to give some lights and shadows.
3.- In another layer I have worked the eyes, they have been my favorite part of all the illustration ♥. First I made the base in white and some shades in gray. Then with the watercolor brush, I started to make the pupils in a blue tone, I added some lights, small veins in the white area and made a red shading all around the contour.
4.- Then I painted my friend's hair and also the emptiness of his head in red gradient to black.
5.- I painted her mouth (finally) and some shadows under her. I did in red what would be the swearter he is wearing.
6.- I finished my illustration deepening shadows, adding some lights and a background in blue tones. Voila!
(Versión en Español)
¡Hola chicos! ♥
Debo confesar que cuando me topé con el tema para el segundo día, me sentí un poco preocupada porque no tenía idea de que iba a hacer. Respiré profundo y me fui a Pinteres para buscar algunas referencias. Al comenzar a ver las imágenes, me pude dar una idea de a que se referían con lo de "mindless" y en eso he encontrado esta imagen de un sujeto que podría adaptar a mi estilo fácilmente para el día #2.
Me gustó la idea general, pero su expresión no tanto, así que sufrió algunos cambios en el proceso creativo. Si nos ponemos a pensar, esa es la idea principal del reto, que dejemos plasmado nuestros estilos y gustos en cada entrada.
En ocasiones, me concentro tanto en lo que hago que paso por alto el ir capturando el avance de mi trabajo. Esas imágenes son las que luego utilizo para el paso a paso que siempre acompaña mi ilustración. Me ha ocurrido con esta ilustración y no tengo tantos pasos como quisiera, pero si he logrado capturar los 3 pasos más importantes.
Como de costumbre he utilizado el programa Medibang Paint, en su versión para Android. A continuación les presento una breve explicación de como he logrado este resultado. Espero lo disfruten ♥.
1.- Primero he cargado la imagen a Medibang y tracé los contornos. He omitido el hacer su boca para luego dedicarme a ella, aún no tenía idea de que expresión quería darle.
2.- Con ayuda de la varita mágica seleccioné el interior de su rostro para trabajar más cómodamente. Utilicé un tono de piel claro para la base y luego le di unos toques en rosa en el área de los ojos, la nariz y orejas. También comencé a darle algunas luces y sombras.
3.- En otra capa he trabajado los ojos, han sido mi parte favorita de toda la ilustración ♥. Primero hice la base en blanco y algunas sombras en gris. Luego con el pincel de acuarela, he comenzado a hacer las pupilas en un tono azul, agregué algunas luces, pequeñas venas en el área blanca e hice un sombreado en rojo por todo el contorno.
4.- Luego he pintado el cabello de mi amigo y también el vacío de su cabeza en rojo degradado a negro.
5.- Pinté su boca (por fin) y algunas sombras bajo ella. Hice en rojo lo que sería el swearter que tiene puesto.
6.- Terminé mi ilustración profundizando sombras, agregando algunas luces y un fondo en tonos azules. ¡Listo!
Espero hayan disfrutado la publicación
Att: Estefania Garcia ♥
.jpg)
Super!!! 😀 ⭐️⭐️⭐️
[nTopaz Curator]
This comment from the curator is for information and encouragement. The upvotes from nTopaz and rankings are based on the popularity of your art work when posted to the nTopaz platform.
Join nTopaz Discord Channel
Thank you :D
This post has been resteemed by @original.content.
Follow me to keep up-to-date with posts tagged #oc and the author on ocdb's follow list.
Powered by witness untersatz!
This story was recommended by Steeve to its users and upvoted by one or more of them.
Check @steeveapp to learn more about Steeve, an AI-powered Steem interface.