Black Friday Deals+How to Calibrate Your Monitor With the Datacolor Spyder 5 ELITE
Black Friday Deals+How to Calibrate Your Monitor With the Datacolor Spyder5ELITE

With the vacation sales beginning on it is the good time to start out calibrating your monitor or upgrade your previous device to a brand new one. Datacolor is providing some nice deals on Black Fri and Cyber weekday. therefore devour a brand new device and skim through my walkthrough on the way to use your new toy.
What is the Spyder 5 Elite?
The Spyder5Elite is that the latest flagship color standardization device created by Datacolor. it's an integral tintometer that captures a screens brightness, color, and white purpose through a sequence of tests. It then uses the computer code to make an operating “profile” supported this info that corrects these factors to convey you a stronger illustration of what is displayed. The corrected profile will currently be mechanically activated anytime your pc boot ups.
Starting Black Fri you'll get an honest discount on either the Spyder5ELITE or Spyder5PRO.

U.S. Sale Prices
Spyder 5 PRO: - Regular price: $189, Sale price: $149
Spyder 5 ELITE: - Regular price: $279, Sale price: $199
E.U. Sale Prices
Spyder 5 PRO: - Regular price: 177€, Sale price: 119€
Spyder 5 ELITE :- Regular price: 257€, Sale price: 179€
Why Calibration is Important
There square measure lots of reasons why you must be calibrating your monitors. I recently wrote another article "Are You Calibrating?" that goes into a lot of detail for numerous reasons. I usually hear photographers say well if {you square measuren't|you are not} printing then why calibrate? This thinking comes out of knowing most client monitors are poorly mark and over the lifetime of these monitors they show pictures wildly completely different. If you cannot manage, however, your pictures square measure displayed then why commit to calibrate on your end?
Most photographers work can largely be seen on the net and whereas this can be true regarding the wide variances on however a picture can be seen. it's no reason to not offer your pictures the simplest place to begin doing. think about calibrating your monitor as giving your pictures a mean doable place to begin. If somebody else's monitor is just too bright or over saturated you cannot manage that. However, by written material your pictures on an associate degree uncalibrated monitor that's already too bright or over saturated you're increasing the probabilities that somebody can see your pictures even a lot of poorly depicted.
All monitors square measure factory-made with a mean color worker of 6500K and brightness of one hundred cd/m². owing to lots of various reasons your monitor may not meet these averages by default. By setting out with the simplest edit and mark illustration 1st you decrease the probabilities that your pictures are seen in drastically other ways. Of course, there'll perpetually be monitors that makeup extremes.
Also once it involves operating with industrial and advertising shoppers. you may learn quickly that their style and art departments do calibrate. They usually have specific color pallets they have you to figure among and demand accuracy since the ultimate results are ads on whole for the show online and in print.
For me in person, I even have been exploitation Spyder devices since the Spyder2 came out and have perpetually had sensible results with each the hardware and support. I 1st started calibrating my monitors as a result of I usually would want to figure in numerous locations on a range of monitors. I started in photography as a digital school and would either be written material on multiple monitors reception, my laptop, or on a client's system. Once I started exploitation, multiple monitors, i spotted quickly the necessity to calibrate. Older laptops were usually thus unhealthy I could not edit with them after I required to. Calibrating once a month on all my devices and even for a few of my consistent shoppers created my life such a lot easier.
How to Calibrate Using the Spyder 5 ELITE?
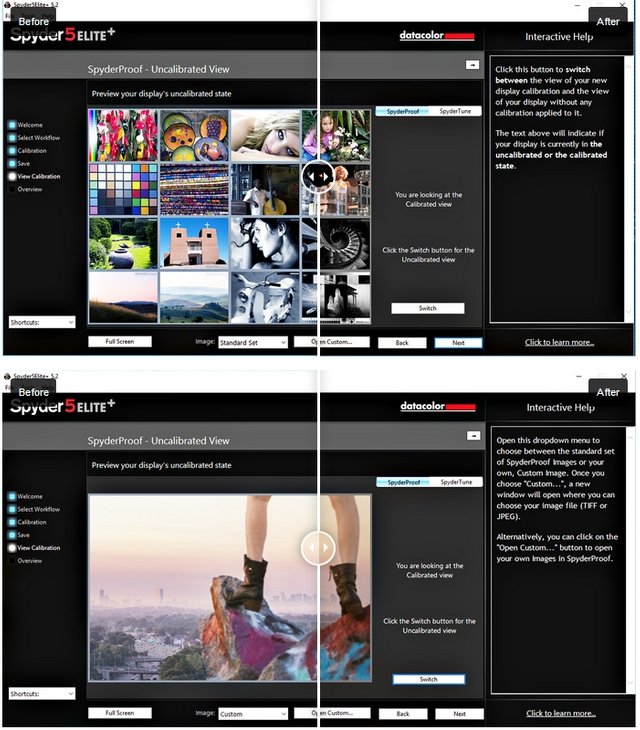
Once you get your device the method is super straightforward. The equipped code is straightforward to put in and walks you thru the whole method. For the additional advanced choices, there's a constitutional “Interactive Help” sidebar that has instruction, tips, and descriptions of what around everything will. it's terribly intuitive to navigate the entire code expertise.
For the common user with a reasonably trendy IPS monitor the default or basic setting can most likely give you with sensible results. My main desktop consists of 2 quality 27” IPS monitors and one older sidebar monitor i exploit to stay a browser open whereas writing. the 2 IPS monitors typically match pretty much however the third is much off with none standardization. So, as a result, I actually have to place slightly additional work into obtaining it to match the others with the code. wanting having a scenario almost like this or having simply associate degree recent or poorly created show the default settings possibly can get you mark.

Step One
When you 1st launch the package it'll show a series of tips and conditions which will create the method additional correct. it is often vital to offer your monitors time to totally activate and this will vary from monitor to watch. Since our eyes square measure thus sensible at adjusting to lightweight it may be tough to inform slight variations over a 10-15 min amount. it's additionally sensible to offer your eyes time to regulate to your operating station. thus I typically do some emailing or social media for slightly before I begin to calibrate my device.
You also need to create certain you have got even lighting conditions within the atmosphere you are doing your redaction and calibrations. particularly ensuring there's no direct lightweight falling on your monitor screen like daylight from Associate in Nursing open window.
Finally invariably reset your monitor's settings to its defaults before doing all of your calibrations. this can be most import the terribly 1st time as you possibly have created changes to create your show additional pleasing to your own eye.
Step Two
Once you've got created certain the monitor is prepared to mark the software package can walk you thru the setup method. subsequent few windows are very solely necessary the primary time you came upon a replacement standardization as you're leasing the software package understand vital data concerning the precise device. when every initial setup, you may have the choice to skip these steps for future calibrations creating the method easier and quicker.
The software package can raise you to settle on a show to calibrate, the kind of device you're calibrating; Desktop, Laptop, or Projector, and therefore the name/model of your device. If you have got multiple monitors connected you may need to repeat the method for every. in addition, there's a neighborhood within the shortcuts menu for matching multiple displays along. this can be terribly handy even though you're victimization 3 terribly totally different monitors. With a trifle additional work, this method can get them as shut as doable to every alternative. it'll then raise you what variety of color and brightness controls your monitor has out there in its menus.


Now that you just have done all the initial setup you'll be shown the standardization settings menu. this can be conjointly wherever you'll be able to realize the advanced menu settings if your monitor wants additional fine-tuning. Like I discussed on top of for many users the default settings can get you sensible results and that I usually use these for my IPS panels. you'll do a bit analysis on your monitor or check the user manual if you do not get good results with the default settings. This was the case with my older monitor. when doing a bit reading I found that the color temperature for that monitor was cooler than what my IPS panels were. therefore dynamic the white purpose to match created an enormous distinction within the final standardization. Once you've got originated these final settings you'll be able to skip to successive method anytime you would like to re-calibrate that monitor.

Step Three
Now you're set to begin the automatic activity method. The Spyder5 Series may be a lot of better-designed device over its previous versions. For starters, the counterweight portion currently doubles as a device protect the sensitive tintometer. This additionally makes the whole device a lot of compact and moveable if you wish to require it with you. for example, I bring mine back and forth between my studio house and residential a minimum of once a month. Another nice improvement is that the further close light-weight device on the highest aspect of the device. this is often nice for obtaining the most effective screen brightness in any setting. one thing I found tougher to properly assail older Spyder devices attributable to however simply your eyes will be fooled into thinking to bright is simply right.
With this new style inserting the device on your monitor is pretty easy. take away the cap and slide it down the USB cable enough so you'll line up the device with the provided matching define the package. connect the USB cable and make certain the device is lying flat on the screen. If your monitor is a lot of vertical like mine and therefore the device doesn't lie flat I'll usually take one thing sort of a TV remote and lean it up against the device to stay it flat. currently hit Next and watch for the device and package to try and do its issue. the quantity of your time it takes to finish could vary thus I generally use now to urge a snack or watch some YouTube on another monitor.

Once it's done it'll raise you to call your profile. I favor owning a special profile for daytime and evening redaction as I notice my eyes get a lot of tired of the various close lighting. as an alternative, with the new five series, you'll like better to run the device obstructed all told the time and let the inbuilt close detector modify your setting throughout the day for various lighting. This appears like an excellent feature, however, I have not been able to work it into my regular progress simply nevertheless. tho' it's one thing I feel would profit Maine.
That's it.
Bonus Step
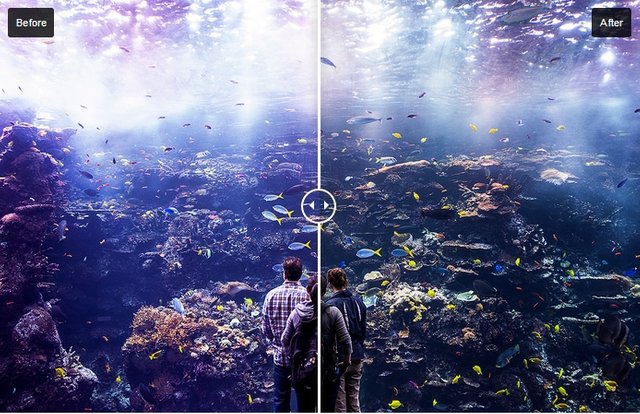
You have simply created a label profile for your monitor. currently whenever you boot up your laptop the software system can either activate the profile or prompt you to update your activity looking on however long you set it for. From here you'll be able to read the results on either the default pictures or your own pictures by making a custom set. the largest changes I usually see in AN uncalibrated monitor square measure the brightness and color temperature. it is so straightforward to not notice what proportion cooler colours like blue will take over your show. particularly if the brightness is turned up too high. while not one thing to match it to love a label monitor or physical print it simply appears traditional. Once {you will|you'll|you'll be able to} switch back and forth within the software system you quickly can see however your eyes simply cannot choose for themselves.

Advanced Display Analysis
Once you've got your monitor graduated Datacolor includes a bunch of fascinating tests that may be run to examine however well your monitor performs. If you've got totally different monitors it's pretty cool to examine the variations between them particularly if they're of an equivalent build and model. For plenty of users, tho' myself enclosed what to try to with this data may simply be overkill. It did facilitate Pine Tree State decide that one in all my 2 IPS panels would be my main monitor for redaction however apart from being fascinating to scan through the result I’m unsure what can be modified to boost them wanting payment extra money on a more robust monitor. If you recognize additional regarding these tests I’d like to hear regarding it in the comments.

Conclusion
The entire Spyder5 series of devices ar pretty easy to use and in my opinion, the simplest designed thus far. The package is absolutely exhausting to screw up and just about walks you thru the complete method. Even once you begin entering into a number of the advanced settings it allows you to recognize what everything will and means that. At that time, it very is simply trial and error to seek out a mixture to induce the simplest results. Since every monitor are often thus completely different there's not how on behalf of me to run you thru that method. but like I've aforementioned within the commonest cases the common user ought to see smart results simply following the default directions.
I believe if you're delivering pictures to a shopper you actually ought to be calibrating your monitors. though all you deliver is unchanged tiffs to a shopper you wish to form certain what you're seeing on your screen straight from the camera is correct. If you're a lot of of a amateur then you continue to may wish to have confidence standardisation. everybody ought to print their work thus it are often appreciated within the globe and that we at Fstoppers have written many articles on however printing your work will improve your photography. Having a properly label monitor is that the start to convalescing prints. For $150 with the present vacation sale costs, you'll be able to create your piece of writing and pictures higher. That even for entry-level photographers feels like a simple selection. particularly considering what proportion we regularly pay on new toys for ourselves.
if you guys like my post don't forget to upvote comment and resteem

I think many people are waiting for black friday.
you are right @aquafi
wow. sorry to ask is this original? did yhu do it urself