NeedleworkMonday: Tutorial Knitting socks toe-up II / Socken von unten gestrickt II + Token-Tutorial (CCC) [Ger/Eng]
Nachdem wir alle Zunahmen gemacht haben und der Zwickel fertig ist, kommt ein kleiner Abschnitt verkürzter Reihen - unsere Ferse ist auf der Rückseite rund, also müssen wir einen Halbkreis machen. Die Anzahl der verkürzten Reihen ist die Hälfte der Anzahl der Zwickelzunahmen. Wer mit dem Nadelspiel strickt, der kann alle Maschen für die "Rückseite" auf eine Nadel legen, die anderen Maschen warten, bis die Ferse fertig ist.
After we made all the increases and formed the gusset, there comes a small short row section - our heel is round at the backside, so we have to make a half circle. The number of short rows is half the number of the increased stitches in said gussets. If you use DPNs you can put all the stitches for the "backside" on one needle, the other stitches wait till the heel is finished.
Du kannst verkürzten Reihen in deiner bevorzugten Technik machen, für mich ist es das was im Englischen "German Short Rows" genannt wird - die mit den Doppelmaschen. Das ist einfach und schnell - und es gibt keine Löcher oder Knubbel. Hier ein Video dazu.
You can do the short row section in your preferred technique, for me that's "German short rows". They are easy and quick - and you have no holes or bumps. Again a video by VeryPink Knits showing how you do that - it's even in slow motion. This technique seems to be a bit more complicated if you knit non-continental (though that might be because knitting that way looks always complicated for me).
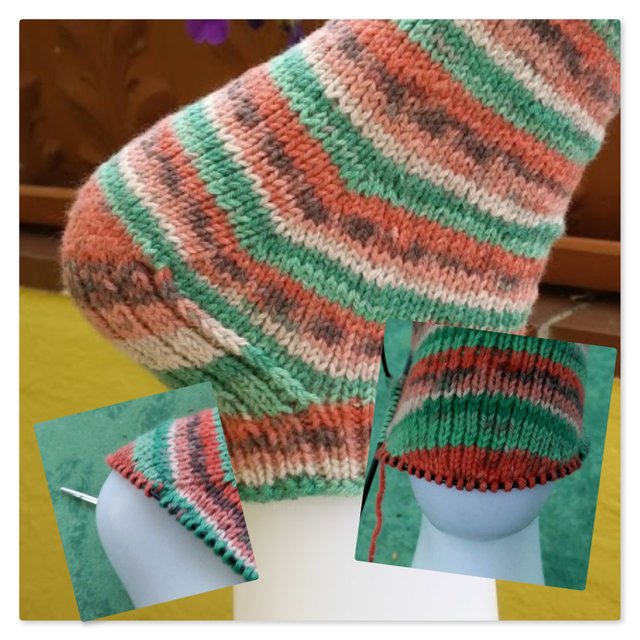
Die fertige Socke mit den verkürzten Reihen in der Vergrößerung / The finished sock with the short row section blown up
Jetzt bis zum zweiten Marker stricken und diesen entfernen, die Masche vor und nach dem Marker zusammenstricken (am besten mit ssk), drehen, 1. Masche abheben, bis zum Marker stricken und diesen entfernen, die Masche vor und nach dem Marker zusammenstricken, drehen, 1. Masche abheben und so weiter, bis die ursprüngliche Anzahl von Maschen erreicht ist. Das war's - die Ferse ist fertig!
Now knit to 2nd marker + remove it, knit the stitch before and after the marker together (best with ssk), turn, slip 1st stitch, purl to marker, remove it, purl together the stitch before +and after the marker, turn, slip 1st stitch and so forth until you have reached the original number of stitches. Now your "heel flap"-heel is finished!
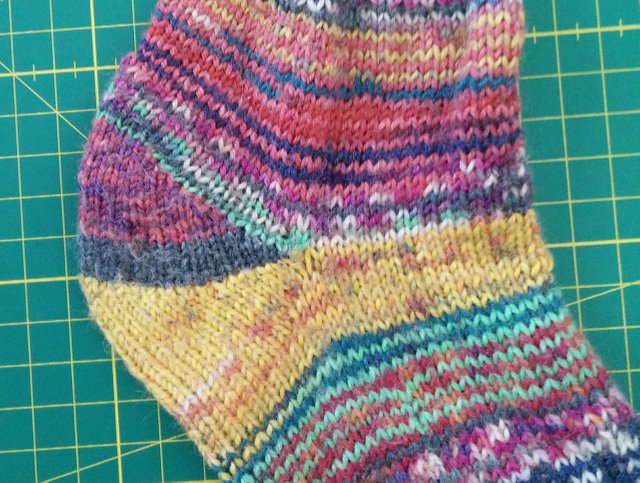
Round short row heel
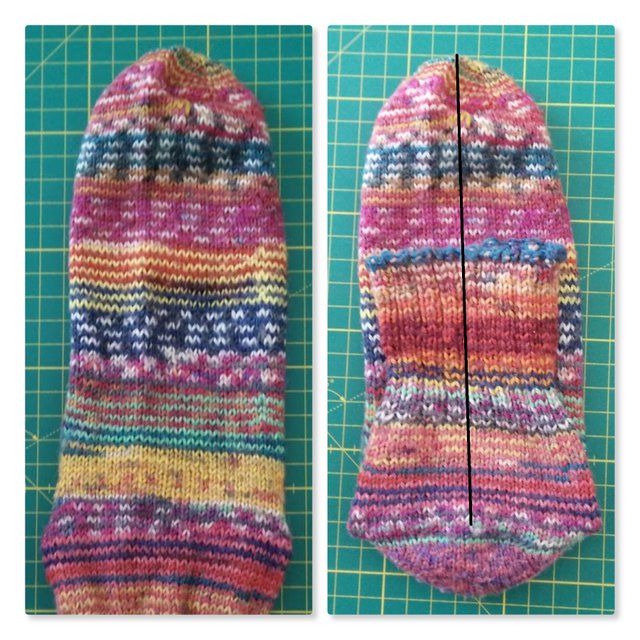
Es ist eine runde Ferse, weil wir zwei Abschnitte aus verkürzten Reihen stricken, also zwei Halbkreise bilden, und das bedeutet eine rundere Ferse als mit nur einem Abschnitt verkürzter Reihen. Es ist ziemlich einfach und schnell zu stricken und passt zu den meisten Füßen, wenn sie nicht zu breit am Knöchel sind - und es spielt keine Rolle, ob von oben oder von unten gestrickt wird! Einfach geradeaus bis zu dem Punkt stricken, an dem die Ferse sein soll. Um den zu bestimmen, eine gut sitzende Socke nehmen und flach hinlegen. Dann diese an der Ferse falten (siehe Bild unten). Jetzt die Länge vom Anfang an den Zehen bis zum Falten der Socke messen - die schwarze Linie im unteren Bild.
It's a round heel because we knit two sections of short rows which form two halfcircles and this means a more round heel than with only one short row section. It's quite simple and fast to knit and fits most feet if they're not too wide at the ankle - and it doesn't matter if you knit toe-up or cuff-down! You just knit straight on till the point where the heel will be. To determine that you take a well fitting sock and lay it flat, then fold it at the heel (see picture below). Now you measure the length from the start at the toes till where you folded the sock - the black line in the picture below.
Beim Nadelspiel alle Maschen für die Ferse von zwei Nadeln auf eine bringen. Die Anzahl der verkürzten Reihen beträgt 1/3 dieser Maschen. Einfach die bevorzugte Art der verkürzten Reihen stricken (ein Video meiner Lieblingstechnik habe ich oben verlinkt), aber eine Randmasche am Ende und Anfang der Reihe lassen und zwischen den Doppelmaschen der verkürzten Reihen. Wenn die berechnete Anzahl der verkürzten Reihen gestrickt ist, eine Reihe stricken, in der alle Doppelmaschen abgestrickt werden und auch die erste und letzte Masche der Reihe. Nun mit dem zweiten Teil der erkürzten Reihen beginnen, diesmal vom Rand beginnend. Unten ein vergrößertes Bild einer solchen Ferse - der erste Teil verkürzter Reihen endete mit der letzten Reihe gelber Maschen. Wie man sieht: Keine Löcher, keine Knubbel!
With DPNs you put all the stitches for the heel from two needles on one. The number of short rows is 1/3 of them. Do your preferred way to knit them but leave one "normal" stitch at the end and beginning of the row between the short row stitches. If you have knit the calculated numer of short rows make one row where you knit all the short row stitches (including the first and last stitch of the row) and then start anew with the second part. Below you see that heel - first short row part ended at the last yellow row. No holes, no bumps!
Jetzt kommt der Schaft, einfach so striken wie man es auch sonst tun würde bis es ans Abketten geht. Hier ist ein elastisches Abketten wichtig - und das geht am besten mit einer Häkelnadel. Das Abketten mit einer Häkelnadel ist unglaublich einfach, am besten eine halbe Nummer größer als die Stricknadel. Ich empfehle Jenys Surprisingly Stretchy Bind Off - hier eine deutsche Erklärung. Das ist so genial einfach, die linken Maschen einfach "links" häkeln. Elastisch aber nicht labberig!
Now you knit the leg part like you would normally do it till you have reached the desired length and start to cast off. Here you should use an elastic cast off - and best do it with a crochet hook. Casting of with a crochet hook is incredibly more easy, best use a crochet hook that's a size up compared to the knitting needle. Do you know Jeny's Surprisingly Stretchy Bind Off? You will love it! It's so easy, especially with a crochet hook.
Und das ist das gesamte Geheimnis ums Socken stricken von den Zehen herauf - auch nicht komplizierter als die herkömmliche Weise :)
And that, my friends, is the secret behind knitting socks toe-up - there is no secret and it's not more complicated than knitting them cuff-down :)
Was mache ich jetzt mit den CreativeCoin Tokens what to do with them?
Wieder einmal meine Bitte an alle, die es noch nicht getan haben: Kümmert euch um eure Token und, als kreativ Tätige, besonders um den CreativCoin. Nutzt den tag - damit können wir uns gegenseitig unsere Rewards erhöhen! Um zu sehen was ihr habt, einfach zu Steemworld gehen. Dort gehst du zu "Balance" und "Token":
Again I urge all needleworkers to take care of their tokens, especially the Creative Coin. Use the tag - that way all needleworkers can profit from each other. To take a look at you tokens go to Steemworld. There you go to "Balance" and "Token":
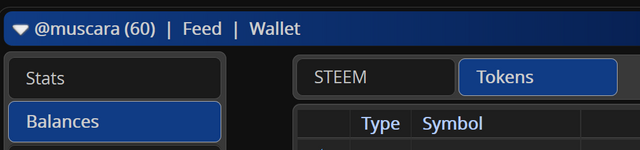
Hier sind alle Token aufgeführt - allzu oft nur ein Bruchteil ohne wirklichen Wert. Aber man sieht die drei "Zustände" der Token, wobei als erstes Steem steht und damit ein gutes Beispiel ist:
Here are all you tokens - all to often only fractional amount without any worth. But you see the three states of tokens with Steem being the first, which makes a good example:

Die rechte Spalte sind "Rewards", wie bei STEEM musst du Token-Rewards "claimen" Siehst du da rechts den Button "Claim All Rewards"? Genau, damit claimt man nicht nur die STEEM-Rewards sondern auch alle wartenden Token. Dann ist da "Balance", das liquide STEEM bzw. Token. Aber genau wie du STEEM durch Power up zu SP umwandeln musst, um deinen Vote Amount zu erhöhen, geht das auch bei Token. Hingehen und staken und voten damit andere auch was davon haben :)
The right columns is "Rewards", you have to claim it to make it yours - just like your normal post rewards. Notice the "Claim All Rewards" button? Yes, that claims your "normal" reward of STEEM/SP but also all the tokens that might wait to be claimed. Then you have "Balance", your liquid STEEM and Tokens. But just like you have to power up STEEM to SP (="Staked") to increase your voting power, you have to power up some tokens if you want to reward others. Take a look - perhaps you already have a number of tokens waiting for you. Go and stake them and vote :)
Das "Wie" ist recht einfach hier bei Steemworld: Man klickt auf den Namen des Token und dort findet man die üblichen Schaltflächen, wo man einfach auf "Power up " klicken kann - fertig! Jedes Mal, wenn du jetzt bei einem Beitrag votest mit einem tag dessen Token du "auf der hohen Kante" hast, beinhaltet deine Stimme automatisch einen Tokenanteil, der durch die Höhe deines Votes und die Menge an Token, die du hast, reguliert wird - genau wie bei SP.
Powering up ("Staking") is rather easy: You click on the name of the token there and there you find the usual buttons where you can simply click on "Power up". Now every time you vote on a post with the associated tag your vote will automatically include an amount of tokens regulated by your vote percentage and the amount of token you staked - same as you do with SP.
Selling Tokens for STEEM / Token zu STEEM machen
Man kann Token bei Steem Engine verkaufen, um STEEM (oder andere Token) zu bekommen. Überlegt welche Token ihr behalten wollt und konzentriert euch auf diese, verkauft den Rest. Auch wenn das nur Werte von Hundertstel STEEM sind - es hilft den Überblick zu halten.
If you want to take you rewards "out of the game" - you can sell tokens with Steem Engine to get STEEM. You should think about which token you want to keep and sell the rest. Even if it is only worth 1/100 of a STEEM - keeping the "weeds" out of your wallet means having a clear view of the useful things there :)

Hier ist ein Beispiel der Anzeige bei Steem Engine für zwei Token. Erst kommen Kürzel und Name, dann wieviel ihr davon "flüssig" habt, deren Preis, die Preisentwicklung, wieviel im Stake sind (in Klammern: wieviel im Power Down). Man kann übrigens über jede Spalte klicken um die Liste danach zu sortieren.
Here is an example of the Steem Engine display for two tokens. First come the code and name, then how much of it you have "cash", its value, the development of the value, how much are staked (in brackets: how much in power down). You can click above the top each column to sort the list.
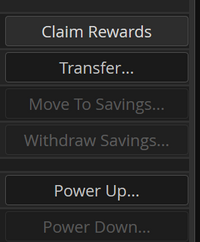
Die nächsten Symbole bedeuten: Ein Popup mit Informationen, der Token Markt, Token an jemanden anders senden, Übersicht über die Umsatzbewegungen dieses Tokens bei euch, Power up, Power down, Übersicht der im Power down befindlichen Token und zuletzt Delegate. Die letzten drei gibt es nicht bei allen Token.
The next symbols mean: A popup with information, the token market, send tokens to someone else, overview of your history of this token, power up, power down, the number of tokens in power down and last but not least Delegate. The last three are not available for all tokens.
Wenn ihr jetzt auf das Symbol für den Tokenmarkt klickt, erscheint ein Bild das euch vielleicht schon vertraut erscheint, z. B. vom Umtausch von SBD in STEEM. Wer keine großen Summen tauscht, den muss nicht mehr interessieren als dieser Bereich. Ein Klick auf die Zahl neben "Lowest ask" und "Highest bid" trägt übrigens diese Zahl in das entsprechende Kästchen.
If you click on the "token market" symbol, you see something you might be familiar with from exchanging SBD/STEEM. Those who do not exchange large amounts need not be interested in more than this area. A click on the number next to "Lowest ask" and "Highest bid" will put this number in the corresponding box.
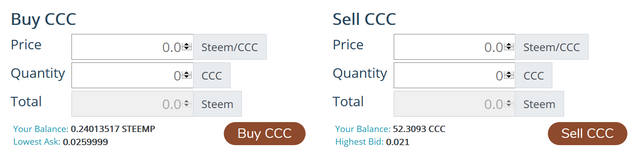
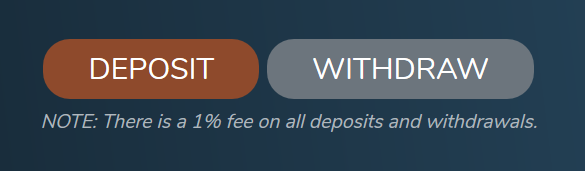
Da steht "STEEMP" - hier wird nicht direkt mit Steem gerechnet, sondern mit einem "Steem Äquivalent". Über den Button "Withdraw" oben bekommt ihr eure STEEMP in STEEM in euer normales Steem-Wallet (abzüglich einer Gebühr).
It says "STEEMP" - they do not use Steem, but a "Steem equivalent". Click on the button "Withdraw" above to get your STEEMP in STEEM into your normal Steem Wallet (minus a fee).
Bei Fragen könnt ihr mich einfach ansprechen, hier in einem Kommentar oder im Discord / If you have any questions, don't hesitate to contact me! Here in a comment or on Discord.
 |  | |
|---|---|---|
5% der Einnahmen dieses Posts gehen automatisch an @t-r-f, den Reisekostenunterstützungsfond für das SteemFest.
5% of this post's rewards automatically go to @t-r-f, the travel reimbursement fund for SteemFest.
This week another SBI-share is looking for a new home. I used Random Draw and the winner is @akipponn! Thanks to all the other who left a comment - if you want to increase the vote you get from SBI, remember to vote their posts or delegate :)
!BEER von oben getrunken
Mit Glueck ein !BEER. Ich wünsche euch einen schönen Feiertag
View or trade
BEER.Hey @muscara, here is a little bit of
BEERfor you. Enjoy it!I have to get around to knitting my first pair of socks. I have done baby socks in the past but I got the sizing all wrong. Thanks for the great tutorial!
Always nice to read sock topic especially in this season. As a sock knitter in Germany I must learn "German short rows" :) Last weekend I finished one and another one is on my needles.
They look great! I love how the black enhances the color gradient!
They look great! I love
How the black enhances the
Color gradient!
- muscara
I'm a bot. I detect haiku.
(Secret: It was a coincidence ... I thought I don't have enough gradient yarn so I mixed in the black one ;))
You are so fast!!!!! And I love the gradient (I guess I read you found it not visible enough?) I especially like the bluish hues at the cuff, together with the black the color scheme reminds me of the dawn sky in a big city. 😍😍😍
View or trade
BEER.Hey @muscara, here is a little bit of
BEERfor you. Enjoy it!Have a witness !BEER
View or trade
BEER.Hey @muscara, here is a little bit of
BEERfor you. Enjoy it!YEEEES, thank you for writing about the coins... I am so lost in these coin heap. And I still don’t know which are ok to use in needlework post and how you can add more than five tags (I guess by using a different interface ?)
Your socks are still amazing, your knitting stitches are so neat and the watermelon color lovely.
Steempeak, my dear, is the answer to a lot of questions around Steem (most of which you never knew you had) ;) Not only because you cann add ten tags...
Since most of your posts are somehow about creative things, you should be able to use CreativeCoin for a lot of posts - one of the tribe's creators made a post about when to use it.
About the "all purpose tags + tokens" like PALnet, Marlians etc. - I don't know. I use PAL because I liked their work with the minnowsupport and the radio shows on Discord. I don't think they really are profitable.
But my heart is in the tokens for my "niches" - being creative and gaming. But I set me a limit for each of them for staked tokens. Once that number is reached, the liquid token I get will be changed into STEEM and then SP. But it will take months to reach these goals. And I love the BEER and COFFEEA token because you can give some posts additional rewards, even if it is only 3/10 of a STEEM worth.