Tips on mixing rock drums ! PART 1 - KICK DRUM
Hi dear Steemians , in this series i'd like to share some tips about how i go about mixing drums . I will be documenting what i say by using pictures , which kinda seems pointless , but i will be showing you some general guidelines , so these concepts can applied to any situation with just a slight tweaking :) So without a further ado , let's dive into the matter , starting with the fundamental - the kick drum !
- EQ
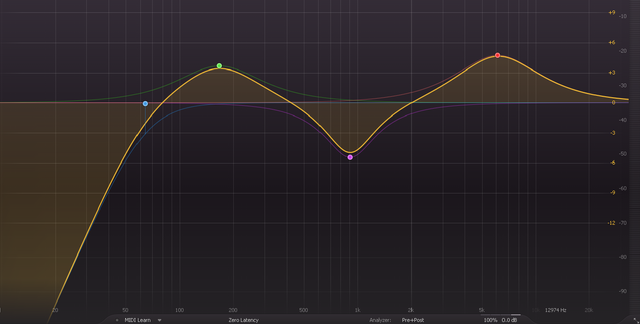
In this particular case i went for the low ''160 hz bump '' , but i believe this is an exception as you'll generally want to boost the low fundamental of the bass drum which is about 60-80 Hz region . Since i have been doing that for a long while now , i decided to go for a 160 Hz thump since it gives a kick drum totally different character , and i quite like the raw ''rehearsal room'' vibe it gives . If you are going for the slick pop production i'd advise to go for the 80Hz region .
Next thing when it comes to eq is getting rid of what many call ''papery'' or ''boxy'' frequencies which are mostly found in the middle region somewhere about 700-900 Hz . These frequencies in most of the cases don't sound so good , so it's best if you just cut them . In my case problem area seemed to be 900 Hz , as it gave an unpleasant boxy character to the kick . And finally , some top end click to help the kick drum not just be felt in the mix , but also be heard . It's important to note that this top end boost doesn't work in every style , but for rock , pop , metal etc. sounds great ! General rule of thumb is if you have busy and cluttered mixes go for it , on the other hand it might be a good idea to leave it sounding warm and let it be felt by the punch that it gives rather than hearing it better with the top end click . In my case i have boosted at 6k Hz as it gave me the desired click , but anything from 2k to 6k or even 8k will do the job depending on your mix . - KICK DRUM COMPRESSION
As far as compression goes , these are the settings i used :
Threshold about -20 db , 4:1 Ratio , Fast Attack and Fast Release with the 5 db of gain reduction .
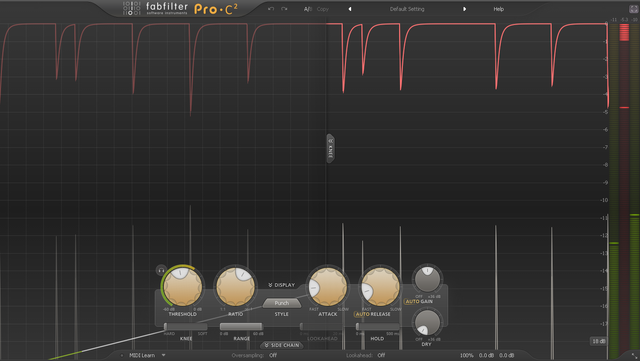
It's worth noting that attack is not on it's fastest as i wanted to let some of the transients squeeze past the compressor and give a kick drum that snap , which would be choked if you would set
your attack too fast . Release was on auto mode but generally i didn't want the kick to linger too long as i wanted to have the bass guitar lead the low end , thus overall release is fast as well . On Fab Filter Pro C2 , you have a couple of compression styles and i went for the ''punch'' style compression as it gave me the most ... well ... punch :D - SATURATION
When it comes to mixing a rock bass drum , saturation is crucial to getting that juicy and fat sound . It took me a while to get this since i was always a bit afraid of ruining the sound by throwing in a distortion plugin but if used moderately ( or not :D ) you can get some amazing sounds ! My personal favorite is the tape saturation ( distortion ) as it gives me the sound of the classic albums that i enjoy ( think RATM , Soundgarden ,Stone Temple Pilots ... all the good stuff ) and just colors the sound in a beautiful manner . Here i have used saturation to color the whole frequency spectrum , but with this particular plugin you have the option of having multiple bands and adjusting each range individually which can give some very interesting sounds . But this old school approach just felt right for the occasion so i stuck with that :) Here are the settings :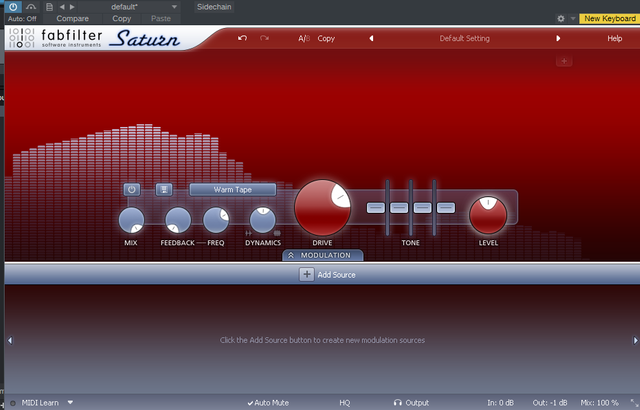 . As you can see it' pretty cranked but it sounds lovely and it is ''warm tape'' preset after all , so you can crank high before it gets distorting out of control .
 - REVERB
This one is optional but if used moderately it can be a big bonus ! The thing you want to avoid is setting too much of the dry signal to a send of the reverb because you will loose a lot of the attack that way . It's also helpful to compress the room reverb pretty hard so it reacts more readily to the kick drum and also cut some of the sub bass parts of the reverb so it doesn't muddy up your mix . If done with taste reverb on kick drum can do wonders ! Here is a picture of settings for the reverb :
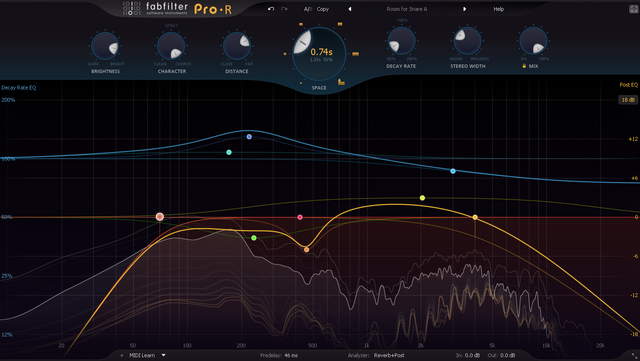
When it comes to reverb types it's really all about the taste so you can't go wrong here , just go for the option that sounds the best for you .
Ok , so that wraps up this little tutorial about mixing the kick drum , i hope it was of use to anyone :) Stay tuned for the part 2 in which i will be talking about mixing the rock SNARE ! Have a wonderful day :)