Let's make better music... Together! - Mixing Basics part 3: Leveling
Let's make better music... Together! - Mixing Basics part 3: Leveling
Hello Steemians!
Coming back with part 3 of my mixing tutorial series!
Today we will be going over the art of leveling, meaning to put each sound at an appropriate level of volume.
Before we get started I'd like to repeat some of the general tips:
- Keep your ears fresh. Make sure to not overhear your track and if you feel tired, take a break and come back to it. You don't want to get too used to the sound, because you'll be less objective in your cleaning process.
- Close your eyes when you're concentrating with your ears. This might be a personal thing, but I think that your eyes take up a lot of the attention you have to give and closing them helps me focus on the sound rather than the visual representations of it.
- Reduce outside noise. Try to move into a quiet room and use headphones. You don't want random things or outside noise to skew your perception of the mix.
- If you don't know what a word means, look it up! I believe that unknown words are the #1 reason for not learning things properly. If you come across I word you don't know and I don't happen to explain it, please look it up!

So last time we covered side-chaining and ended up with a track like this
Today we will be putting on that final chocolate coating to give our mixing cake main stream appeal.
Note: I recommend you check out the other tutorials on mixing before getting into this one, as I will be assuming that you have read those guides. You can find the first one here
So before we actually get into leveling, let's talk about what it's supposed to do.
At this point in the mix we have properly EQed our sounds and have connected everything to each other the way we want it to. This last step is to firstly, getting the mix to sound as clean as possible, making sure to have everything be as loud as it should be and secondly, to make sure that the mix sounds good no matter what audio system you are listening on. For the first point, it's important to give the mix some head room, meaning to not have it sit at 0db on the master track, but rather around -6. For the second point, this means making sure we have a level environment , meaning that our headphones are as flat as possible and that we mix in MONO. Always do your leveling in mono, this is key. It's the exact same process as doing it in stereo, but if you're doing it in mono and then put it back to stereo it will guaranteed sound better.
So we want to set ourselves up to win here. The steps you take before hand are just as important as those you take afterwards. If you want to make a cake, but start with a dirty kitchen a full oven and haven't bought your supplies yet, you're gonna have a shitty time making that cake.
Prep step 1:
Put it in mono
This means that the loudness of everything will be coming out equally from both ears and let's you discern what sounds dirty or what sounds fine easier. Note the music itself will sound worse while it is in mono, but you're just trying to put everything in appropriate levels right now. To put it in mono, simply turn the stereo separation nob on your master track all the way to the right ( in FL) or to mono if you are using a different DAW.
m m m mono
Prep step 2:
Get you some pink noise
Pink noise is kind of like mixing training wheels. It's a type of noise that has leveled out energy throughout all the frequencies and we will be using it in this tutorial to help us find the correct volume as we mix. Pink noise won't get you a perfect mix, but it can get you a decent one and you can work from there making changes to your liking. I'll be using the pink noise from this website.
Prep step 3:
Loop the section where the most shit plays
This just makes it easier to listen to what you expect to listen to. You'll always know where you'll start when you hit space and you'll never move out of the section if you're listening for a while. Make sure your pink noise covers this whole loop.
Prep step 4:
Turn all instruments all the way down in the mixer
This may be a stylistic thing, but I find it easier to solo things out if the only thing that's making any sound is the one I am touching.
So with all these steps covered this is how my mixer looks like:

And this is how my playlist looks like:

Time to get started! :)
So what are we actually doing now that we got all of this setup? Well we're gonna listen to the pink noise and turn up one sound at a time until we can just barely hear it and then turn the sound down until we can't hear it. We are trying to get each sound about as loud as the pink noise, meaning the noise just barely cancels out the other sound. If this is confusing, don't worry I'll be going over an example!
So the first sound I'm gonna mix in is the 'strummy guitar' track. Right now, it's turned all the way down and I'm just hearing pink noise, so I'm gonna start by turning It up till I hear it. For me it sounds something like this:
Now, I am going to, even more carefully, turn the sound down, until I don't hear it whatsoever.
In my current case, I also decided to turn the pink noise up a tad. It's perfectly fine to have your pink noise sitting at around -2db, because everything else is going to be WAY quieter as it's only competing with a specif section of the pink noise.
After fidgeting with it, I can just barely slightly hear it if I focus all of my energy on hearing it. Sounds like this

Great!
Now we just procede to do this for every sound. Solo out the sound, try to get it to sit equal to the pink noise and do this for each sound. I'll add one more example of this and then show you the mixer track after this is done.
Using the same technique from earlier on the Square Bass we get the louder square bass:
And then turning it back down we just barely slightly maybe hear it:
After going through all of the sounds and leveling them with the noise, my mixer tracks look like this
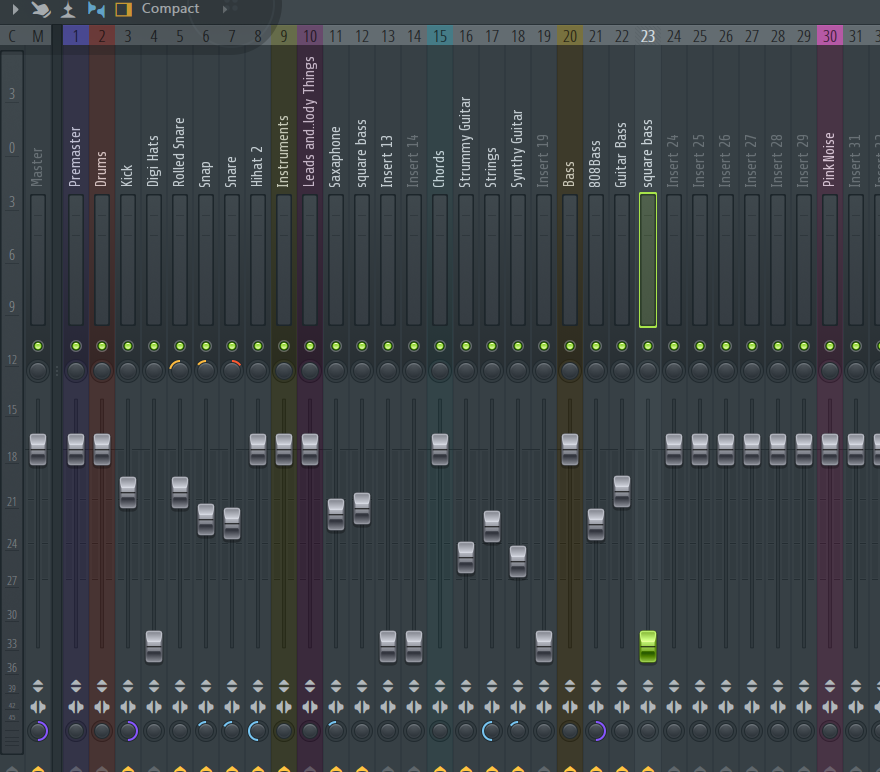
- Note: Some of the faders are still turned down. This is because they had no instrument routed to them *
It sounds like this with the noise:
and like this without the noise:
Now we got a good base level for our mix and it's time for you to play around with it. Turn the noise off, and make small, but meaningful changes to things you think should be louder or quieter.
Once you think everything sounds OK, flip it back to stereo and listen to it again. Change the things that you think should sound quieter or louder. This isn't an exact process and you should put finishing touches on YOUR piece of music as YOU see fit!
After playing around with it for a bit and flipping it to and from stereo/mono I'd like to end this basic mixing tutorial series with a comparison of where we started and where we are now :)
I hope this series helped you guys learn how to mix better, even if only a little. Please leave your thoughts and experiences with mixing in the comments and feel free to ask me anything if you didn't quite understand something.
That's it for now and until next time