The music of a pumpkin: creating organic beats from scratch

Regular readers must have already spotted my proclivity for organic sound, especially with percussion. There’s nothing I dislike more than when I listen to nice tracks by renowned producers with terrible sound design. “Are they deaf?” – I ponder. There seems to be a lazy tendency to just grab samples and release tracks with very little work behind the sound, being snare drums among the most neglected elements in today’s electronic music.
How can we escape the ordinary path of using sample libraries and bring some life to the palette? Truth be told, most of my drum patters and sounds come out of the blue, by mere accidents or exploration, and sampling is one of the key ingredients.
In this second episode of the “Use Your Intuition” series (see episode 1), we explore sampling and granular synthesis as a way to get drum patterns that would easily fit in a hip hop album from the nineties.
Back to the source
Yes, we start recording real “carbon-made” percussion. The goal is not to get studio-quality samples but the opposite, to get as dirty and unpredictable as possible. We want to escape the paths we normally tend to go through when composing in automatic pilot, so just pick up an instrument, mic it and start playing.
The music of a pumpkin
I picked up an instrument called “checo” that is made out of a pumpkin, originally from the north of Peru. It sounds terribly dry and dead, with a lot of resonances, and that makes it the right candidate. Challenge accepted. I placed one dynamic microphone pointing the hole and one condenser mic pointing to the surface. Once set, I started improvising to 100 BPM without anything in mind, I just sat down and played.
(Listen: track “Example 1” – “Audio Clip 1”, scroll down to “Example 1“)

Image: Checo, an Afro-Peruvian percussion instrument from the north of Peru.
Organic means imperfection (and vice-versa)
Don’t worry about little mistakes while playing, they can actually develop new and interesting patterns during the sampling phase (bear with me). If your rhythm is off during one beat, don’t edit it, we’ll take care of that later on.
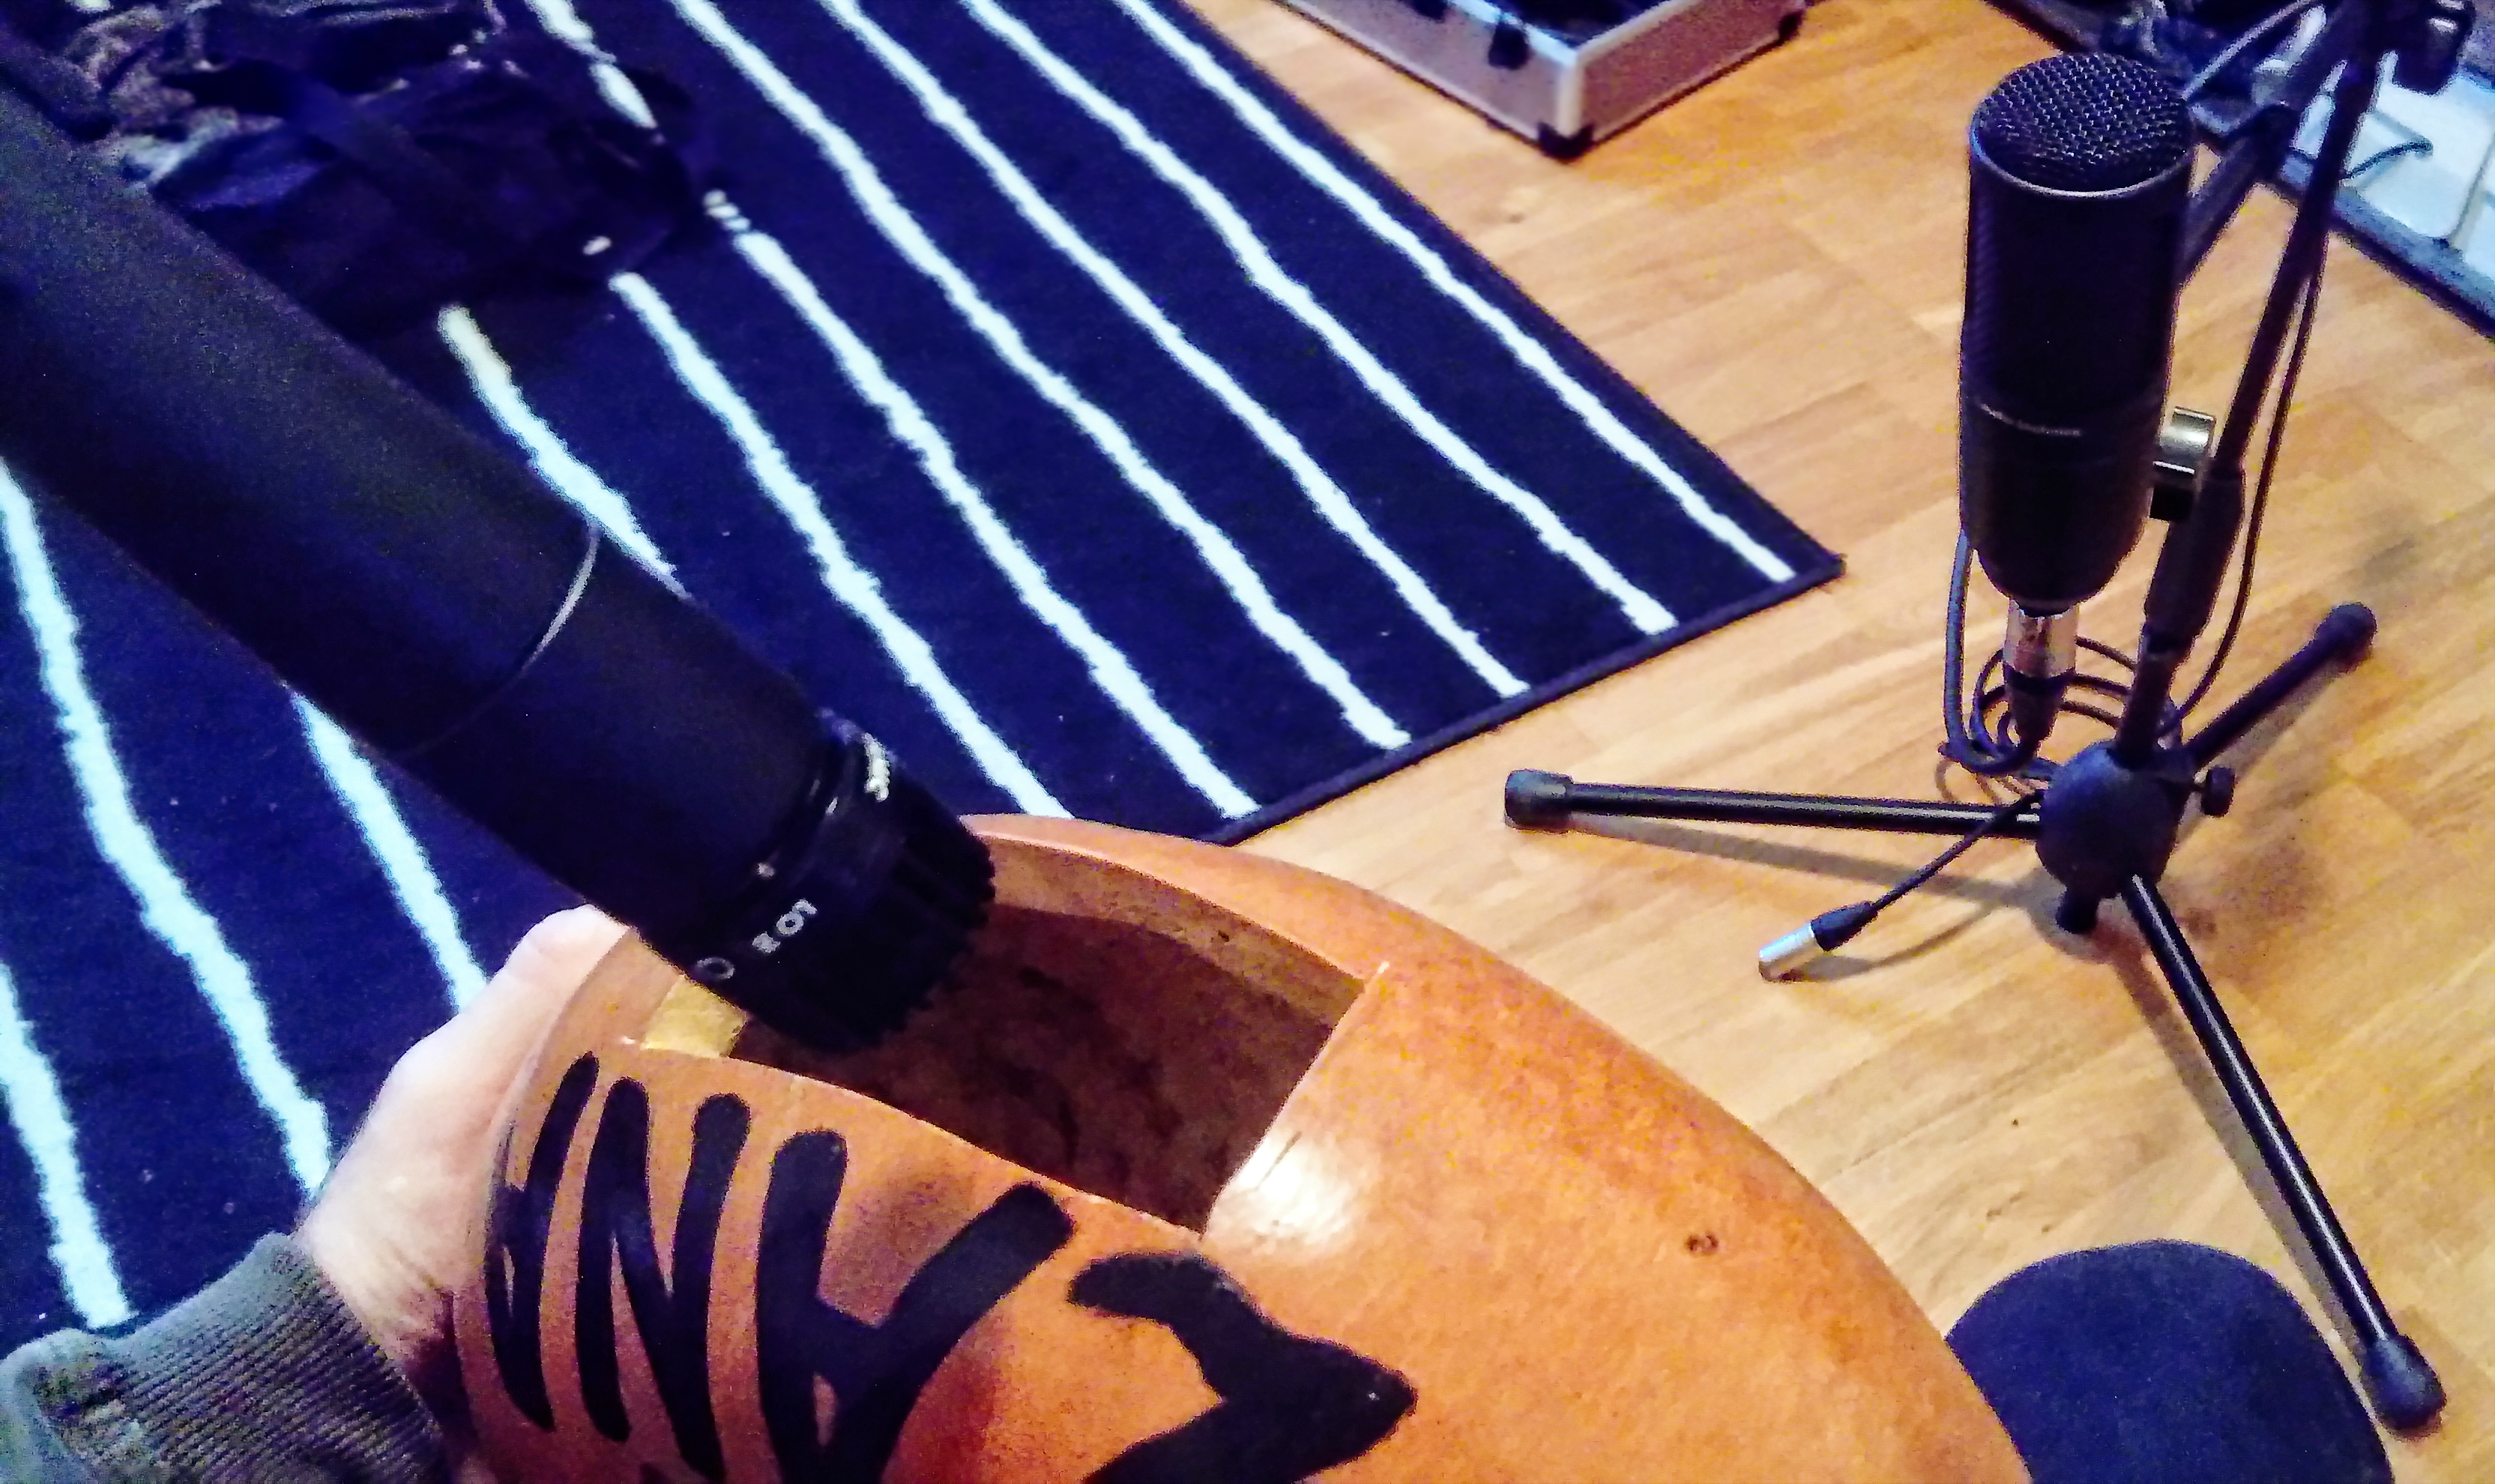
Image: Microphoning a checo: a Shure SM57 pointing to the hole and an Audio-Technica AT2020 (unplugged in the picture) pointing to the surface, where it’s hit by the hands.
Some make-up for the little pumpkin
Before ripping it off, we’ll add some color to this dry sound. Let’s start with the take from the condenser mic (Audio Technica AT2020): we need more presence in the high end and a cohesive sound so we apply our beloved GRM Contrast (a plug-in we covered in this article) and then we add some massive compression, first with Soundtoys’ Devil-Loc and then with McDSP’s ML4000. Finally, we apply a bit of distortion for adding more harmonics.
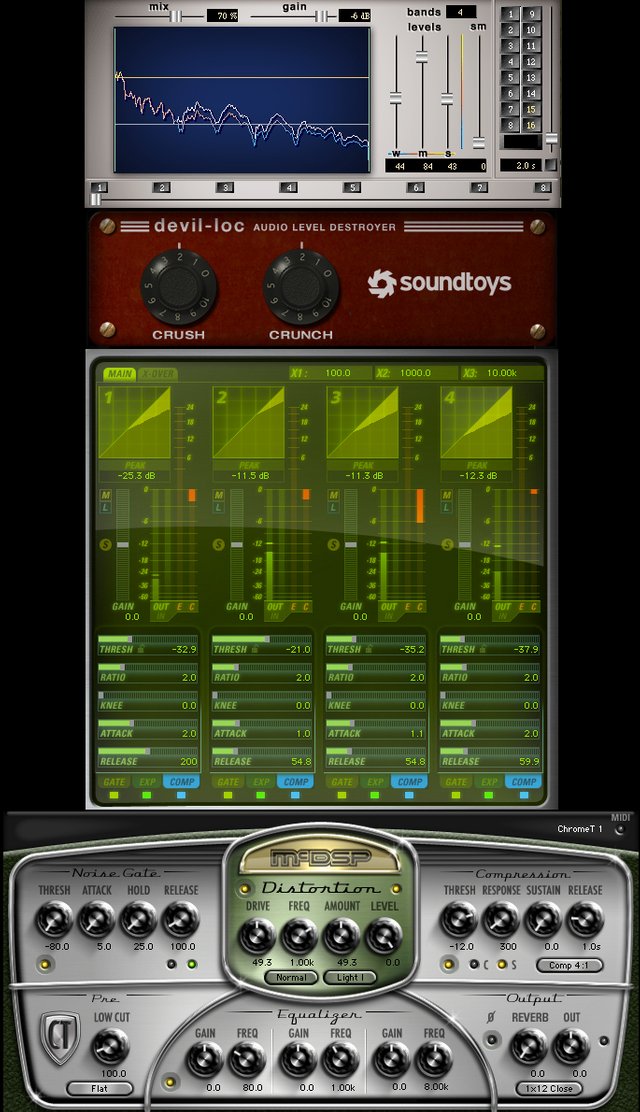
Image: Checo, processing chain (take: Audio-Technica AT2020)
As for the take from the dynamic mic (Shure SM57), we go a bit wild: GRM Contrast → Distortion (Decapitator) → EQ → Compression (ML4000) → Distortion (McDSP Distortion) → Amp Simulator (BIASAMP) → EQ
(Listen: track “Example 1” – “Audio Clip 2”, scroll down to “Example 1“)
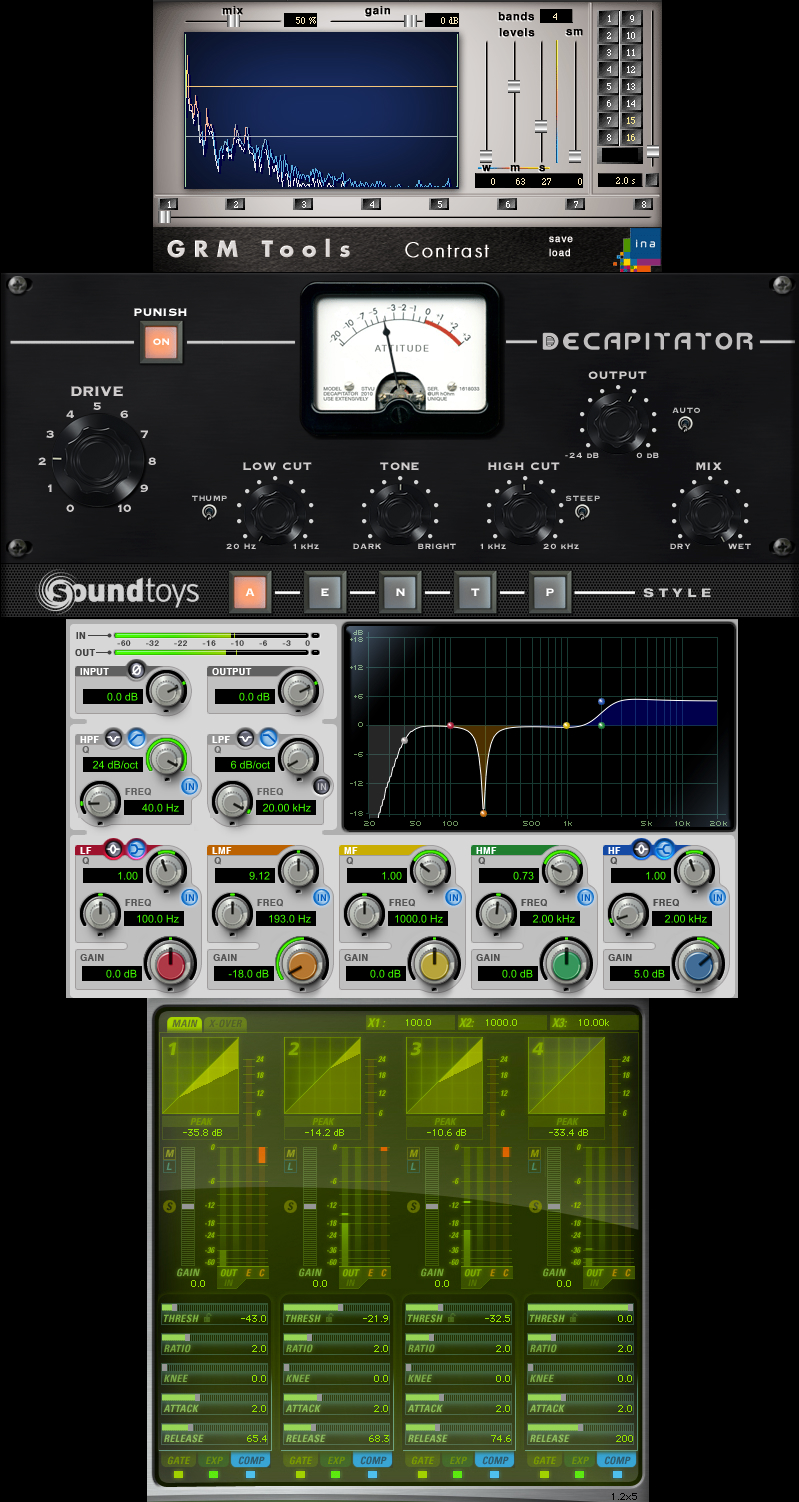
Image: Checo, processing chain (take: Shure SM57) – Part 1
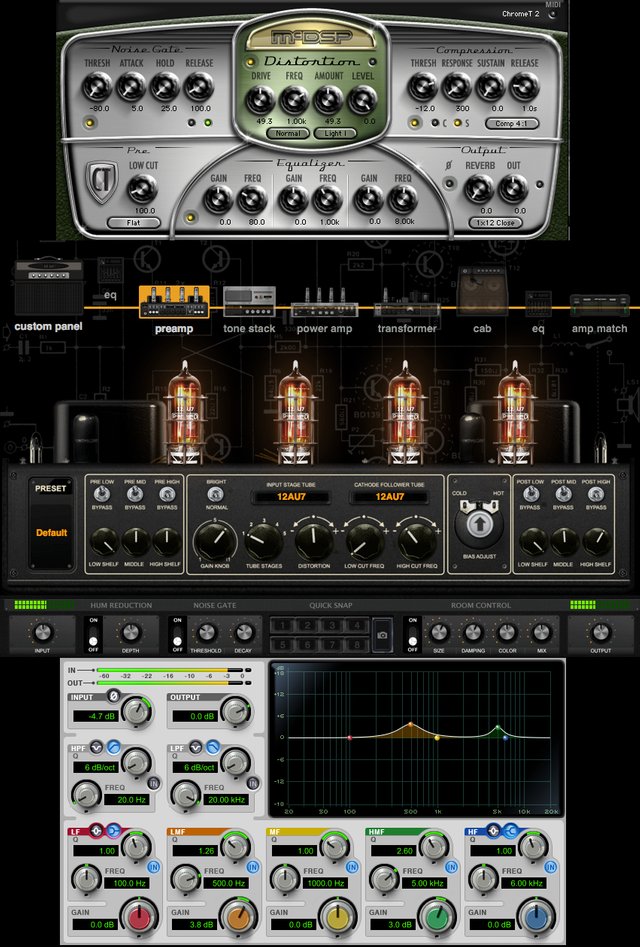
Image: Checo, processing chain (take: Shure SM57) – Part 2
Example 1
Audio Clip 1: Original recording with two microphones (AT2020 & SM57).
Audio Clip 2: The same recording after some processing.
Granular synthesis: chopping off the pumpkin
We wrote a whole article about granular synthesis, in which we mentioned BASTL’s microGranny, a tiny and toyish piece of gear that can do marvels when loaded with samples that are rich in harmonic content. So what do we do with it?
We could have had a more scientific approach with it, but I’d rather get into the wild and explore, so we load it with our pattern and start turning knobs until we find something interesting. My advise is to keep the microGranny plugged to the audio interface and ready to be recorded because you might not be able to get the same sound again.
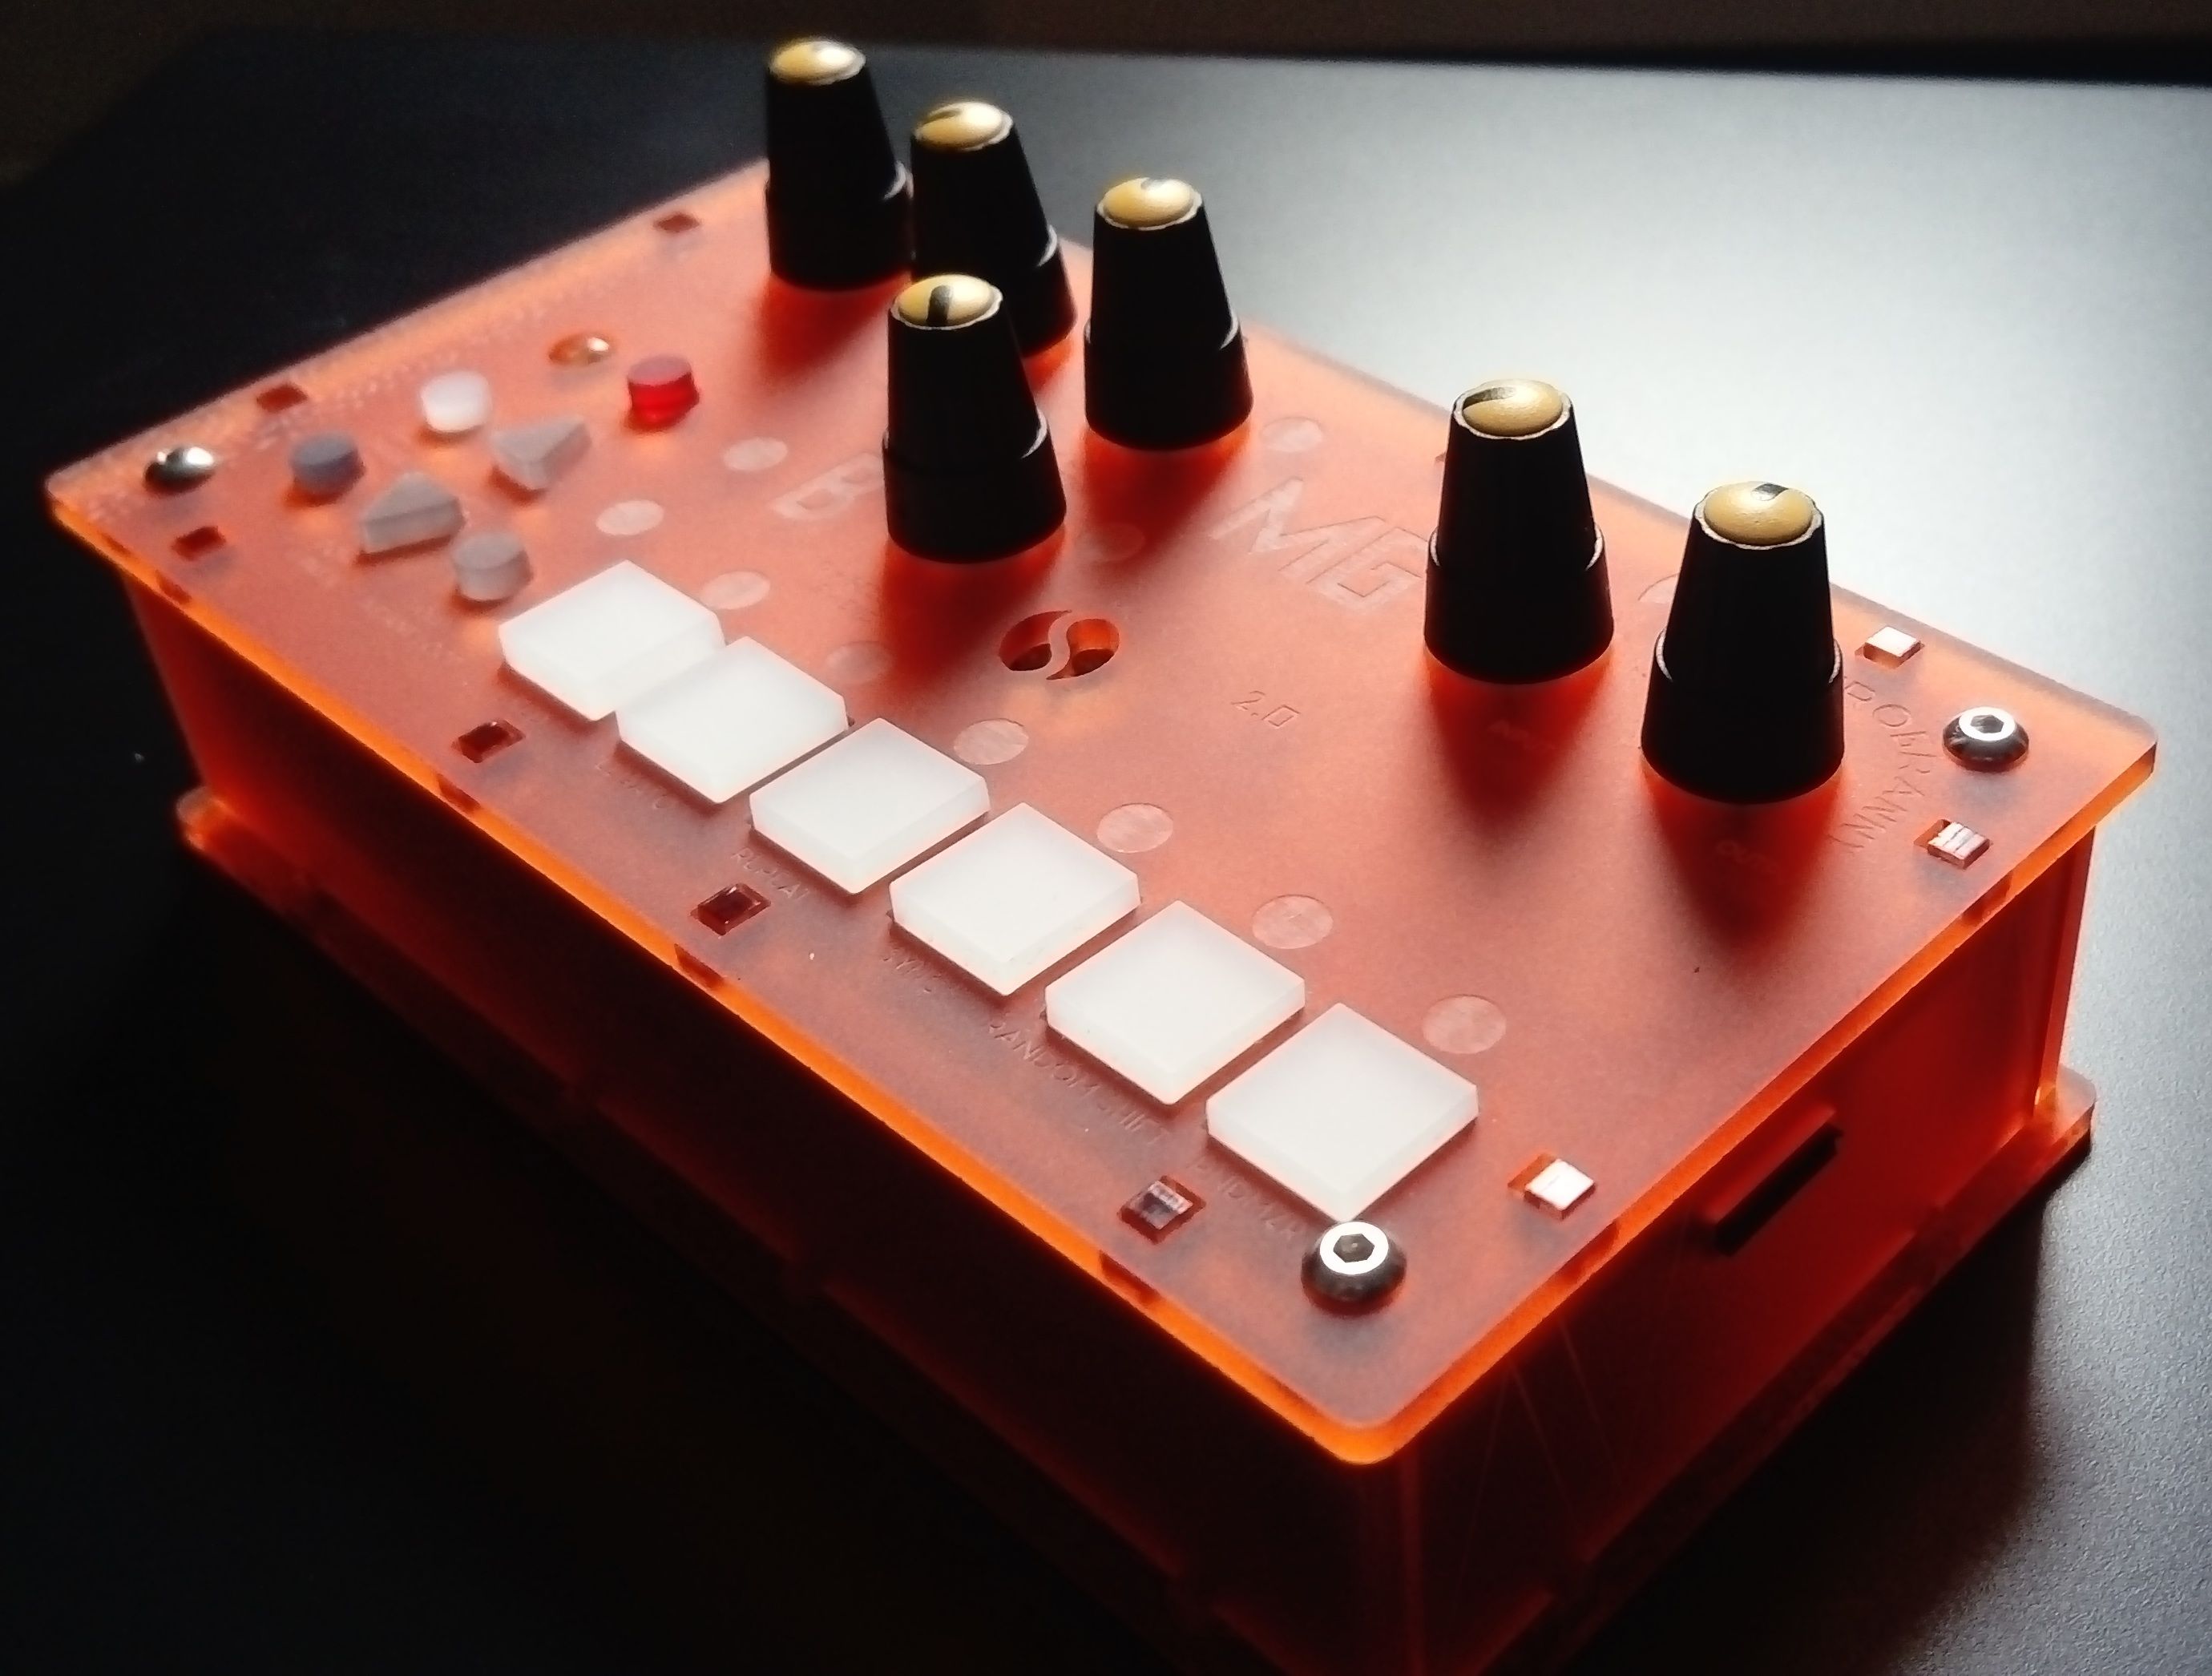
Image: The microGranny, by Bastl Instruments. Workshop Edition.
Example 2
Audio Clip 1: Pattern 1, done with BASTL Instrument’s microGranny.
Audio Clip 2: Pattern 2, done with BASTL Instrument’s microGranny.
Audio Clip 3: Pattern 3, done with BASTL Instrument’s microGranny.
Audio Clip 4: Pattern 4, done with BASTL Instrument’s microGranny.
Audio Clip 5: Pattern 5, done with BASTL Instrument’s microGranny.
After some minutes of joy and play, we ended up with five new patterns in Ableton Live.
(Listen: track “Example 2“)
Carving and polishing
The new patterns are not in the same tempo as the original recording, that’s a side effect of granular synthesis, so the first thing we do is to match the transients to follow the beat (in this case, 100 BPM). That’s pretty easy to do in Ableton Live, just double click on the transient and move the yellow marker to the desired position in the grid (ideally, to the closest beat).
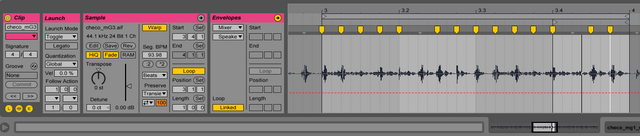
Image: Matching transients to beat divisions in Ableton Live
Creating loops
We need a set of loops to work with, and that involves listening to our new (and now fixed) patterns and choosing the right start position, the right end position and the right length. If there’s a portion that bothers us, we can mute it by using the volume envelope. The idea is to be happy with every single pattern.
As a result of this process, we end up with five loops at 100 BPM, they are catchy and they can be combined easily.
(Listen: track “Example 3“)
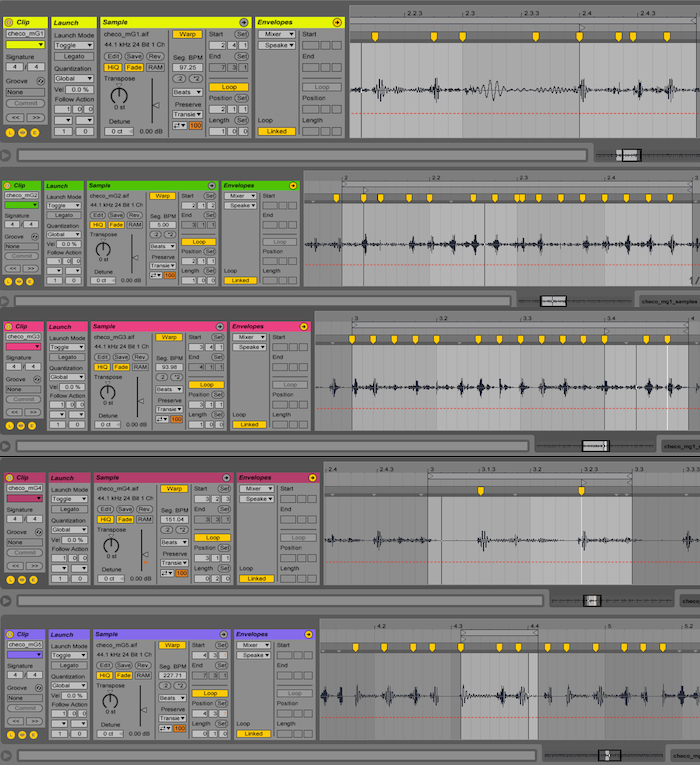
Image: All drum patterns after adjusting the transients
Example 3
Audio Clip 1: “Pattern 1” (from “Example 2”), after transient adjustment in Ableton Live.
Audio Clip 2: “Pattern 2” (from “Example 2”), after transient adjustment in Ableton Live.
Audio Clip 3: “Pattern 3” (from “Example 2”), after transient adjustment in Ableton Live.
Audio Clip 4: “Pattern 4” (from “Example 2”), after transient adjustment in Ableton Live.
Audio Clip 5: “Pattern 5” (from “Example 2”), after transient adjustment in Ableton Live.
Assembling the final pattern
“Every track tells a story”, that’s what I stand up for and my motto when writing music. With a story in mind, it’s now a matter of triggering the individual loops one after another and tell the story of the track with them. You can listen to the final result down below (Listen: track “Example 4”, which includes the final touches described in the next paragraph).
Example 4
Audio Clip 1: The whole drum sequence, out of the loops from the track “Example 3”, after some basic audio processing.
The cherry on top: adding the final touch
We could have stopped there, but why not taking it to the next level? By applying the concept of layering (that we explained in this article), we can get a killer sound out of this humble pumpkin.
The track has been split in three layers, each with a different processing:
–Layer 1: Compression (ML4000) → Low-pass Filter
–Layer 2: Distortion (FutzBox)
–Layer 3: Compression (ML4000) → Band-pass Filter → High-pass Filter → EQ → Distortion (Decapitator)
(Listen: scroll up to “Example 4“)
Something new is coming... Stay up to date with Cracking Sound: Subscribe!
Written by Miguel Chambergo (aka Donatien Sade)
Listen to my music - My new album will be out soon.
Follow us on Facebook: Cracking Sound
This article was originally published in CrackingSound
Really interesting results and super nice to read your post! Pumpkin music! The other day I ate Pumpin soup and now I have the music that will go along with it :)
Hi @qsounds,
Thanks for reading and I'm glad you liked it. Enjoy your soup :)
Take care,
Miguel
Congratulations @crackingsound! You received a personal award!
Click here to view your Board
Congratulations @crackingsound! You received a personal award!
You can view your badges on your Steem Board and compare to others on the Steem Ranking
Vote for @Steemitboard as a witness to get one more award and increased upvotes!