MSP-Waves Broadcast Tips Ep. 4 - Home Studio Setup
The Home Studio

Hello, dear MSP fans, members, and visitors!
@globocop again for you, on behalf of the station. Today, we're talking about our home studio setup - with tips and even a video of my own humble broadcast station. I hope you enjoy today's edition.
MSP Waves is an amazing project. It allows everyday folks to host not just a podcast, but live audio and video shows with a live chat audience via Discord. Free software, low-cost equipment, some technical knowledge, dedication to the project and the ability to express oneself is all that's required.
We here at MSP-Waves have designed a process that helps MSP Members to become show-hosts themselves. Some host more than one weekly show. What an amazing opportunity to support the ideas and ideals you're passionate about and at the same time, to deliver entertainment and also improve our own skills and knowledge.
Amazing!
That said, as broadcasters, we can make our transmission time more fun and relaxing while delivering the best listening experience for the MSP-Waves audience.
Here are some tips for a savvy home studio setup that will go a long way to a more confident and truly relaxing show with a professional touch. Here are the basics.
Basic equipment:
- Microphone
- Microphone stand and shock-mount
- Interface and/or mixer (optional)
- Wind/Pop filter
- Headphones
- A computer
- Internet
- OBS software

Microphone
For broadcast purposes, the best choice will always be a condenser microphone, as it captures the voice most accurately in a studio environment. I am using an Rode NT2K and a Rode Podcaster as a backup.
If you are using a condenser mic, an interface for your computer is also required. In my case, it's an iTrack Solo, which plugs into the USB port of my computer. Most mixers will also provide an XLR-input for condenser mics with a pre-amplifier to power the microphone.
Some DJs are using a combined Mic/Headset for gaming, which also does the job. If you purchase one, make sure you can return it if it doesn't deliver the expected results.
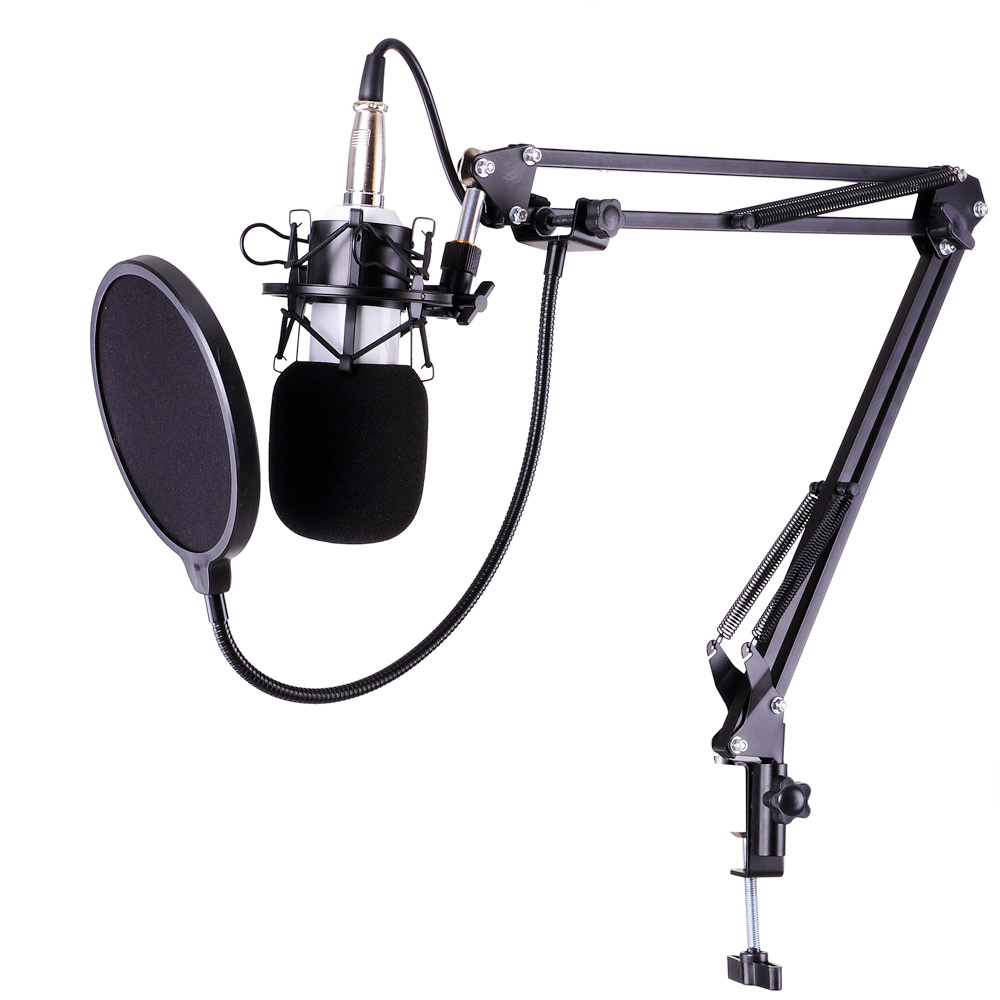
Stand and shock-mount
If you're using any stand-alone microphone, it is vital that it is mounted on either a desk stand or a microphone studio arm, which I prefer, as it is flexible and frees up desk space.
The shock-mount is important, too. It cushions the microphone against shocks resulting from working at the desk, even floor vibrations by someone walking in the house.
Wind or pop filter
When we speak face to face, the sound our lips make my popping the 'P' sounds natural. The 'S' also comes across smoother, although a de-esser will better take care of that. However, when we speak into a sensitive microphone, the Pop of the 'P' and the sharp sound of our 'S' are greatly amplified, resulting in a disturbing sound that disrupts our listening experience. The solution is easy: Get a foam wind or pop filter. Wind screens are generally used for outside environments, while pop filter are used in studio settings. However, both will do the job.

Foam Wind Filter
While these dampen the audio level somewhat, they also eliminate the P-pop and sharp S-sounds we make when speaking. These fit over the microphone and generally make the overall mic sound a bit warmer.
Pop Filter
A bit more expensive, but these round little screens are mounted in front of your mic and eliminate and pop or hissing when you speak.

Headphones
There are fancy ways of setting up a headphones via a headphone amplifier. This is especially useful, if you have in-studio guest or co-hosts.
However, when you're alone, a simple direct cable headphone is important. They serve as a monitor, so that what you say and broadcast can be hear by you, but is not picked up by the mic. Without using headphones, you wouldn't hear your voice as it is transmitted, and having your voice come through monitors/speakers would create feedback.
I don't recommend the use of bluetooth or Wifi headsets, as (1) the battery is a potential point of failure and (2) wireless transmission may be subject to interference during broadcast.
Computer
Any Linux, MAC or Windows system with generally 8 GBs of RAM, at least a dual core processor and plenty of storage for recording will do.
Internet
The faster the better. However, the minimum speed suggested is 1 Mbps Up and 4 Mbps download.
It is also best to connect the computer via an ethernet cable directly to the router, because WIFI are potentially subject to interference form neighboring Wifi devices.

OBS Software
Last but not least, OBS. It's designed to transmit audio and video from many sources. Images, live web pages, a video feed of yourself via a video camera, a video file, and many more options are possible. For an in-depth look, check out The Most in-depth OBS course ever made.
The Room
Now let's talk about the room - your studio.
Dedicated Space
It should be a dedicated space. Once you're setup and running, you don't want to move/unplug your equipment unless absolutely necessary. The more complex a set-up gets, the more space you will need and the more points of failure are introduced. Once plugged in and working, it's best to document the set-up and to leave it alone.
Acoustics
Reverberations
Carpets will help reduce and room reverberations.
If you really want to go fancy, use acoustic foam in strategic locations on walls. even ceilings, to hone in on truly great studio sound. Another solution is the microphone screen, although this works in my view best for performances where the space behind the mic is not needed, such as performing while standing.

Windows
Windows are a source of unwanted noise. The less, the better. The further away the setup is from windows, the better.
One can reduce window noise by hanging up dense blankets that will serve as noise insulators. It's getting fancy now, and may not be required, but it is good to have options.
Family, room mates, pets
A red light outside your door during broadcast time with an agreement that family members and room mates will not barge in when the red light is on will ensure you’re not broadcasting your families wants and needs when you're on the air.
Also, cats walking on your keyboard and purring into the mic, barking dogs, and singing birds may just take away from the message and an uninterrupted experience you have during transmission. Best for everyone that the studio is off limits when live.
I have included a little video of my own studio setup.
I hope you enjoyed this edition of our MSP-Waves Broadcast Tips Ep. 4.

How to become a MSP-Waves Presenter
And now, practice makes perfect.
If you would like to become a show-host on MSP-Waves, please contact me on MSP Discord. I look forward to having a chat to discuss your show idea.
Thanks everyone for reading.
Chris
on behalf of
your MSP-Waves operations team.
Useful Links
MSP-Waves
Minnowsupport Project
MSP/PAL on Discord
Listening on Discord

I am using Bitwing and its really cool DAW. Looks like ableton + logic together but without some features. And with some unique cool features that speeding up workflow. I think it have much better look and it is more tidy than ableton.
Right, but we're looking here not as much at audio post-production as at live-broadcast.
Yay! A tutorial on something I really should NOT have for the sake of humanity! LOL
All based on free will !! :)
Just because I can, does not mean I should... ROFL
Yeah - we have safeguards built into the onboarding process...
It's not for everyone - especially when public safety is at stake. 😝
THis is a BEAUTIFUL post! So much helpful information. The pictures and formatting is on point. Do you have this on a google doc, would love to see the formatting codes you used.
Here you go @kubbyelizabeth
The code can usually be reviewed via steemdb.com/@account-name --> Posts for any account/post, however, the dataabase seems v slow atm.
https://hackmd.io/s/S10dRNTQz#
You got a 2.27% upvote from @mercurybot courtesy of @msp-waves!
This is some solid info!!!
I would also recommend you check out this piece of free software!
https://www.vb-audio.com/Voicemeeter/index.htm
A student of mine shared this with me some time ago, and it has helped immensely for doing skype vocal lessons!!
This turns your computer's different audio feeds into "virtual cables" as it were, so you can mix and match different stuff right on it, like a skype call and music and a daw, all at once into one stream of audio, and it also creates a "driver" option on most programs, that way you could choose the output of it on discord and you could play music and use your setup at the same time, I wanted to share this with you on the las Chaos show broadcast but I remembered just now! :)
I hope this info can be useful to you, in case you didn't know about it before hehe
Thanks a lot for sharing valuable tips...Carry on my friend...
Such valuable information
You got a 0.43% upvote from @upme requested by: @msp-waves.
Send at least 1.5 SBD to @upme with a post link in the memo field to receive upvote next round.
To support our activity, please vote for my master @suggeelson, as a STEEM Witness
This post has received a 2.72% upvote from @lovejuice thanks to @msp-waves. They love you, so does Aggroed. Please be sure to vote for Witnesses at https://steemit.com/~witnesses.
Thank you for this! Just what I needed to know :)