Plugin insight: GRM Contrast - A helpful tool when it comes to get interesting sound textures
I have to admit that I have a weakness for low frequency sounds. They are so powerful that they can shake the whole building when played on a nice set of speakers. When that is not the case, unfortunately, they disappear completely.
If you have ever played a song on your cell phone or laptop speakers, you know what I am talking about. They can take a piece of music that has been recorded, mixed and mastered in state-of-the-art studios by the best engineers in the world and reduce it to a dull, plain track. That’s why it is important to balance the mix and always have something in the mid-high range of the frequency spectrum, which is the portion that won’t get lost. Ideally, the mix should result in a sort of flat frequency response that anyone can enjoy no matter which speakers it's being played on.
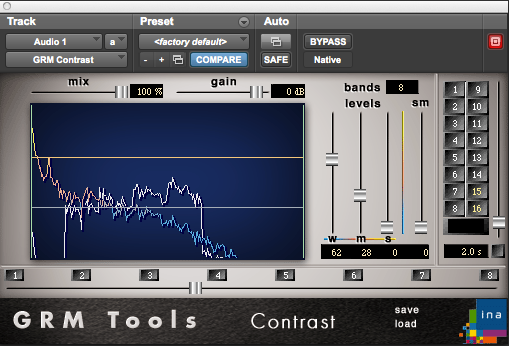
This is when the GRM Contrast comes in handy. As part of the GRM Tools "Spectral Transform" bundle, this plugin lets you modify different bands in the spectrum and increase the contrast between them. The result is a more intense and audible contrast than the one you could get by simply applying equalization.
For instance, when applied to a guitar, it can give more presence to the mid-highs by bringing the sound of the strings being plucked to the front; and at the same time it keeps the mid-lows just where they were, which results in a clear, shiny sound full of nuances. If it’s taken to an extreme, however, it can destroy the original sound, so finding the balance between the dry and wet signal is the key.
It is also a great tool for experimenting, since it can bring to the surface certain frequencies that were too subtle to be noticed. The more a sound is rich in texture and frequencies, the more this tool can do.
How does it work?
The audio is separated in three bands, “weak” (w), “moderate” (m) and “strong” (s). According to a test made by DesigningSound¹ ,
adjusting the "S" parameter will mostly just affect the volume of the fundamental and its first overtone, the strongest signals in the spectrum; adjusting the "M" has some effect on the fundamental but mostly controls the first overtone, the second-strongest signal; and the "W" knob will accentuate or cut the 5th harmonics on up, the weakest signals in the spectrum.
The results are not always predictable, though.
Approach
There are two different ways of approaching this plugin. The first one is to just drag the horizontal slider at the bottom, which will transition across all different presets and thus give a rough glance of the possible sounds that can be obtained.
The second approach is to use the individual vertical sliders, 'w', 'm', 's' and 'sm' in order to see the effect each one has on the original signal and then combine them to get the desired sound.
I personally prefer to start with the presets and continue from there by tweaking the individual sliders. Once I have a sound that I like, I try to find the right balance between the dry and wet signals using the “mix” slider.
The bottom line
What makes this plugin attractive is its overall level of unpredictability. You can’t know for sure if you are going to come up with a nice sound or not. Anyway, whether you just want to add more mid-high frequencies to a specific sound or you are experimenting with sound textures, this is a plugin worth checking out. As said before, the richer the sound, the better results you can get out of it. Just explore.
1: (source: http://designingsound.org/2011/04/grm_tools_3/)
Written by Miguel Chambergo
This article was originally published in CrackingSound

