Built a GPU Miner! GPUでの仮想通貨マイニング!
I have been working on building a GPU miner the past few days. This is my 2nd try at mining. My first try was back in end of 2013. I started with mining Litecoin then moved to Dogecoin but due to electricity cost eating most of the income and the heat being unbearable, I had to stop mining in the summer of 2014.
With the recent rise in the value of cryptocurrency, mining is looking like an attractive investment again. I also like building a rig and messing around with Linux and GPU clocks. So, here is my build!
この数日間でGPUマイナーを作りました!これは私のマイニングの再トライです。私は2013年の終わりごろ、ライトコインのマイニングを初めて2014年の夏にはドッジコインのマイニングをしていました。ですが電気代と熱がひどくて止めてしまいました。
だが、最近の仮想通貨の上昇のおかげでまたマイニングで儲かりそうなので再トライです!
Here is my parts list.
これがパーツリストです。
GPU: 3 x MSI Radeon RX 580 4GB
Motherboard: 1x Biostar TB250-BTC
Power Supply: EVGA 750 GQ 750W 80 Plus Gold
CPU: Intel Celeron G3930 Kaby Lake Dual-Core 2.9 GHz
RAM: Samsung DDR4 4GB
Storage Drive: 16GB USB 3.0 Thumb drive
Case: Home Depot Wood
Others: PCI-E riser cards, DVI-D cable, etc.
All in all, cost is about $1000. Now lets get to the actual build.
すべてで$1000ぐらいです。では、組み立てに行きましょう。
Take the dimensions of the parts to get an idea of the layout.
部品の大きさを測って。
Build the platform out of wood.
台を木で作ります。
Then build the top structure to hang the GPUs.
そして、GPUをつら下げる為に上を作ります。
Mount the motherboard/power supply. Hang the GPU, then start connecting all the cables.
電源装置・マザーボードを固定して、GPUをつら下げてケーブルをつなげます。
Then power it up by jumping the power pins on the motherboard (No money to spend on a switch).
そしてマザーボードのピンをショートさせてブートさせましょう(スイッチを買うお金ないんで、、)
Then after this, you can mess with the bios setting such as having it boot up as soon as you power on the power supply so you wouldn't have to worry about shorting the motherboard every time it gets turned off.
バイオス設定を変更する事で電源装置の電源が入れば自動にブートするように出来ます。
For the OS, I decided to use a Linux based mining OS called Hive OS. It is easy to use and installs in a compact 8GB flash drive.
OS は Hive OSと言うリナックスベースのマイニングOSにしました。使うのが簡単で8GBのフラッシュドライブに入ります。
For RX 580overclocking, I messed around with the few settings and this setting seems to get me the best results.
RX 580 のオーバークロック設定ですが、いくつか設定で遊んだ結果、これが一番良かったです。
Core Clock (Mhz):1175
Core Voltage (mV): 850
Memory Clock (Mhz): 2175
Results 結果
Ethereum 27Mh/s per GPU card.
Sia Coin: 406Mh/s per GPU card.
Temperature: 70* C
Total Power Pull at Socket: 731watt/hour
The settings still need some improvement since these GPUs are supposed to be capable of 30Mh/s for Ethereum.
このGPUはEthereumのマイニング30Mh/sが可能らしいので、まだまだ設定の改善が必要です。
Thank you for reading! Please upvote, follow, and resteem!(^^)
最後まで読んでありがとうございます!もしよろしければ、アップボート、フォローとリスティームお願いします!(^^)
自作マイニングはあまり知識がないもので参考になります。
フォローさせていただきます。
これからもよろしくお願いします。
こちらもよろしく!(^^)
初めまして!フォローさせていただきました。私も、マイニング興味あります。実践できている方、羨ましく思います、、、
始めまして!!フォローありがとう!こちらからもフォローします!
1ヶ月後にマイニングの結果の投稿をしようと思うのでよろしく!
Nice man - thinking about building something similar myself - only for ETH - how did you jump the power pins to turn it on?
Awesome! I am currently mining mainly Ether with this GPU mining rig. So, to jump the power pins, you would need to figure out which pins are the power pins by reading the manual for the motherboard. It would look something like this.
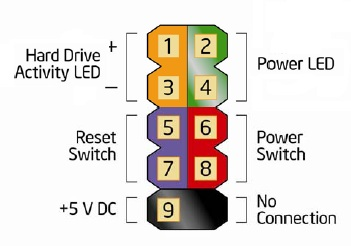
So, in this example, you would just need to short the pins 6 and 8.
Awesome build! Good luck!
Thanks! I will need it!
Killer write up, Aki.
Thanks! :)
short term business