CCBC - Easy guide to setup multiple masternodes on 1 VPS
![]()
Setting up a CCBC masternode is already very easy. Even for a non-tech guy like me... And we have the CryptoCashBack developers to thank for that.
They created 1 single script to set up your node, and to update it when necessary. The setup guide can be found HERE.
I used to think that every masternode required a seperate VPS, but that's far from true! You can stack up several ones on 1 single VPS, but there is no easy to run script for that. But even someone like me managed to work it out!
And to help the CCBC community out, here's the easy step by step guide for you!
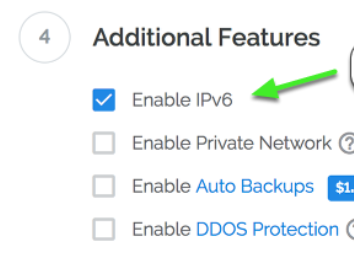
I'm not going into setting up a VPS server on Vultr. If you do need a guide for that, you can just use this one and follow the steps until your VPS is created. Just make sure that, before you fire up the server, you toggle the IPv6 option as shown here:
Then log into your server and we are all set to go!
(For every step, just copy & paste the command)
Step 1:
git clone https://github.com/CryptoCashBack-Hub/Advanced-Install.git && cd Advanced-Install
This will only take a few seconds so we can quickly move to the next step.
Step 2:
./install.sh -p ccbc -c 4 -n 6
here it's important to know how many MNs you want to start. In my example I'm using 4... If you need a different number just replace the 4 by any number needed.
This will copy and install the entire setup for the number of masternodes you need. This will take around 25 minutes, so just let the script run.
In the meantime you can go to your wallet, open up the debug console and generate the number of genkeys that you need. So just get 1 key for every masternode you are setting up.
Step 3:
nano /etc/masternodes/ccbc_n1.conf
Now we'll have to insert the different genkeys into the different conf files that were created. You do this with the above command.
On this screen you will see your IP address; copy this to put into your masternode.conf file in the wallet later on. This IP address will end in ::1, and all the numbers in front will be exactly the same for every masternode we are creating right now. The only difference is the last digit; that will be ::2 for the 2nd node, ::3 for the 3rd, and so on.

Further below you will have to insert insert your genkey.

If you've done that, just close and save the file as follows:
< ctrl+X > (to exit the file),
< Y > (to save the file),
< enter > (to confirm the file name)
You will have to repeat this for every masternode. So just do it again, but just replace the '1' by '2', like this:
nano /etc/masternodes/ccbc_n2.conf
and then do exactly the same and insert another genkey that you created.
Repeat this for every masternode.
Step 4:
/usr/local/bin/activate_masternodes_ccbc
This will activate the synchronisation of your masternode, and will only take a short while.
Step 5:
/usr/local/bin/ccbc-cli -conf=/etc/masternodes/ccbc_n1.conf getinfo
This command lets you check the status of the synchronisation. The number behind 'blocks' needs to match the current block number which you can check here.
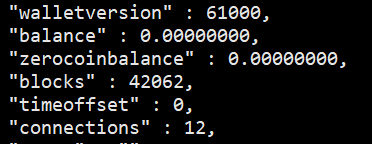
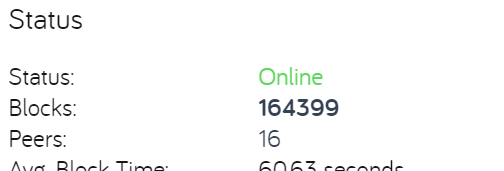
In these images you see that both numbers don't match, so just let it run... This can take a while and you can check the status once in a while until both numbers match.
In the meantime you can configure your masternode.conf file in your wallet. (if you don't exactly know the actions you have to take in your wallet, i'll repeat them at the end of this article)
To remind you what the masternode.conf has to look like; for each MN you will have to insert a line in the .conf file as follows:
1 =>. CCBC_01 (the name of your masternode)
2 =>. [2001:19f0:5001:xxxx:xxxx::1]:5520 (the ip address that you found in Step 3)
3 =>. 87YYv9azxxxxxxxxxxxxxxxxxxxxxx (the genkey that you created)
4 =>. c7aebdc2aa2b369d3db78a02819df70f30223256cf789a0126974903bf05 (the transaction id)
5 =>. 0 (the output index)
So this will give you the following line:

Step 6:
When the synchronisation is complete, go to your wallet and start your masternodes. (go to the 'Masternodes' tab and right click on the MN you want to start).
Be sure that your transaction of the masternode collateral has at least 16 confirmations, because otherwise your masternode will not start yet.
If that's the case, and you started the masternodes in your wallet, you can go back to your VPS and check the status by typing the following command:
/usr/local/bin/ccbc-cli -conf=/etc/masternodes/ccbc_n1.conf masternode status
If it shows status '4' your masternode is up and running!

And you can do this for every masternode by just changing the number '1' into '2':
/usr/local/bin/ccbc-cli -conf=/etc/masternodes/ccbc_n2.conf masternode status
and so on.
Support
Now if i can do this, everybody can... if you do happen to run into a problem, just go to the CCBC Discord group and ask your question in the tech-support channel.
Adding A Masternode
If you already did set up your VPS, but after a while you want to add more masternodes to it, that is also very easy to do! Just follow the step by step guide again, except for Step 1 (which will be a different command):
Just open up the VPS server you would like to add your masternode to. And then start with the following command:
cd Advanced-Install
This is the directory that we installed everything to before.
Then you can go to Step 2 in the above guide. And in that command you will just have to put the total number of masternodes you want to have (so add together the number of masternodes that you are already running and the number you want to add).
I installed 4 in the above guide, and let's say I want to add 1... that means I will have to give the following command:
./install.sh -p ccbc -c 5 -n 6
Just follow the guide from there and you will be able to easily add more masternodes!
Know that the installation script remembers the input you have done for the first 4 masternodes, so you will only have to configure the new masternodes. In my example that means only 1 (the 5th one in total):
nano /etc/masternodes/ccbc_n5.conf
Then activate the masternode as explained in Step 4... this will take a little bit longer this time. However the syncing in Step 5 will be a bit quicker.
And then you can check when the masternode is fully synced and you can fire up your extra masternode!
How to setup your wallet
For this guide I'm assuming that you know how to perform the necessary actions in your wallet, but for those who don't, here's a quick reminder.
To create the genkey, you will have to go to the 'Debug Console' in your 'Tools'-tab.
Type in the command masternode genkey and it will generate the key that you will have to enter in Step 3.

Then you have to send the masternode collateral (of 25,000 CCBC). Create a 'receiving address' in the 'File'-tab. Give it the same name as your masternode; so in my above example mine would be 'CCBC_01'.
Then copy that address and click the 'Send' button. Now send 25,000 CCBC to that address!
Once the transaction starts confirming, check the transaction id:

When the transaction is confirmed, go back to the 'Debug Console' in the 'Tools'-tab and type in the following command: masternode outputs
You'll get a list of all the transactions that qualify as a masternode transaction. Look for the correct id in the list and look at the number (always a 0 or a 1) that follows it. This is the output index!

Now you have all the components to configure the masternode.conf file. To open this, go to 'Tools'-tab again and click on 'Open Masternode Config File'. And then you put in the line that we created in Step 5.
That's it folks!
This guide could not have been possible without the work of CCBC's developer Tfinch, and special thanks to danyway for the proof read and the added tips. There are other ways (and possibly better ways) to install and configure your server and masternode, but I wanted this to be an easy to follow guide for non-tech guys like me. And this is what works for me.
If this guide helped you save money on hosting masternodes, please feel free to make a donation. All donations will go towards the CCBC Development Fund:
BTC: 33GsxhhjQDj1TgULeDkjjwUEBkfBF6oAwg
CCBC: Sgqzf7evgrP5r6vYB6rTZtDxE2LQwxUAgZ
There are also other ways to help out the project and you can read them in my previous article I did for CCBC.
If you want to read more about the project CryptoCashBack, I'll leave you some links below. This article is only meant to be a guide on how to setup multiple CCBC nodes on 1 VPS, and is in no way intended as financial advice.
Website
Discord
Cryptobridge Exchange
BTT Announcement
You can also contact me at [email protected]
Thank you so much for sharing this amazing post with us!
Have you heard about Partiko? It’s a really convenient mobile app for Steem! With Partiko, you can easily see what’s going on in the Steem community, make posts and comments (no beneficiary cut forever!), and always stayed connected with your followers via push notification!
Partiko also rewards you with Partiko Points (3000 Partiko Point bonus when you first use it!), and Partiko Points can be converted into Steem tokens. You can earn Partiko Points easily by making posts and comments using Partiko.
We also noticed that your Steem Power is low. We will be very happy to delegate 15 Steem Power to you once you have made a post using Partiko! With more Steem Power, you can make more posts and comments, and earn more rewards!
If that all sounds interesting, you can:
Thank you so much for reading this message!
great guide explaining how to set up multiple ccbc masternodes. sounds easy enough. great work
After collecting some more of the great CCBC coins, I managed to setup a VPS with several masternodes on the same machine, thanks to this great article! Very nice explaned, not a single problem occured. Thank you!!
Congratulations @swcrypto! You received a personal award!
You can view your badges on your Steem Board and compare to others on the Steem Ranking
Vote for @Steemitboard as a witness to get one more award and increased upvotes!