How to Add Layered Navigation to a Custom Page in Magento 2
You have amazing products to sell in your online store? But will it matter if people can’t find your products?
When it comes to an eCommerce website, organic traffic, and user experience are useless if people can’t reach or find the information they’re hunting. Research shows that 88% of online shoppers are less likely to return a website after a bad experience. Indeed, layered navigation plays a vital role in overall user experience in an eCommerce store.
You should have well-designed layered navigation to hold users’ attention for longer. If you manage a Magento 2 store and want to add layered navigation to a custom page from your website, we recommend a win-win solution - Mageplaza Layered Navigation.
What is the Layered Navigation?
Like a sitemap of an online store, layered navigation helps customers find products more quickly based on price range, category, and other available product attributes. It’s one out of many different methods to improvise customers’ way of browsing online stores and products.
Layered navigation often displays in the left column of the search results and category pages. It sometimes appears on the Home page.
By using layered navigation, users can narrow down the search results by selecting multiple product filters at once to specify the items they’re going to buy. Based on all filterable attributes users select, the search result will show the most appropriate products. You can set up layered navigation at the backend without having a technical background or complicated code.
Why should we have layered navigation in online stores?
If you already get to know the layered navigation through the first section, you must be understanding how important it is for an online store partly. A clean and easy-to-browse layered navigation will make your website highly functional.
According to Marketing Sherpa, 73% of users leave an online store in two minutes if they can’t find what they need. That’s why it’s essential to show what customers are looking for in your online store, not what you think they would love to see.
Imagine you’re an online shopper, it must be tiring browsing a site with too many products without excellent website navigation. On the contrary, a website with layered navigation provides users with multiple filters and price range to find and sort out their items with ease.
How to add layered navigation to a custom page in Magento 2
Install Mageplaza Layered Navigation
First of all, check guide to install Magento 2 module.
Backend configuration
- Login to your admin account. Go to Stores > Configuration > Mageplaza > Layered Navigation.
- In the General Configuration, choose Yes to enable Layered Navigation. Complete all the fields in the General Configuration.
- If you select No in the Add Apply Filter button field, the results will automatically load and show up right after the user clicks on the checkbox. Choose Yes to require commit before filtering.
- Expand the Additional Filters section, configure Product State Filter, and Rating Filter.
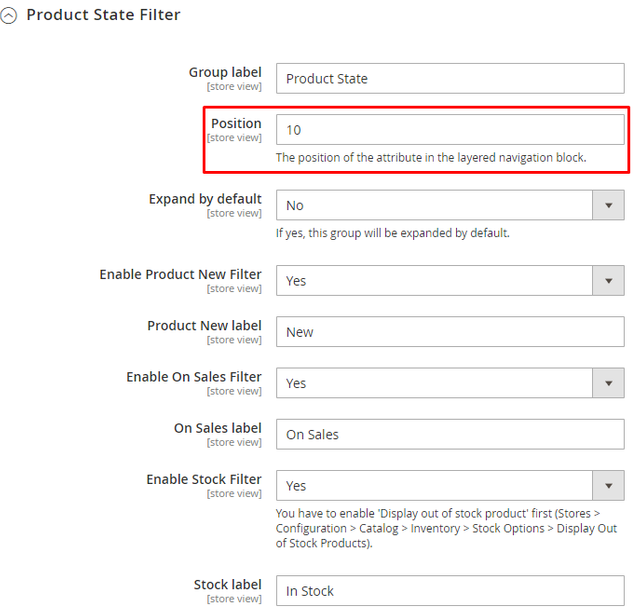
- In the Product State Filter section, the position is the position of the product attributes that you want to display in the layered navigation block on your website.
- Choose Yes to enable the Rating filter.
- Add a Sub-category slider and determine the design configuration of the layered navigation. You can add many categories to a slider at once to apply layered navigation.
After completing all the sections, remember to save the configuration.
Shop By Brand
The module allows users to filter products from their favorite brands. To enable this feature, go to the Shop by brand section, complete the configuration.
Add a new attribute
In the Admin panel, navigate to Stores > Attribute Set > Add New Attribute.
Enter the name of the attribute and choose which category to show the attribute in the layered navigation.
Add new product attributes
Go to Stores > Product. Then open attribute in the edit mode.
Set up each attribute to use in layered navigation according to one of the following elements:
- Filterable (with results): The layered navigation only shows the attribute values that apply to the products. Filters with no product matching the filter values will not display.
- Filterable ( no results): All attribute values will appear in the layered navigation column even if there are no products connected with it. Layered navigation will display at a category page with available filterable attributes.
Use in Search Results Layered Navigation is optional. In ProductsPage Navigation Properties, choose Yes to enable it. After completing all fields, click on the Save Attribute button.
Repeat the configuration steps for other attributes you want to appear on the layered navigation. Refresh cache management to see the filterable attributes associated with layered navigation on the storefront. To do it, navigate to System > Cache Management.
Layered Navigation on the frontend
Multiple filterable product attributes appear on the left column of the category page.
Featured brands display as a preview. Click on the View all button under the Brand List to see all brands. Customers can search their favorite brands to purchase more conveniently.
Conclusion
Along with speed, layered navigation of an eCommerce website is one of the crucial factors you should never ignore. If you’re finding solutions to tackle problems related to navigation for your online store, Mageplaza Layered Navigation will make your website navigation easier and comfortable for customers.
If your online store is suffering bad layered navigation, we’ll help you to find out the problem and solve it. Or, in case you have any questions related to Mageplaza Layered Navigation extension, feel free to leave a comment under this article.