Lightning network: get your sticker, a detailed howto.
Overview
I document how to setup a Lightning node on mainnet and purchase a sticker from Blockstream's store. This is not necessarily the recommended approach, the cheapest or most efficient one. The figure below describes the final setup.
The setup is composed of two AWS virtual machines, one running Bitcoin's core node, bitcoind, and one running Lightning Lab's node, lnd. A Lightning channel to a well connected LN node (FederalReserve) is opened, which facilitates the payment of the invoice (QR code) provide by Blockstream's store.
Please comment so I can improve the tutorial.
All commands shown on servers are run on top of the terminal multiplexer tmux.
Setup
Setting up the VMs
I use two VMs, one for running the lightning node lnd and the special 'roastbeef' branch of the Go Bitcoin daemon btcd (which I didn't use eventually), and one for Bitcoin's core bitcoind server.
If you don't have an account with Amazon's AWS, open one and add a payment method. Login to the AWS console.
Select the region you'd like to install the servers on the right top of the AWS amazon (N. Virginia in my setup).
Select the EC2 service on the services menu to open the EC2 dashboard. Here we do 3 things; define a security group, add two VMs (instances) and buy two Elastic IPs.
Select the Security group section, add a security group, and add rules until you get something similar to:
BTC and LN ports are necessary to communicate with the nework. RPC and ZMQ ports are for local communication between your LN and BTC servers, therefore can be left out if you run a single VM running both.
It is not a good practice to leave RPC and ZMQ ports open for everyone to connect. To close those, it is possible to define a Network Access List. I left that for later. Give the group a meaningful name, e.g. 'LN and BTC network'.
Select the Instances section, and launch an instance for the LN node. Choose 'Ubuntu Server 16.04 LTS (HVM), SSD Volume Type' AMI. Select 'General Purpose' t2.small instance type. This is the cheapest instance type that has 2G memory, the minimum recommended for running bitcoind. Leave the instance details at their default. Choose to 'Add Storage' and change the default (8G) to 500G. The Blockchain size is over 160G and we need at least twice. No need to add tags in 'Add tags'. Select the security group created before on the 'Configure Security Group' step. Select Launch the instance. Before launching it'll ask you to select and existing pair or a new key pair. Create a new key pair and save the downloaded pem file as ln.pem. The instance will then start the launch process. To easily identify the instance, add a name for the instance by inline editing the 'Name' left most column of the instance in the instance list (e.g. LN node).
Select the Elastic IPs section and allocate new address. Select the address and select Associate address from the action menu. Associate the IP address to the new instance created.
Repeat this process for the second VM for the BTC node. You can reuse the key pair if you wish.
Setup domain names
Its not mandatory to have a domain name associated with your servers. I purchased bluetegu.cc domain through Namecheap. Namecheap are cheap, accept payments in Bitcoin, and are easy to use. I moved the actual domain name work to AWS, using their Route 53 domain name service.
From AWS' services menu select Route 53 under 'Networking & Content Delivery' section. Select 'Hosted Zones' and 'Create Hosted Zone'. Add the domain name (bluetegu.cc) and create a public hosted zone. An NS (Name Server) and SOA records will be created automatically. Create A records for both ln.bluetegu.cc and btc.bluetegu.cc, mapping each to its Elastic IP. Add an A record for the domain itself, pointing to one of the Elastic IPs (at this point not really important which).
Use How can I change the nameservers for my domain? to set Route 53 names servers as the names servers of the bluetegu.cc domain. Basically its selecting the DOMAIN tab on namecheap for the domain, changing 'Nameservers' to 'Custom DNS', and copying the name servers from AWS to the list here. In AWS Route 53 screens, select the domain name (don't go into the record details) and the list of nameservers are available on the right.
It takes a few minutes for the domain names to propagate across the Internet.
Setup access to servers
The pem key file downloaded from AWS should be used to access the servers. To easily access the servers without referencing the pem file each time, shortcuts should be added to the ssh configuration. The commands below are for unix. Similar commands are available for window-based or Mac-based machines.
Move the downloaded key file and make sure its read only by the system.
ronc@laptop:~/.ssh$ mv ~/Downloads/ln.pem .
ronc@laptop:~/.ssh$ chmod 400 ln.pem
Now add entries mapping the domain name to its IP and the pem file for each of the servers in config file in this directory.
ronc@laptop:~/.ssh$ tail -n 5 config

Host ln.bluetegu.cc  *.bluetegu.cc
  HostName 18.233.54.241
  User ubuntu
  IdentityFile "~/.ssh/ln.pem"
Once its done you should be able to open a terminal (ssh) or copy files from/to the servers (scp) mentioning only their domain names.
ronc@laptop:~$ ssh btc.bluetegu.cc
Welcome to Ubuntu 16.04.4 LTS (GNU/Linux 4.4.0-1052-aws x86_64)

 * Documentation:  https://help.ubuntu.com
 * Management:     https://landscape.canonical.com
 * Support:        https://ubuntu.com/advantage

  Get cloud support with Ubuntu Advantage Cloud Guest:
    http://www.ubuntu.com/business/services/cloud

8 packages can be updated.
0 updates are security updates.


*** System restart required ***
Last login: Wed Apr 11 11:45:40 2018 from 109.186.111.9
ubuntu@btc:~$
ubuntu@btc:~$ tmux attach -t 0
Two things to note here. The server prompt by default is not btc, rather it'll be the IP address assigned to it. Its quite confusing to have the internal IP addresses as the prompts. Fortunately its easy to change the prompt as described here.
Change the loopback hostname:
ubuntu@ip-172-31-80-222:~$ sudo vim /etc/hosts
ubuntu@ip-172-31-80-222:~$
ubuntu@ip-172-31-80-222:~$ head -n 2 /etc/hosts
#127.0.0.1 localhost
127.0.0.1 btc.bluetegu.cc
Change the hostname:
ubuntu@ip-172-31-80-222:~$ sudo vim /etc/hostname
ubuntu@ip-172-31-80-222:~$ cat /etc/hostname
btc.bluetegu.cc
Use hostname without restart:
ubuntu@ip-172-31-80-222:~$ sudo hostname btc.bluetegu.cc
exit and ssh again, and now the prompt is:
ubuntu@btc:~$
Once this is set, use tmux to multiplex terminals to each server, and run all commands over tmux. The tmux command 'tmux attach -t 0' reattached the already open tmux session. Learn to love tmux; its great.
Installation
BTC node
Installing Bitcoin's core on Ubuntu is a breeze. it is well documented on Running a full node Add the repository and install it. No need for the GUI part. All commands are entered over tmux.
ubuntu@btc:~$ sudo apt-add-repository ppa:bitcoin/bitcoin
ubuntu@btc:~$ sudo apt-get update
ubuntu@btc:~$ sudo apt-get install bitcoind
bitcoind options can be controlled through a bitcoin.conf configuration file. Running Bitcoin explains the available options. The bitcoin.conf in linux should be placed in ~/.bitcoin/ . It is not automatically created if you run the daemon. Create the file and add something similar to the commands below
ubuntu@btc:~/.bitcoin$ tail -n 14 bitcoin.conf
daemon=1
# Enable RPC
server=1
rpcbind=0.0.0.0
# Must list IP addresses (subnets) that are allowed to access RPC
# Unfortunately rpcallowip doesn't support hostnames (rpcallowip=ln.bluetegu.cc)
# hence Elastic IP of LN node must be specified here explicitly
rpcallowip=18.233.54.241
rpcuser=<YOUR RPC USERNAME>
rpcpassword=<YOUR RPC PASSWORD>
zmqpubrawblock=tcp://0.0.0.0:28332
zmqpubrawtx=tcp://0.0.0.0:28332
txindex=1
Set the RPC username and password, and change the IP address of LN node accordingly. The rpcallowip is not needed if you run bitcoind together with lnd on the same node.
bitcoin-cli is a command line tool to access bitcoind daemon (through RPC). The list of available commands can be found here. In particular the daemon is stopped via the bitcoin-cli interface:
ubuntu@btc:~/.bitcoin$ bitcoind
Bitcoin server starting
ubuntu@btc:~/.bitcoin$ bitcoin-cli stop
Bitcoin server stopping
As well as getting basic status, e.g. figuring out the current block height (check if synchronized)
ubuntu@btc:~/.bitcoin$ bitcoin-cli getblockchaininfo | head
{
  "chain": "main",
  "blocks": 518447,
  "headers": 518447,
  "bestblockhash": "0000000000000000001a604a691af594c65dd8dd86d35ff75215b8ee09e823b8",
  "difficulty": 3839316899029.672,
  "mediantime": 1523865116,
  "verificationprogress": 0.999989053864647,
  "initialblockdownload": false,
  "chainwork": "0000000000000000000000000000000000000000018380ba95e0067cdbd9a690",
Note though that LN commands, even those commands that eventually are fulfilled by the Bitcoin daemon are all controlled via the LN node and its cli, so there isn't a real need to get familiar with the bitcoin-cli for the purpose of LN operations.
LN node
Installation and other relevant information are available on Lightning Lab's site installation guide and release notes. All commands are entered over tmux.
Install Golang to usr/local:
ubuntu@ln:~$ mkdir tmp
ubuntu@ln:~$ cd tmp
ubuntu@ln:~/tmp$ wget https://dl.google.com/go/go1.10.linux-amd64.tar.gz
ubuntu@ln:~/tmp$ sudo tar -C /usr/local -xzf go1.10.linux-amd64.tar.gz
Set the path to golang globally (as su and exit mode at end) by adding golang.sh file.
ubuntu@ln:/etc/profile.d$ sudo su
root@ln:/etc/profile.d# vim golang.sh
root@ln:/etc/profile.d# cat golang.sh
#!/bin/sh
export PATH=$PATH:/usr/local/go/bin
root@ln:/etc/profile.d# exit
ubuntu@ln:/etc/profile.d$ source golang.sh
Add $GOPATH by editing .bashrc file.
ubuntu@ln:~$ vim .bashrc
ubuntu@ln:~$ tail -n 4 .bashrc
export GOPATH=~/go
export PATH=$PATH:$GOPATH/bin

ubuntu@ln:~$ source .bashrc
ubuntu@ln:~$ echo $GOPATH
/home/ubuntu/go
Get lnd Lightning node code:
ubuntu@ln:~$ git clone https://github.com/lightningnetwork/lnd $GOPATH/src/github.com/lightningnetwork/lnd
ubuntu@ln:~$ cd $GOPATH/src/github.com/lightningnetwork/lnd
Get (new) dependency manager, dep, and run it to get all lnd dependencies
ubuntu@ln:~/go/src/github.com/lightningnetwork/lnd$ go get -u github.com/golang/dep/cmd/dep
ubuntu@ln:~/go/src/github.com/lightningnetwork/lnd$ dep ensure
Compile code (takes a while...)
ubuntu@ln:~/go/src/github.com/lightningnetwork/lnd$ go install . ./cmd/...
You can use git pull to update the code, and rerun dep and the installation to update lnd.
lnd options can be controlled through a lnd.conf configuration file. A sample configuration file is available here. Copy the sample file and make similar changes to the ones below to connect it to the bitcoind daemon.
ubuntu@ln:~$ mkdir .lnd
ubuntu@ln:~$ cd .lnd
ubuntu@ln:~/.lnd$ wget https://raw.githubusercontent.com/lightningnetwork/lnd/master/sample-lnd.conf
ubuntu@ln:~/.lnd$ cp sample-lnd.conf lnd.conf
Now edit the various configuration such that the following options are set:
ubuntu@ln:~/.lnd$ diff sample-lnd.conf lnd.conf | grep '>'
> externalip=ln.bluetegu.cc
> alias=LN.BLUETEGU.CC
> color=#003366
> ; bitcoin.simnet=1
> bitcoin.mainnet=1
> ; bitcoin.node=btcd
> bitcoin.node=bitcoind
> bitcoind.rpchost=btc.bluetegu.cc
> bitcoind.rpcuser=<YOUR RPC USERNAME>
> bitcoind.rpcpass=<YOUR RPC PASSWORD>
> bitcoind.zmqpath=tcp://btc.bluetegu.cc:28332
Note that the settings supports using hostnames instead of explicit IP addresses, which is nice. externalip, alias and color are not mandatory. I did not enable autopilot and similar.
lncli is a command line tool to access lnd process (through RPC). Use "lncli --help" to get a list of available commands and options.
There isn't much point in running lnd before it can be connected to a synchronized Bitcoin node. Running and further setup of lnd is documented in a later section (after sync).
Initially I thought of using btcd as the Bitcoin node, so below are the installation instruction for it too, although I haven't used it yet with the LN network.
Install older dependency manager, glide:
ubuntu@ln:~/go$ go get -u github.com/Masterminds/glide
Install btcd (relevant roastbeaf and dependencies):
ubuntu@ln:~$ git clone https://github.com/roasbeef/btcd $GOPATH/src/github.com/roasbeef/btcd
ubuntu@ln:~/go$ cd src/github.com/roasbeef/btcd
ubuntu@ln:~/go/src/github.com/roasbeef/btcd$ glide install
ubuntu@ln:~/go/src/github.com/roasbeef/btcd$ go install . ./cmd/...
btcd options can be controlled through a btcd.conf configuration file. A sample configuration file is available here.
btcctl is a command line tool to access btcd process (through RPC). Use "btcctl -l" to get a list of available commands.
The minimal configuration files I am using include only the RPC username and password.
ubuntu@ln:~/.btcd$ cat btcd.conf
[Application Options]
rpcuser=<YOUR RPC USERNAME>
rpcpass=<YOUR RPC PASSWORD>

ubuntu@ln:~/.btcd$ cat btcctl.conf
[Application Options]
rpcuser=<YOUR RPC USERNAME>
rpcpass=<YOUR RPC PASSWORD>
For LN to work btcd should be run with the --txindex.
Blockchain sync
Overview
Before LN node can start operating, it has to have access to a fully synchronized Bitcoin node. This step can be frustrating. What I eventually did was install bitcoind, Bitcoin core's implementation, and let it sync with the network for 4 days. Initially I planned to use btcd, as it supports also LN light client, the neutrino mode, and various other LN specific optimization, but synchronization took so long to complete that I ended up using bitcoind instead.
I document below the synchronization of both btcd and bitcoind. I had several failed attempts to synchronize both, each attempt took hours to several days before I realized its going nowhere, which added to the frustration.
Picture by Dez
Download or Sync
The blockchain size is over 160GB. If you simply hook up your new Bitcoin node it'll request from its peers the entire +160G. Both bitcoind and btcd implementations support initial bootstraping using a file that contains the blockchain data from the genesis block through a relatively recent one, leaving only few GB of recent blocks to be actively synced from the network.
The approach differs though. For btcd, bootstraping an addblock utility is used to import the blocks from a file to the database. You don't need to worry that someone tampered with the bootstrap file, as the "addblock utility verifies every block using the same rules that are used when downloading the block chain normally through the Bitcoin protocol".
bitcoind doesn't have a special utility for import, rather you can simply copy the database files from the bootstap files to the bitcoind's home directory, and it'll work from there. Unlike btcd, here you must have full trust in the bootstrap files "The database files in the "blocks" and "chainstate" directories are cross-platform, and can be copied between different installations. These files, known collectively as a node's "block database", represent all of the information downloaded by a node during the syncing process. In other words, if you copy installation A's block database into installation B, installation B will then have the same syncing percentage as installation A. This is usually far faster than doing the normal initial sync over again. However, when you copy someone's database in this way, you are trusting them absolutely. Bitcoin Core treats its block database files as 100% accurate and trustworthy, whereas during the normal initial sync it treats each block offered by a peer as invalid until proven otherwise."
Synchronizing btcd
I started out setting btcd per LN documentation and tried to sync to the network. I monitored the advance of the block height and soon enough advance almost halted. I googled and found an issue and discussion on slow sync here. The title of the issue is "Bad sync peer stalls sync". It describes situations were bad or malfunctioning peers halt the sync process. It is suggested there to limit the number of peers and manually connect to a trusted peer, etc. Other reasons for slow sync are discussed in this issue as well. Since the issue was not resolved, I decided to try out the bootstrap approach instead. In hindsight I don't think that was the problem for my sync, as I got the same crawling synchronization using the bootstrap file attempt, as described below.
I got the bootstrap file from Blockchain download. I selected bootstrap.rar (for btcd), paid around $5.5 in Bitcoin and got instructions, file signatures and a download link.
I downloaded the giant file and started importing using addblock (see detailed instructions below). At the beginning blocks were added in a rapid pace, yet after a while the rate trickled to approximately 2 block per 10 seconds. 7days later it finished import at block 513601. Unfortunately, the instruction I followed for importing the blocks did not include creating a transaction index, and hence once I started the daemon with transaction indexing enabled (required for LN), it started indexing the imported blockchain data for another 5 days, and then synchronized the rest of the blocks online for another 2 days.
This convinced me that the slowness of synchronization is not related to network affects, its an implementation issue handling big data. I'm going to guess here that its related to the SQlite database. The guess is based on a comment from 2013 by Dave Collins explaining the database optimization they did in order to improve performance. I think that further optimizations are required.
Here are the detailed commands I used:
Blockchaindownload provide a torrent link to download the file. Something of the sort:
https://www.blockchaindownload.eu/download-btcd-bootstrap-rar/?gourldownload_file=
Since the file is huge, it should be download directly to the server. I downloaded the torrent file, moved it to the server, and used a torrent client to download it to the server.
Moving the torrent file from local Download folder to move it to the remote server:
ronc@laptop:~/Downloads$ scp btc.bootstrap.rar.torrent [email protected]://home/ubuntu/tmp/btc.bootstrap.rar.torrent
btc.bootstrap.rar.torrent                                                                                                                     100%  142KB 142.0KB/s   00:00
Install aria2 torrent client and use it to download the file to the tmp directory. Create the tmp directory if not already created.
ubuntu@ln:~/tmp$ sudo apt install aria2
ubuntu@ln:~/tmp$ aria2c btc.bootstrap.rar.torrent
The download takes +3 hours. aria provides progress report. Once done, cntr-C once to exit.
Verify that file's checksum is as written on the download page
ubuntu@ln:~/tmp$ sha256sum btc.bootstrap.rar
57a98efa8f51298c9c13f0c41b2a3f8660dab7aad275a09aa348939c07a46bab  btc.bootstrap.rar
Unpack
ubuntu@ln:~/tmp$ sudo apt-get install unrar
ubuntu@ln:~/tmp$ unrar x btc.bootstrap.rar
Creating    btc.bootstrap                                             OK
Creating    btc.bootstrap/bootstrap                                   OK
Extracting  btc.bootstrap/bootstrap/hashlist.txt                      OK
Extracting  btc.bootstrap/bootstrap/bootstrap.dat                     OK
Extracting  btc.bootstrap/bootstrap/hashlist.txt.sha256.txt           OK
Extracting  btc.bootstrap/bootstrap/bootstrap.dat.sha256.txt          OK
All OK
And import to the database
Note: you may want to use --txindex option here to create the transaction index during import and save time when running the daemon. If you do, please share your experience in the comments
ubuntu@ln:~/tmp$ $GOPATH/bin/addblock -i btc.bootstrap/bootstrap/bootstrap.dat
2018-03-22 07:48:08.614 [INF] MAIN: Loading block database from '/home/ubuntu/.btcd/data/mainnet/blocks_ffldb'
2018-03-22 07:48:08.849 [INF] MAIN: Block database loaded
2018-03-22 07:48:08.849 [INF] CHAN: Loading block index.  This might take a while...
2018-03-22 07:48:34.393 [INF] CHAN: Chain state (height 260958, hash 0000000000000017b6133e976a69bb25c1c5dd8539b85ee8a9f9555f8c5b6824, totaltx 24665326, work 6011413434372599859916)
2018-03-22 07:48:34.393 [INF] MAIN: Starting import
2018-03-22 07:48:44.394 [INF] MAIN: Processed 148713 blocks in the last 10s (1659268 transactions, height 148713,  2011-10-09 18:05:08 +0000 UTC)
2018-03-22 07:48:54.398 [INF] MAIN: Processed 30609 blocks in the last 10s (1404164 transactions, height 179322, 2012-05-08 21:28:11 +0000 UTC)
...
Import completed after 7 days.
2018-03-29 18:15:52.087 [INF] MAIN: Processed 5 blocks in the last 10.31s (4742 transactions, height 513597, 2018-03-15 06:12:38 +0000 UTC)
2018-03-29 18:15:57.675 [INF] MAIN: Processed a total of 513601 blocks (252642 imported, 260959 already known)
ubuntu@ln:~/tmp$
Since I didn't use the --txindex option during import, running btcd indexed all blocks, and then completed synchronization with the network, taking another extra 7 days.
ubuntu@ln:~/tmp$ btcd --txindex
2018-03-30 10:00:38.785 [INF] BTCD: Version 0.12.0-beta
2018-03-30 10:00:38.791 [INF] BTCD: Loading block database from '/home/ubuntu/.btcd/data/mainnet/blocks_ffldb'
2018-03-30 10:00:42.528 [INF] BTCD: Block database loaded
2018-03-30 10:00:42.556 [INF] INDX: Transaction index is enabled
2018-03-30 10:00:42.556 [INF] INDX: cf index is enabled
2018-03-30 10:00:42.556 [INF] CHAN: Loading block index.  This might take a while...
2018-03-30 10:01:34.081 [INF] INDX: Catching up indexes from height 260958 to 513600
2018-03-30 10:01:44.161 [INF] INDX: Indexed 196 blocks in the last 10.08s (56791 transactions, height 261154, 2013-10-01 20:42:48 +0000 UTC)
2018-03-30 10:01:54.240 [INF] INDX: Indexed 158 blocks in the last 10.07s (52408 transactions, height 261312, 2013-10-02 17:47:04 +0000 UTC)
...
But finally it is synchronized. Compare the blocks to the block height available in blockchain.info.
ubuntu@ln:~/.btcd$ btcctl getinfo
{
  "version": 120000,
  "protocolversion": 70002,
  "blocks": 518456,
  "timeoffset": 0,
  "connections": 8,
  "proxy": "",
  "difficulty": 3839316899029.672,
  "testnet": false,
  "relayfee": 0.00001,
  "errors": ""
}
Synchronizing bitcoind
I did attempt to bootstrap bitcoind too, but failed miserably. I believe the failure is due to my incompetence. Each attempt lasted days until I gave up. Eventually I simply run the daemon until after 4 days it synchronized directly from the network.
LN finally
Initialize
Run the LN node. A wallet must be defined at the first run, or unlcoked whenever the node is rerun. The LN node will not connect to the network beforehand.
Here I'm running lnd with higher debug level. This is not required.
ubuntu@ln:~/.lnd$ lnd --debuglevel=debug
2018-04-08 17:45:40.404 [INF] LTND: Version 0.4.1-beta commit=
2018-04-08 17:45:40.404 [INF] LTND: Active chain: Bitcoin (network=mainnet)
2018-04-08 17:45:40.406 [INF] CHDB: Checking for schema update: latest_version=0, db_version=0
2018-04-08 17:45:40.460 [INF] RPCS: password RPC server listening on 127.0.0.1:10009
2018-04-08 17:45:40.462 [INF] RPCS: password gRPC proxy started at 127.0.0.1:8080
2018-04-08 17:45:40.462 [INF] LTND: Waiting for wallet encryption password. Use `lncli create` to create wallet, or `lncli unlock` to unlock already created wallet.
On a different tmux terminal create the wallet, insert a password, and write down the menemonics in a safe place. The password is needed each time the lnd node is reset or restarted, i.e. whenever the wallet needs to be unlocked.
ubuntu@ln:~$ lncli create
Input wallet password:
Confirm wallet password:

Do you have an existing cipher seed mnemonic you want to use? (Enter y/n): n
Your cipher seed can optionally be encrypted.
Input your passphrase you wish to encrypt it (or press enter to proceed without a cipher seed passphrase):

Generating fresh cipher seed...
!!!YOU MUST WRITE DOWN THIS SEED TO BE ABLE TO RESTORE THE WALLET!!!
---------------BEGIN LND CIPHER SEED---------------

<THIS PART REMOVED>

---------------END LND CIPHER SEED-----------------
!!!YOU MUST WRITE DOWN THIS SEED TO BE ABLE TO RESTORE THE WALLET!!!
lnd successfully initialized!
ubuntu@ln:~$
Once the wallet is created (or unlocked), lnd will attempt to connect to the Bitcoin node and to its peers.
Check Sync
Check the connection to the bitcoin node is working and the bitcoin node is synchronized.
ubuntu@ln:~$ lncli getinfo
{
    "identity_pubkey": "03c42d3b66012697d078eae412c3b4806df274b7e6a18dacac474cd7c4bfa28849",
    "alias": "03c42d3b66012697d078",
    "num_pending_channels": 0,
    "num_active_channels": 0,
    "num_peers": 3,
    "block_height": 517400,
    "block_hash": "0000000000000000000f76b44f8d4c27586259b3460d41a88e5d7c39a76d0dca",
    "synced_to_chain": true,
    "testnet": false,
    "chains": [
        "bitcoin"
    ],
    "uris": [
    ],
    "best_header_timestamp": "1523282595"
}
Indeed "synced_to_chain" indicates the Bitcoin node is connected and synced. 3 peers are already connected. Those were added automatically.
Create address and fund wallet
Let's now add an address, and send some bitcoins.
ubuntu@ln:~$ lncli newaddress np2wkh
{
    "address": "3FvDCiAa7BWDfCU93zccdPynrpFpsqHX9w"
}
An address starting with 3 can be funded also by wallets that do not support Segwit.
I sent $10 from my wallet to this address.
ubuntu@ln:~$ lncli walletbalance
{
    "total_balance": "147654",
    "confirmed_balance": "0",
    "unconfirmed_balance": "147654"
}
Now we have to wait a bit for it to be confirmed.
ubuntu@ln:~$ lncli walletbalance
{
    "total_balance": "147654",
    "confirmed_balance": "147654",
    "unconfirmed_balance": "0"
}
Opening a channel
I did not enabled 'autopilot' mode that is supposed to open channels and manage them automatically. Instead I opened a channel to a major LN node, in the hope that it'll be able to route my payment to Blockstream. Fortunately this naive approach worked.
To select a major LN hub I used 1ML, Lightning Network Search and Analysis Engine. 1ML lists the latest nodes and channels, and if you scroll further down, also lists the largest nodes and channels. I selected one of the largest nodes; Federval Reserve.
The information needed is the public key and IP address (and port) of the node:
0327049d8d63f0c40193cdf3afc61817c8647808a4e482de0716fcef74e6d92ebf@35.184.46.254:9735
To open a channel to a node you have to first connected to it as a peer.
ubuntu@ln:~$ lncli connect 0327049d8d63f0c40193cdf3afc61817c8647808a4e482de0716fcef74e6d92ebf@35.184.46.254:9735
{

}
And indeed it was added to the other 3 peers that were already auto-connected.
ubuntu@ln:~$ lncli listpeers
{
    "peers": [
        {
            "pub_key": "0327049d8d63f0c40193cdf3afc61817c8647808a4e482de0716fcef74e6d92ebf",
            "address": "35.184.46.254:9735",
            "bytes_sent": "6",
            "bytes_recv": "6",
            "sat_sent": "0",
            "sat_recv": "0",
            "inbound": false,
            "ping_time": "0"
        },
When a channel is opened in LN, a funding transaction is sent to the Bitcoin network. The transaction takes times to confirm, and requires a miners fee. Hence it wasn't possible to commit my entire $10 to the channel.
ubuntu@ln:~$ lncli openchannel --node_key=0327049d8d63f0c40193cdf3afc61817c8647808a4e482de0716fcef74e6d92ebf --local_amt=147654
[lncli] rpc error: code = Unknown desc = not enough witness outputs to create funding transaction, need 0.00148534 BTC only have 0.00147654 BTC  available
The difference, 880 satoshies, is required for the funding transaction fee. Committing the rest to the channel worked:
ubuntu@ln:~$ lncli openchannel --node_key=0327049d8d63f0c40193cdf3afc61817c8647808a4e482de0716fcef74e6d92ebf --local_amt=146774
{
        "funding_txid": "a9ec8645c78415dad54a600fba7eb70212b1dfe793b13bfa44ba55554c7a9143"
}
And the channel moved to pending to wait for confirmations.
ubuntu@ln:~$ lncli pendingchannels
{
    "total_limbo_balance": "0",
    "pending_open_channels": [
        {
            "channel": {
                "remote_node_pub": "0327049d8d63f0c40193cdf3afc61817c8647808a4e482de0716fcef74e6d92ebf",
                "channel_point": "a9ec8645c78415dad54a600fba7eb70212b1dfe793b13bfa44ba55554c7a9143:0",
                "capacity": "146774",
                "local_balance": "145688",
                "remote_balance": "0"
            },
            "confirmation_height": 0,
            "commit_fee": "1086",
            "commit_weight": "600",
            "fee_per_kw": "1500"
        }
    ],
    "pending_closing_channels": [
    ],
    "pending_force_closing_channels": [
    ]
}
After two confirmations, the channel became active.
ubuntu@ln:~$ lncli listchannels
{
    "channels": [
        {
            "active": true,
            "remote_pubkey": "0327049d8d63f0c40193cdf3afc61817c8647808a4e482de0716fcef74e6d92ebf",
            "channel_point": "a9ec8645c78415dad54a600fba7eb70212b1dfe793b13bfa44ba55554c7a9143:0",
            "chan_id": "569235861522219008",
            "capacity": "146774",
            "local_balance": "145507",
            "remote_balance": "0",
            "commit_fee": "1267",
            "commit_weight": "600",
            "fee_per_kw": "1750",
            "unsettled_balance": "0",
            "total_satoshis_sent": "0",
            "total_satoshis_received": "0",
            "num_updates": "1",
            "pending_htlcs": [
            ],
            "csv_delay": 144,
            "private": false
        }
    ]
}
The difference between the capacity and the local balance is 1086 which is the commit_fee. The commit fee is reserved as the fee to paid to miners for the Bitcoin transaction that will be used to close the channel.
Once a channel is enabled. The LN node is able to calculate routes to destinations.
Buying the sticker
Finally we can buy a sticker or two. Go to the Blockstream Shop, and press the 'Shop' tab. Select the sticker and add it to the cart. Each sticker is $1.99 plus mailing for $3.
Press 'view cart', and then proceed to checkout. Fill in your mail details and proceed to 'Proceed to Lightning Payment'. An invoice will be presented with a one hour expiration timer to complete payment.
Copy the invoice. You can decode the invoice locally.
ubuntu@ln:~$ lncli decodepayreq lnbc738842420p1pdvhthapp5p74hlu02z7v0nns22dk7f9wn6y8j6tkez5dxlvz59a4kyfrz9hkqdrdgfkx7cmtwd68yetpd5s9xar0wfjn5gp59cunjgz42dzzqen0ypskuepqgfkx7cmtwd68yetpd5s9xct5v4kxc6t5v5s9xarfvd4k2u3q0qsrzcqpgtdnykkcrc6guwr8kxvmt50swc06ef520hldja5kj9u522ujra36kk762xvj8kyn4r6rs6438d29j2068umenn5pdflgm988t7u6f9gcp6amw9q
{
    "destination": "02f6725f9c1c40333b67faea92fd211c183050f28df32cac3f9d69685fe9665432",
    "payment_hash": "7b9547f34773e911f58c1ac4a521b175dfa7868770d84519685fa6749940dc0b",
    "num_satoshis": "100674",
    "timestamp": "1523463650",
    "expiry": "3600",
    "description": "Blockstream Store: 6.98 USD fo and Blockstream Satellite Sticker x 2",
    "description_hash": "",
    "fallback_addr": "",
    "cltv_expiry": "8"
}
And now the payment itself.
ubuntu@ln:~$ lncli payinvoice --pay_req lnbc1006748420p1pdvud0zpp50w250u68w053ravvrtz22gd3wh060p58wrvy2xtgt7n8fx2qms9sdrdgfkx7cmtwd68yetpd5s9xar0wfjn5gpk9cunsgz42dzzqen0ypskuepqgfkx7cmtwd68yetpd5s9xct5v4kxc6t5v5s9xarfvd4k2u3q0qsrycqpg34duz4cfaln3d342hrpsph40ftk79wh9mntavdaskx0spquljjlny6kczwkelg53jhwfmhj08cq6pphk7ur888e20hk5l4ndj4a2dyqqc6auq4
And it went through. No need to wait for confirmation. I almost immediately got an invoice email from Blockstream.
It is interesting to check the channel balance now.
ubuntu@ln:~$ lncli listchannels
{
    "channels": [
        {
            "active": true,
            "remote_pubkey": "0327049d8d63f0c40193cdf3afc61817c8647808a4e482de0716fcef74e6d92ebf",
            "channel_point": "a9ec8645c78415dad54a600fba7eb70212b1dfe793b13bfa44ba55554c7a9143:0",
            "chan_id": "569235861522219008",
            "capacity": "146774",
            "local_balance": "45010",
            "remote_balance": "100677",
            "commit_fee": "1087",
            "commit_weight": "724",
            "fee_per_kw": "1500",
            "unsettled_balance": "0",
            "total_satoshis_sent": "100677",
            "total_satoshis_received": "0",
            "num_updates": "92",
            "pending_htlcs": [
            ],
            "csv_delay": 144,
            "private": false
        }
    ]
}
The channel capacity stayed the same. The total Satoshis sent, is equal to the remote balance, and is 3 Satoshis higher than the price of the sticker. I believe these 3 Satoshis were paid to the routing LN nodes.
That it!
Now I'm waiting for the sticker.
Let me know if you have comments, improvements suggestions or questions.
well done.
Hope this article will get the curation rewards it deserves on steemit.
Easy peasy.
Mass adoption in 3..2..1... .... .... .... ....
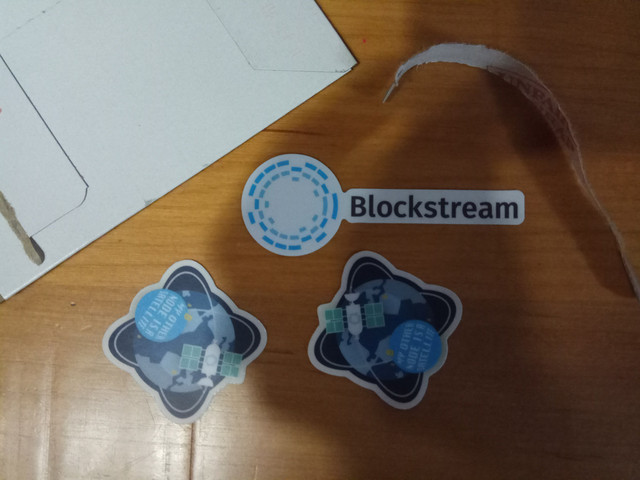
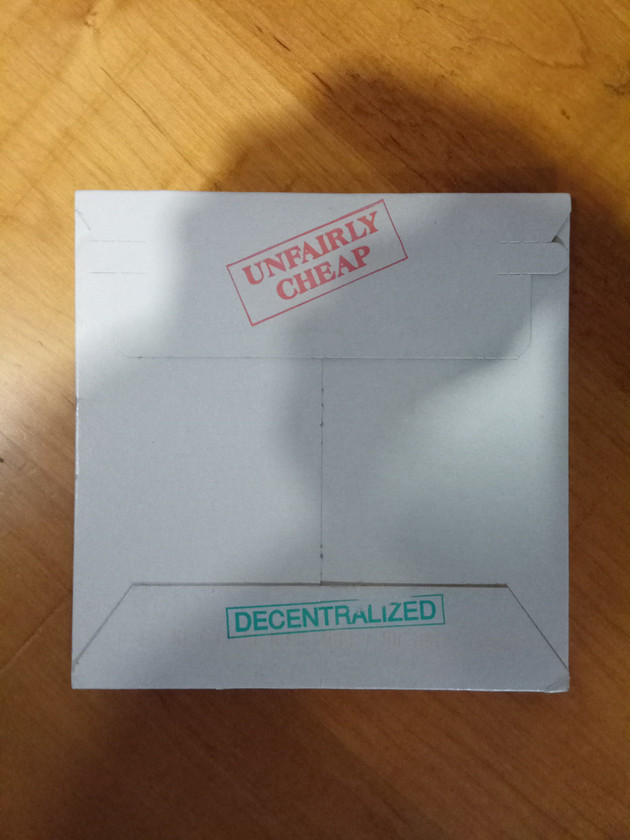
Got them! Nice touch on the envelope.
The cost of the setup above is high. Especially the memory part, which charges $50 for 500G per month.
Since the LN node eventually doesn't use the btcd Bitcoin node, there is no need for such a large disk. I believe 8G is enough, and also a micro instance with 1G RAM is enough for LN.
Decreasing memory in AWS is a pain. I used MATT BERTHER's 'How to Resize AWS EC2 EBS volumes' for that, but make sure to take the advice in the comments.
The other more troubling aspect is the payment for data traffic. I got charged almost $60 for the last month, with around 800GB download. I suspect that it was mostly new Bitcoin nodes asking for download of the whole blockchain.
To try and limit the possible traffic I added maxuploadtarget=144 to bitcoin.conf and restarted the daemon. This limits the number of full-blockchain downloads in a smart way. I'm hoping this will keep the bills somewhat sain.