Weaving a Basket
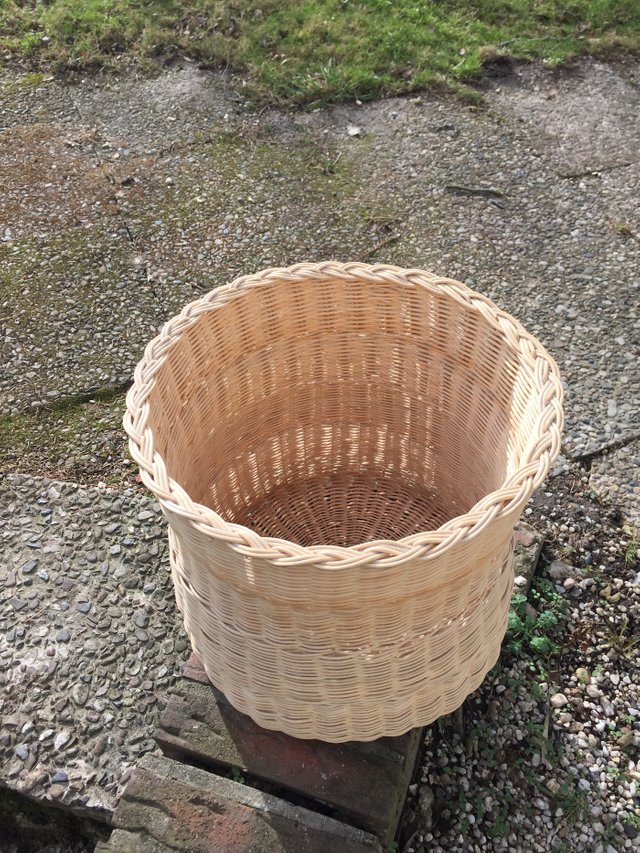
Hey I would like to show you my first basket I weaved on my own. Further more I’d like to talk about the issues and problems I was facing while doing it and how I got the idea of weaving things from time to time.
Making a basket
After I realized that I was completely overburdened studying, parallel lecturer activity and gaming until the late night in 2009, I just needed rest and a break from this lifestyle. During this time I have focused on simple things like gardening, firewood and just the lichens concentrated. To date, it would not have occurred to me that such simple work is a lot of fun for me. Before I had only one thing in mind: Career Career Career.But back to braid. The idea to do something like this I had in a coffee, by enjoying its ice cream in the beach basket. The question how something is done, then let me somehow not go. In short, I've looked at a few Youtube videos and got me a little book explaining the basics of braiding. Afterwards, I ordered the raw material, the rattan in various thicknesses as well as braided tape, online.
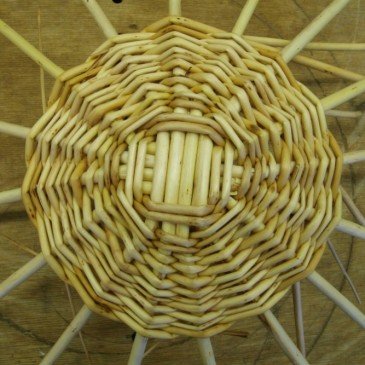
And off I went: Lay several bars crosswise and then wrap them with a peddle pipe until they are tight. After that, the struts are drawn apart in a star shape and begin with the braiding. The strings should be a little thicker than the braiding material - as far as the theory is concerned.
I started a hundred times from the beginning and it took me an hour to finally get to such a result.;)

After I had finally brought the floor to a sufficient size, I had to turn the bows upwards by 90° to brace the outer walls. In doing so, I decided to change the braid direction after about ten centimeters, so that the basket got a more individual look. After a short time, the movement of the hand went into blood and veins. The joy had already come so far and now drove me as a matter of course to the further, so that I made it very quickly to the last steps.
However, the interweaving of the Korbrandes turned out to be much more difficult than described in the book and shown in the videos. The braiding of the edge, especially the beginning as well as the ending, became a true challenge, which occupied me more than an hour.
Now it was time for the last and simple steps to come . First, soak the whole basket in lukewarm water to bring it into the final shape. The next day the basket was dry and I could seal it several times with a protective lacquer.
The whole thing gave me a lot of pleasure and I was amazed that my first attempt really got well. Maybe someone wants to try it out. I can promise you it's a good feeling in the end.
Korbflechten
Nachdem ich feststellen musste, dass ich mich damals (2009) komplett überfordert hatte mit Studium, parallel laufende Dozententätigkeit und Gaming bis in die späte Nacht, brauchte ich einfach Ruhe und eine Auszeit von diesem Lebensstil. In dieser Zeit habe ich mich auf einfache Sachen wie Gartenarbeit, Brennholz machen und eben das Flechten konzentriert. Bis dato wäre es mir nicht in den Sinn gekommen, dass solch einfache Arbeiten mir sehr viel Spass machen. Vorher hatte ich eigentlich nur eines im Sinn: Karriere, Karriere und Karriere.Aber zurück zum Flechthandwerk. Die Idee sowas mal zu machen hatte ich in einem Kaffee, indem man sein Eis im Strandkorb genießen kann. Die Frage wie so etwas gemacht wird, ließ mich dann irgendwie nicht mehr los. Kurzum habe ich mir also ein paar Youtube-Videos dazu angeschaut und mir ein kleines Buch besorgt, in dem die Grundlagen des Flechtens erläutert werden. Danach habe ich das benötigte Rohmaterial, Peddigrohr in verschiedenen dicken sowie Flechtband, online bestellt.
Und los ging es: Mehrere Staken über Kreuz legen und dann mit Peddigrohr umwickeln bis sie fest sind. Danach die Staken sternförmig auseinanderziehen und mit dem Umflechten beginnen wobei die Staken etwas dicker sein sollten als das Flechtmaterial - soweit zumindest die Theorie.
Ich habe gefühlte hundert mal von vorne angefangen und es hat über eine ganze Stunde gebraucht bis ich endlich zu solch einem Ergebnis gekommen bin. ;) Nachdem ich endlich den Boden auf eine ausreichende Größe gebracht hatte, musste ich die Staken um 90° Grad nach oben biegen um im Anschluss die Außenwände zu flechten. Dabei entschied ich mich die Flechtrichtung nach etwa zehn Zentimetern zu wechseln, damit der Korb auch etwas individueller aussieht. Nach kurzer Zeit sind die Handbewegung in Gleich und Blut übergegangen. Die Freude schon soweit gekommen zu sein und trieb mich nun wie von selbst zum weitermachen an, sodass ich sehr zügig zum letzten Schritt kam.
Die Verflechtung des Korbrandes stellte sich aber als viel schwieriger heraus als es im Buch beschrieben und in den Videos gezeigt worden war. Somit wurde das Randflechten, ganz besonders der Anfang sowie der Abschluss, zu einer wahren Herausforderung, die mich locker eine Stunde beschäftigte.
Nun ging es an die letzten und wirklich einfachen Schritte. Zuerst den gesamten Korb noch einmal kurz im lauwarmen Wasser einweichen um ihn danach in die endgültige Form zu bringen. Am darauf folgenden Tag ist der Korb trocken gewesen und ich konnte ihn mit einem Schutzlack mehrfach versiegeln.
Das ganze hat mir sehr viel Freude bereitet und ich bin erstaunt über mich gewesen, dass sich mein erster Versuch durch aus sehen lassen kann. Vielleicht will es ja mal jemand von euch ebenfalls ausprobieren. Ich kann euch versprechen es ist am Ende ein gutes Gefühl.

Beautiful!
tha a lot
Wow. that is cool. keep up the good work. I cant wait to see more.btw can you follow me thank you
thx a lot;)