How to make a simple blacksmith forge at home! steps and pictures included.
Recently I've become interested in Blacksmithing/Bladesmithing, I don't really know why but I've always enjoyed making things with my hands and being able to make say a battle-axe or a sword would be awesome.
There are only 3 things a blacksmith really needs for their craft. Obviously there are a large variety of different tools available that more experienced craftsmen can utilize but the only 3 you really need to get started are
Hammer
Anvil
Forge
I've got a few hammers to choose from, I have a large piece of rock to use as an anvil until i can be bothered finding a real one (basically any flat hard surface will do). So today I decided to build myself a basic forge!
I actually made a very temporary one yesterday where i just stacked bricks and put a sheet of metal on top but this is much sturdier and slightly larger. It should also hold the heat a lot better.
There are a few different options for making a forge, you can build them up from the ground, or down into the ground, they both have advantages and disadvantages but I chose to make one in the ground because it will be sturdier over time unless you really put in some work, and I just wanted something quick and basic that works.
So, let's get started.
Dig a hole.
Alright this is prettttty simple.
Get yourself a shovel and dig out a hole. It's entirely up to you how big you make it, I only plan on working with fairly small stuff for now so I didn't need it to be huge, about 2 shovels wide, 2 shovels long and a shovel deep.
 !
!
Smooth out the bottom and the sides so its reasonably square. Again I'm not worrying too much about the craftsmanship of this as its going to be fairly temporary.
Also, its just a hole...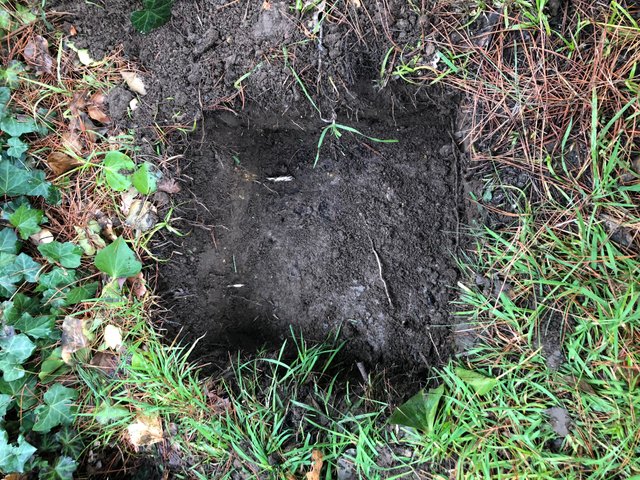
Line your forge
Now you can use pretty much any refractory material for this, all i really had around the place was some standard bricks so that's what I used. I lined the inside of the hole with bricks, leaving the floor as dirt, I can always slide some bricks in for a base later if i so desire.

On the back wall of our forge i cracked one of the bricks so as to leave a hole to build a chimney into. For the chimney all I did was take a length of 50mm PVC piping, i propped it to my desired angle and then mixed up some mud and poured and shaped over the top. When the mud dries ill pull out the pipe and have a nice little mud-brick chimney :D(hopefully, it may well collapse upon itself at which point it doesn't matter anyway because I have made it so I can leave the top off)


Dig an entrance and make a lid
Again pretty straightforward, i dug a fairly large tunnel entrance so I can have plenty of access to get in there if I want. The lid will be easily removable too so that will help.
I smoothed it out and made it wide enough so as I will be able to fit my piece of metal for heating and my forced-air source.

I then took some steel mesh off-cuts we have leftover from an aviary we built, cut it to the size of the roof of the forge and placed it on. I was worried if the temperatures got too hot it may melt so I also took 2 straight pieces of riobar and laid them across the top. To hold them in place I simply buried both sides of the bars with dirt, then placed my mesh on top.

I then lined the top with bricks, these bricks have holes which allows for ventilation and airflow but I have a barbecue lid I can place over the top to seal it and keep in the heat depending on the temperatures we want to reach. It also means I can easily life it all out of place if I want to get into it and do anything.


Voila
That's basically it. If you don't have a good way to force air into the fire then you can easily substitute it with a hair dryer. I found one laying around that I've been using and it works a treat. Ideally your forge will contain coals or "coke" (refined coals) but you can still reach temperatures acceptable for blacksmithing with just timber. You will definetly need to force air into it to reach high enough temps but otherwise you should be good to go :D

I lit a small fire in it for now just to show you and also to help dry out the mud around my pipe before I build up some real temperature in there and start trying to forge. First little project will be a small knife made of rio using only hand tools. My hammer, forge anvil some files and some sandpaper. We will see how it comes up.
All of this was made with materials I found laying around the property and nothing more than a shovel and some boltcutters. It's nothing fancy, It doesn't look pretty. But it's practical and most importantly it works :)
Keep an eye out for the next post where i show you how I make my knife (assuming it works, otherwise ignore this last paragraph entirely)
Steem on Steemians
I like your second forge! And the mud chimney too. Hope the knife works out! <3
This post was shared in the Curation Collective Discord community for curators, and upvoted and resteemed by the @c-squared community account after manual review.
You've rediscovered the most ancient of forges :D Hope the knife turns out well do you can show us how that went :)
haha I think I may need to mudbrick up the whole thing to conserve the heat better as i couldnt get my steel to stay red hot for more than a few seconds which means my working time isnt amazing ;/