
Hey guys! It's Andy here again, with a brand new banner as promised, and this time I'm going to go through and wick my Griffin 25 RTA. While this tutorial uses my Griffin, these same tips and tricks apply to any RTA.
Using an RTA can be a little more complicated than a straight rebuildable dripping atomizer (RDA), and it requires more effort to set up than a simple tank atomizer with a replaceable coil, but the flavor and convenience are second-to-none. You get all the flavor and production that comes with an RDA, but rather than dripping on it constantly, all you have to do is refill it the same way you do any other tank. I love my RDAs, but any time I'm driving, I slap my Griffin 25 on there for the convenience. Wicking an RTA well, so that it doesn't leak and you don't have dry hits, can require a little finesse and trial-and-error, but hopefully this tutorial will help clear that up by showing you a method that works every time for me.
Step 1: Clean your RTA and prep it for a build
The first thing you should do, even with a brand new RTA right out of the box, is
clean it thoroughly. For brand new tanks or drippers, I recommend washing with very hot tap water (let the water run until that sucker is
scalding hot) and Dawn dish soap. Let it sit for about 2-3 hours to clear out any gunk in there, and then flush it out with hot water again. If you've been using it already, hot tap water will suffice. The reason I suggest doing this even for brand new tanks is that, in some cases, there is machining oil residue left on the various component parts. I dunno about you guys,
but I'm not keen on inhaling lubricant.
Step 2: Gather your tools and materials together, and organize your workspace
Once everything is cleaned up and dried out, it's time to collect your building materials and organize your workspace. I've done it on a kitchen counter and on my cluttered desk, but whenever I do it, I get all my stuff ready so I don't have to dig around for tools. As for what to use, the sky is pretty much the limit, but
at a minimum you should have the following:
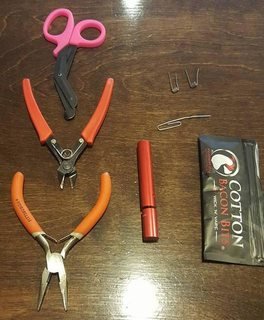
a pair of sharp wire snips, needle-nose pliers, and a decent pair of scissors. Those sexy pink scissors are surgical scissors I borrowed from my wife's collection (she's a nurse), and they are absolutely fantastic. I'd recommend getting a set if you don't have a pair already.
Along with those tools, I would also have your cotton, coil wire, and wrapping tool handy. Cotton-wise, anything can work, including cotton balls (I've made it work using them, but make sure you get the non-sterilized, 100% cotton kind;
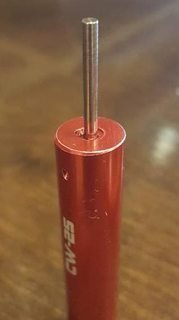
you don't need to inhale solvents), but I prefer Cotton Bacon. In these pictures, I'm using pre-built stapled claptons, but you can replace them with whatever wire you want. I also use a 2.5mm manual coil jig made by CW, but a micro screwdriver can work just as well as long as you know what the diameter of the shaft is.
Step 3: Wrap your coils
Here's where the first half of the magic happens when it comes to building an RTA properly. Building wire on an RTA is fundamentally no different than building on an RDA, so if you've already built a dripper, you'll have a leg up in this regard.
However, it is extremely important to be aware of how much build space you have on an RTA. RTAs use smaller decks (generally speaking) than regular drippers do, so that sweet 4mm-wide fused staggered clapton build that's
AWESOME in your 30mm Mason isn't going to fit in the space of your 25mm RTA.
I'd recommend not building coils any wider than 2.5mm, and no more wraps than 8, depending on what kind of wire you're using.
This is especially true if you want to put claptons in there. The more wire you're trying to wrap, the more space it's going to take up, and I've never fit more than 7 wraps worth of clapton wire in my Griffin without it touching the sides and shorting out. However you decide to build it, make sure the wire is wrapped nice and tight, so that each coil is roughly the same diameter. This is going to help tremendously later on when you condition your coils and dry fire them.
Step 4: Mounting your coils on your build deck
Mounting and positioning your coils properly on the build deck is going to easily be the most time-consuming portion of setting up an RTA. Just like an RDA, you're going to have to spend time making sure that they're evenly spaced and heat evenly, from the center out. To start with, make sure you've pulled your set screws out to where the post holes are wide open. RTAs, just like RDAs, come with either a micro-screwdriver or an Allen key/hex key to move the set screws in and out; use whatever tool corresponds to the set screws you have and make sure those channels are not restricted. With that done, take one of the coils you just wrapped and mount it.
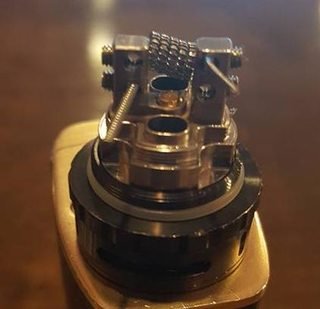
If your RTA has a Velocity-style (two-post) build deck, slide the legs of your coil to the corresponding upper and lower mounting holes. If your RTA uses a different kind of deck (either with clamps or three posts), then attach the leads to their corresponding mounting posts. You'll want to position the coil itself directly over the airflow holes leading up from the base. This ensures that, when you're taking a hit off your RTA, air is going to flow directly and evenly across the whole coil.
Uneven airflow can contribute to dry hits and burning wicks, so it's important to make sure they're positioned properly.
With the coil positioned properly, it's time to tighten your set screws down on the coil. Now, when you tighten the screws down, you can opt to just tighten them up and re-adjust the coil afterward, but I prefer to use whatever I made the coils with (a jig or a micro screwdriver shaft) as a guide. I slide the shaft through the wraps to keep them from curling or twisting -
and to keep them level with the deck - as I tighten the screws down. The set screws don't have to be torqued down, but you want to ensure that there is
no play at all after you've tightened them down.
Loose set screws can cause a poor connection, and a poor connection will keep you from vaping.
If you're using a single coil build, you're done once the first coil is mounted. For dual coil builds, repeat the process with the second coil, making sure it's positioned properly on the other side and the set screws are sufficiently tightened down.
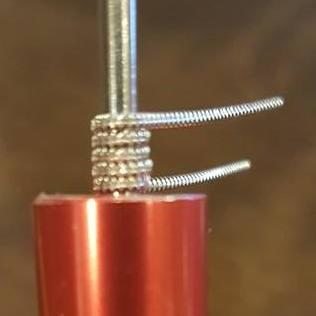
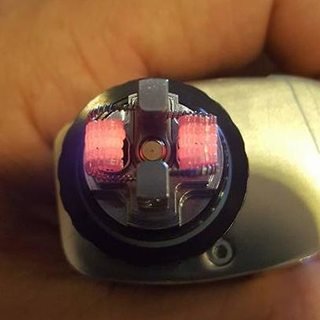
With your coils mounted, it's time to make sure they're heating up evenly by dry firing them. If you haven't already, screw your RTA onto a device and check the resistance. If you're using standard Kanthal wire or stainless steel, you can just run it in wattage mode; I'd recommend setting your wattage to adjust your coils a little on the high end, so they heat up a little faster. Use your pliers to crimp your coils together and get rid of any uneven heating across the wraps, and keep your wrapping tool handy to keep your wraps uniform looking.
Once your coils heat up from the center out, and both coils are heating up at the same rate, you're ready to wick it.
Step 4: Wicking your coils
You can wick your coils whatever way you want to wick them.
There is no wrong way to wick a coil, so long as it works for you. That being said, the method I've found that works the absolute best in my Griffin (as well as my friend's Herakles RTA) is using what's called the
Scottish roll method. Don't worry; it sounds a lot fancier than it actually is. Take whatever cotton you're using, whether it's cotton pads or Cotton Bacon, and cut/tear the piece you're going to use for your coils off. The width or thickness of the piece should be about the same as the width/diameter of the coils.
Once you have that piece of cotton, spread it out across your work area perpendicular to the grain of the cotton. What this means is, if you have your piece of cotton with one end facing you and the other end facing away, take your fingers and spread it across the table.
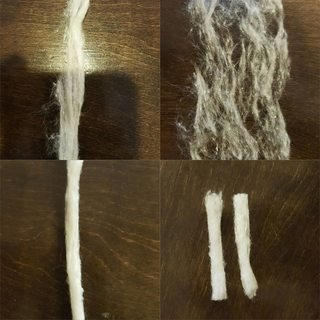
Once it's spread out and you can practically see through it, take one edge of your cotton and slowly roll it onto itself. You don't have to roll it very tightly, as the whole point of this method is to make your wick as fluffy as possible, but try to keep it from ending up looking like a big ball. With your rolled Scottish wick in hand, just cut it into two equal pieces. If you need a point of reference, the picture to the right shows each step in this process, from taking a base piece of cotton, to spreading it out, to rolling it, and finally to cutting it into two similar length pieces.
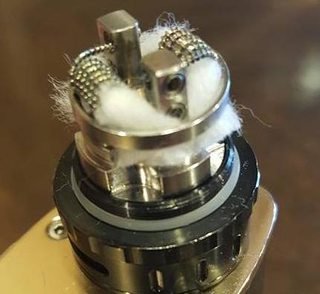
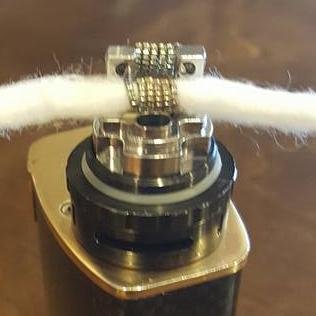
Once you have your two pieces, take one and slide it through one coil. Roll one end of the piece you're using until it's a small tip; this is going to make it
much easier to pull through the coil. Pull the cotton through until the coil is sitting about halfway along the length of the piece of cotton. Next, take your scissors in hand and prepare to make your cut.
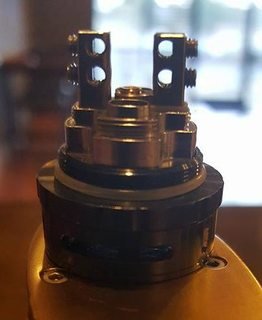
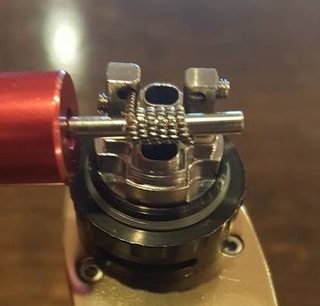
This is where things can get tricky, because you want just enough cotton to plug up the juice channels completely, but not so much that there's cotton sticking all the way down them. The general rule of thumb I use is to line up my scissors with the bottom threads on the base of my tank (for the Griffin, it's the set of threads that the build deck sits inside of, just above that o-ring in the first picture). If you're using a thinner juice, like a 70/30 VG/PG ratio juice, you can afford to use a little more cotton, but if you're using a high VG ratio (80/20 or more), you'll want to use the least amount of cotton possible. If you use too much, you'll end up getting dry hits because it won't wick fast enough.
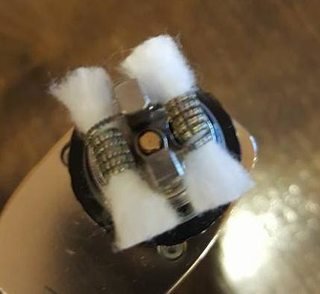
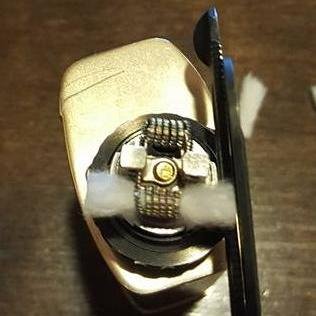
With your wicks cut on both your coils (or just the one coil if you're running a single-coil build), now it's time to tuck them down into the juice channels. Most RTAs come with a retainer ring, which you can choose to use or not use; it's all personal preference. For me, I like to slide the ring down over the cotton and tuck them that way, using a small paper clip end to nudge any stray cotton strands into the juicing channels. Screwing down the ring over your cotton catches a few strands into the threads, which tends to hold the wicks in place once the ring is fully seated.
This can be invaluable, as it is possible to nudge the cotton out of those channels when you screw the tank portion back on, leaving you with a leaky mess. Using the ring is especially helpful if you want to run a higher VG juice, since it's going to be more difficult positioning the short wicks by hand (I've done it, so take my word for it).
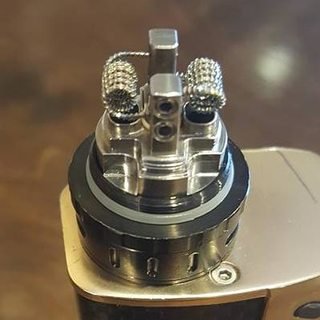
Once you have the ring screwed down, check the cotton and make sure that the channels are completely covered up by cotton, but there isn't any excess hanging down. If you look at the image on the left, you'll notice that the cotton wick tucks into the channel at the ring and doesn't hang down into the channel
at all. If there's a little bit of fuzz peeking down from under the ring, you'll be alright.
The important thing to remember is not to jam a ton of cotton down those channels. You will get dry hits repeatedly.
Step 5: Juicing up the cotton and re-assembling the tank
Now that your cotton is in place, you're almost done! The next step isn't really necessary, but I like to do it because it cuts out that cotton taste that oftentimes comes with brand-new wicks. All I do is drip a little juice along the wick and coil, being careful not to let any drip down into the airflow holes (dunno about you, but I
hate having to clean up juice spills). Once the wick is nice and saturated, press the fire button on your device and let it vaporize some. Make sure to blow on the coils to keep them from heating up too much when you do, as the tank isn't attached to allow you to use the built-in airflow. Do this about four or five times, re-saturate the wicks across the top, and you're ready to screw the tank onto it.
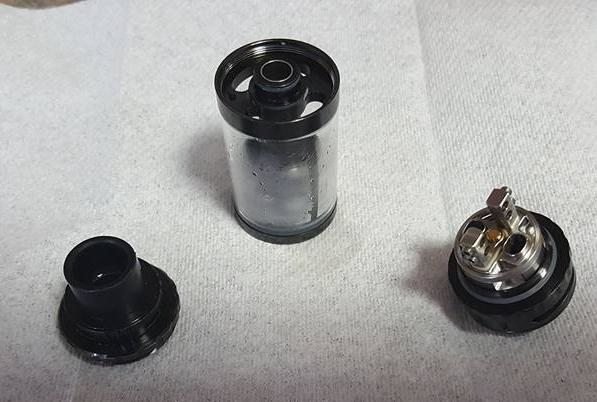
Like I mentioned earlier, be careful when you screw the tank portion back down onto the base.
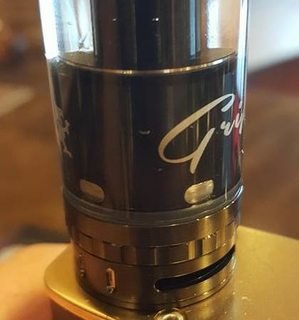
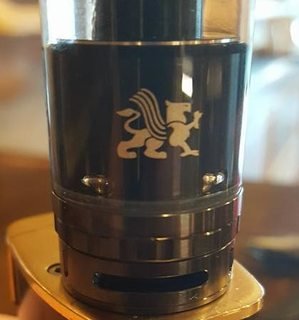
If you unseat your wicks from the juice channels, it will leak all over the place when you fill it. With the tank screwed down and fully seated (just finger-tight; you don't need to run the risk of stripping the threads by torquing it down), you're ready to fill it up. Make sure the juice channel holes are closed (see the first image on the left for reference) and fill it all the way up. Screw the top cap back on once it's full, then turn the tank to open the juice channels. If your wicks are still in the right place and they're not already oversaturated, you're going to see air bubbles forming in the channel holes.
That means the juice is displacing the air and forcing it back out through the tank; it's a good sign. Go ahead and take a pull on it! As you hit your RTA, the coils will vaporizer the juice from the wicks, which will pull more juice up from the channels and into the cotton.
And there you have it! Now that you've wicked your RTA, pull on that bad boy like there's no tomorrow. I hope this guide was helpful and informative; if you want to keep an eye out in the future for more guides like these and other vaping product reviews, follow my blog. Upvotes, resteems, and comments are always appreciated. Let me know how your RTA experience went in the comments, and if you have other suggestions or tips for people, leave them in the comments!


Love that cotton bacon! Nice tutorial!
Me too, man! And I'm glad you liked it. I was re-wicking my Griffin at work and I thought: "Hey, maybe I can take some pictures of this and do something useful with it."
This is great! I knew there was a strong modding community out there when it comes to vapes, but this is some serious next-level shit.
Well thanks for the comment and the appreciation! Do you vape as well, man?
A bit here and there, I'm not really seriously into it. My wife @alladesria is all about it, as she uses it to kick her smoking habit. She started at the bottom with those cheap little pen vapes and she's working her way up through box mods and things like that. Though I think her vape got misplaced in the move... it's probably at the bottom of some box somewhere, dripping e-juice over our wedding album or something.
Just dripping over the non-essential stuff. lol I used them to quit smoking, and that's how I went, too.
Wicking was always the trickiest part when I got my limitless plus rdta. I either used too much or too little but I finally got it after a few tries. Now every hit is maximum flavor! What a great tutorial too. Haven't seen many vape threads around here and this one really tops the list.
Very useful love the simple tips
GOOD STUFF, THANKS!!
Great tutorial @anarcho-andrei. I love Cotton Bacon too. Which juices are your favourites?
I use the juices that we make at the store here in Montgomery. Our houses juices are phenomenal :D