Xcode 9.2에서 swift사용해서 아이폰 앱을 만들면서 node.js + mongodb기반의 RESTful한 웹서비스에 GET,POST,PUT,DELETE하는 전체 데모 입니다.
서버측 기술로는 node.js 와 mongodb 데이터베이스를 활용해서 RESTful한 서비스를 만들고 아이폰 앱은 리스트를 출력할 수 있는 테이블뷰를 사용해서 입출력할 수 있도록 UI를 구성하려고 합니다. mongodb는 저도 익숙하지 않아서 조금씩 공부하면서 작업하고 있습니다.
일단은 맥에 mongodb를 설치해야 합니다. 다양한 데이터베이스 기술들 중에 mongodb는 NoSQL 오픈소스의 선두 주자입니다. NoSQL은 Not Only SQL의 약자입니다. NoSQL기반의 기술들은 기존의 RDBMS의 한계를 극복하기 위해 만들어진 새로운 형태의 데이터 저장소입니다.
Document는 문서라고 번역하기 보다는 RDBMS의 레코드와 비슷한 개념입니다. 데이터 구조는 한개 이상의 key-value쌍으로 이루어져 있습니다다. _id는 12바이트의 헥사값으로 유일함을 제공합니다. Collection은 MongoDB Document의 그룹입니다. Document들이 Collection내부에 위치하고 있습니다. Database는 Collection들의 물리적인 컨테이너입니다. 각 Database는 파일시스템에 여러파일들로 저장됩니다.
맥에 설치하는 것은 아래와 같이 합니다.
brew update
brew install mongodb
mongo 를 입력하면 바로 쉘이 실행됩니다. mongodb서비스를 실행하는 것은 아래와 같이 합니다.
brew services start mongodb
mongo를 입력해서 쉘로 들어갑니다.
데이터베이스의 생성을 아래와 같이 입력해서 실행합니다.
use mongodb_demo
현재 사용중인 데이터베이스 확인은 show dbs명령을 실행합니다. 만든 데이터베이스 리스트 확인은 아래와 같이 합니다.
show dbs

빠져나올 때 quit()로 빠져나오면 됩니다.
노드 셋팅을 위해 다음과 같이 합니다. 맥의 데스트탑으로 이동해서
mkdir nodeMongo 명령으로 폴더를 생성합니다. 파인더를 통해 폴더를 만들어도 됩니다.
npm init 명령으로 package.json을 생성합니다. 엔터를 계속 눌러 설정값은 기본값으로 합니다.
패키지를 아래와 같이 설치합니다. Express 웹프레임워크와 body-parser데이터 처리 미들웨어, mongoose MongoDB연동 라이브러리 등을 설치합니다.
npm install --save express mongoose body-parser
폴더의 구조는 아래와 같습니다. models폴더에 book.js가 일종의 테이블 스키마와 같은 파일입니다. 주소를 해석하는 파일은 routes폴더에 있는 index.js입니다. 전체 실행은 루트에 있는 app.js가 담당합니다.

서버의 메인 파일인 app.js는 다음과 같습니다.
// app.js

// [LOAD PACKAGES]
var express     = require('express');
var app         = express();
var bodyParser  = require('body-parser');
var mongoose    = require('mongoose');

// [ CONFIGURE mongoose ]

// CONNECT TO MONGODB SERVER
var db = mongoose.connection;
db.on('error', console.error);
db.once('open', function(){
    // CONNECTED TO MONGODB SERVER
    console.log("Connected to mongod server");
});

mongoose.connect('mongodb://localhost/mongodb_demo');

// DEFINE MODEL
var Device = require('./models/device');

// [CONFIGURE APP TO USE bodyParser]
app.use(bodyParser.urlencoded({ extended: true }));
app.use(bodyParser.json());

// [CONFIGURE SERVER PORT]
var port = process.env.PORT || 8080;

// [CONFIGURE ROUTER]
var router = require('./routes')(app, Device);

// [RUN SERVER]
var server = app.listen(port, function(){
 console.log("Express server has started on port " + port)
});

새로운 데이터를 추가하는  POST메서드는 PostMan에서 아래와 같이 호출한다.
    // CREATE DEVICE
    app.post('/api/devices', function(req, res){
        var device = new Device();
        device.name = req.body.name;
        device.price = req.body.price;
        device.numbers = req.body.numbers;

        device.save(function(err){
            if(err){
                console.error(err);
                res.json({result: 0});
                return;
            }

            res.json({result: 1});

        });
    });
크램 웹브라우져에 PostMan익스텐션을 설치했다면 실행해서 방식을 POST로 변경하고 주소에 http://localhost:8080/api/devices를 입력합니다. Raw를 클릭하고
{
    "name": "iphone",
    "price": "900000",
    "numbers": "10"
}
를 입력해서 Send버튼을 클릭합니다. { "result": 1 }이 나오면 정상입니다.

전체 검색을 하는 GET은 다음과 같습니다. PostMan에서 방식을 GET으로 변경하고 http://localhost:8080/api/devices를 입력하고 Send를 클릭합니다.
// GET ALL DEVICES
    app.get('/api/devices', function(req,res){
        Device.find(function(err, devices){
            if(err) return res.status(500).send({error: 'database failure'});
            res.json(devices);
        })
    });

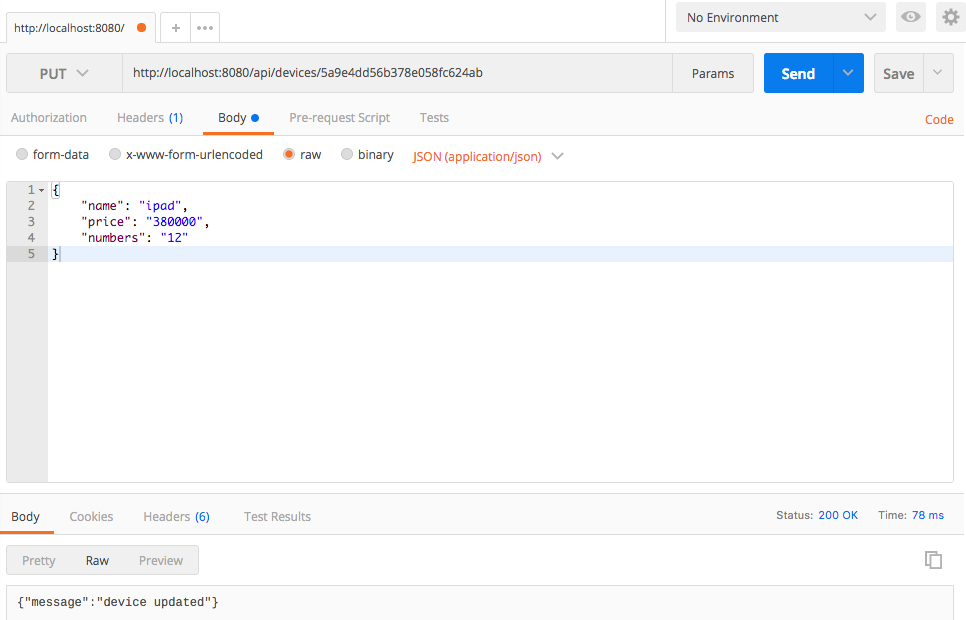
업데이트를 하는 경우는 아래와 같이 작성합니다.
    // UPDATE THE DEVICE
    app.put('/api/devices/:device_id', function(req, res){
        Device.update({ _id: req.params.device_id }, { $set: req.body }, function(err, output){
            if(err) res.status(500).json({ error: 'database failure' });
            console.log(output);
            if(!output.n) return res.status(404).json({ error: 'device not found' });
            res.json( { message: 'device updated' } );
        })
    });
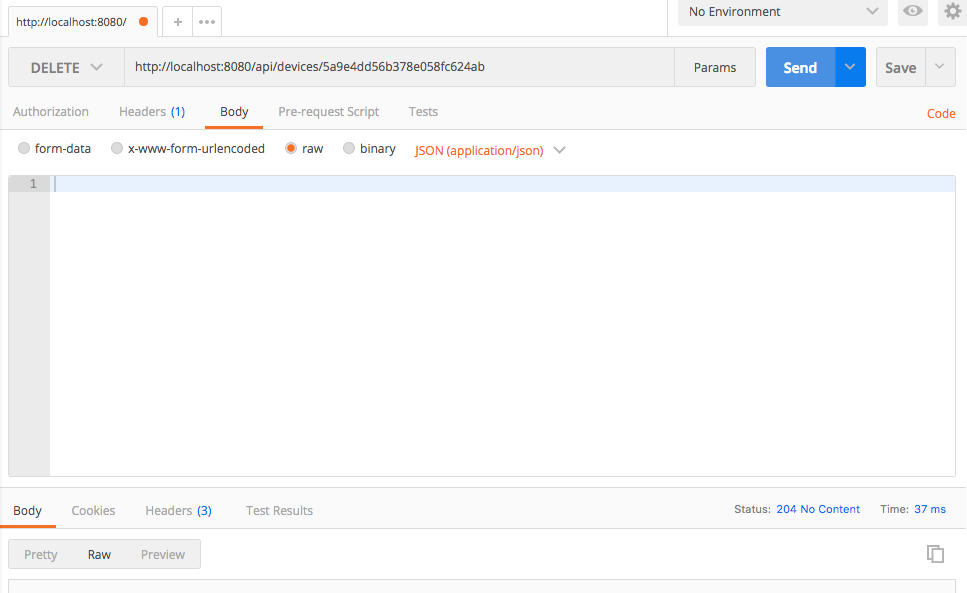
삭제하는 경우 PostMan에 기존 리턴된 객체의 id를 하나 복사해서 아래와 같이 입력합니다.
http://localhost:8080/api/devices/5a9e4dd56b378e058fc624ab
DELETE로 방식을 변경하고 Send를 누르면 삭제됩니다. 결과값은 아무것도 리턴되지 않습니다.
   // DELETE DEVICE
    app.delete('/api/devices/:device_id', function(req, res){
        Device.remove({ _id: req.params.device_id }, function(err, output){
            if(err) return res.status(500).json({ error: "database failure" });

            res.status(204).end();
        })

    });
맥에서 Xcode를 실행해서 새로운 프로젝트에서 DemoRESTful이라는 이름의 싱글앱을 생성합니다.

기존 ViewController클래스 파일과 스토리보드에 있는 뷰컨트롤러를 삭제합니다. 스토리보드에 테이블뷰 컨트롤러를 추가하고 네비게이션 컨트롤러를 임베딩한다. is initial controller 체크를 해 줍니다. 테이블뷰컨트롤러를 상속받은 ListViewController를 추가해서 아이덴티티 인스펙터에서 연결을 합니다. 스토리보드를 보면 아래와 같이 완성됩니다.

프로젝트에 UITableViewController를 상속받은 ListViewController클래스 파일을 추가합니다.
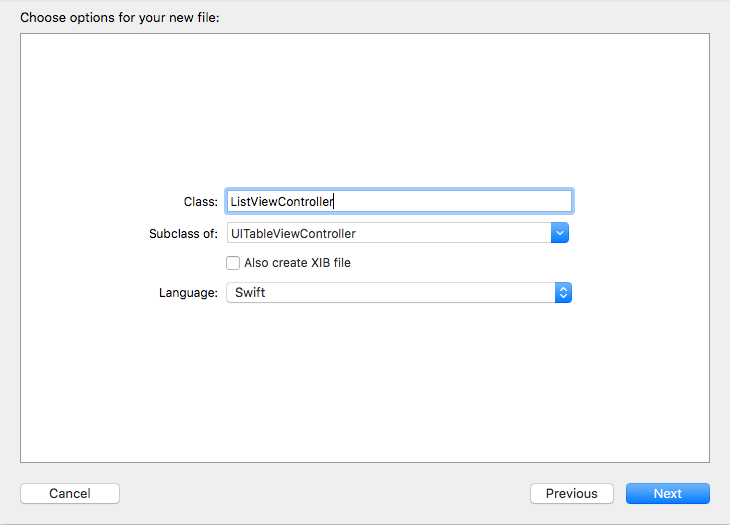
테이블뷰컨트롤러를 선택한 상태에서 인스펙터창에서 커스텀 클래스를 ListViewController로 변경해 줍니다.

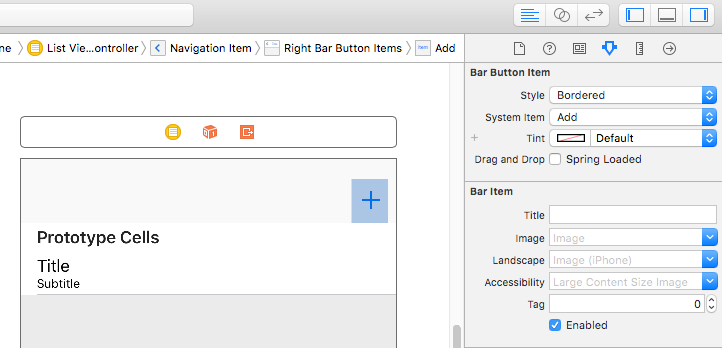
테이블뷰셀을 선택하고 style을 subtitle로 변경합니다. Identifier에 devicecell을 미리 입력합니다. 바 버튼 아이템을 네비게이션바 오른쪽에 추가하고 Add로 변경합니다. 액션으로 add를 추가합니다.

같은 폴더에 Podfile을 아래와 같이 작성합니다.
source 'https://github.com/CocoaPods/Specs.git'
platform :ios, '11.0'
use_frameworks!

target 'DemoRESTful' do
pod 'Alamofire', '~> 4.5'
end
데스크탑에서 DemoRESTful로 이동해서
pod install
을 실행합니다.
데스크탑에 있는 DemoRESTful폴더에서 workspace파일을 통해 다시 DemoRESTful을 오픈합니다. DemoRESTful프로젝트를 선택하고 Build Phases => Link binary with Libraries메뉴에서 +를 클릭해서 Alamofire를 추가합니다.
ListViewController를 아래와 같이 코딩합니다.
//
//  ListViewController.swift
//  DemoRESTful
//
//  Created by papasmf on 2018. 3. 5..
//  Copyright © 2018년 multicampus. All rights reserved.
//

import UIKit
import Alamofire

class ListViewController: UITableViewController {

    var deviceList = [(id: String, name: String, price: String, numbers: String)]()

    func initUI() {
        let url = "http://127.0.0.1:8080/api/devices"
        let call = Alamofire.request(url, method: .get, parameters: nil)
        call.responseJSON {
            res in
            guard let jsonObject = res.result.value as? NSArray else {
                NSLog("서버 호출 과정에서 에러 발생")
                return
            }

            self.deviceList.removeAll()
            for element in jsonObject {
                let data = element as! NSDictionary
                let id = data["_id"] as! String
                let name = data["name"] as! String
                let price = data["price"] as! String
                let numbers = data["numbers"] as! String
                self.deviceList.append((id: id, name: name, price: price, numbers: numbers))
            }
            DispatchQueue.main.async {
                self.tableView.reloadData()
            }
        }
        self.tableView.allowsSelectionDuringEditing = true
    }


    override func viewDidLoad() {
        super.viewDidLoad()

        self.initUI()

        let dummyView = UIView(frame: CGRect(x: 0, y: 0,
            width: 0, height: 0))
        self.tableView.tableFooterView = dummyView
    }

    override func didReceiveMemoryWarning() {
        super.didReceiveMemoryWarning()
        // Dispose of any resources that can be recreated.
    }

    // MARK: - Table view data source

    override func numberOfSections(in tableView: UITableView) -> Int {
        return 1
    }

    override func tableView(_ tableView: UITableView, numberOfRowsInSection section: Int) -> Int {
        return self.deviceList.count
    }


    override func tableView(_ tableView: UITableView, cellForRowAt indexPath: IndexPath) -> UITableViewCell {

        let rowData = self.deviceList[indexPath.row]

        let cell = tableView.dequeueReusableCell(withIdentifier: "devicecell")

        cell?.textLabel?.text = rowData.name
        cell?.textLabel?.font = UIFont.systemFont(ofSize: 14)

        cell?.detailTextLabel?.text = rowData.numbers
        cell?.detailTextLabel?.font = UIFont.systemFont(ofSize: 12)

        return cell!
    }


    @IBAction func add(_ sender: Any) {


    }


}
입력과 삭제 그리고 수정에 대한 코드는 아래의 코드를 완성하면 됩니다.
@IBAction func add(_ sender: Any) {
        let alert = UIAlertController(title: "새로운 디바이스 등록",
                                      message: "새로운 디바이스를 등록해 주세요", preferredStyle: .alert)
        //디바이스명, 갯수, 가격 텍스트 필드 추가
        alert.addTextField() { (tf) in tf.placeholder = "디바이스명" }
        alert.addTextField() { (tf) in tf.placeholder = "가격" }
        alert.addTextField() { (tf) in tf.placeholder = "갯수" }

        alert.addAction(UIAlertAction(title: "취소", style: .cancel))
        alert.addAction(UIAlertAction(title: "확인", style: .default) {
            (_) in
            //새로운 디바이스 등록 로직이 들어감
            //이름
            let name = alert.textFields?[0].text
            //가격
            let price = alert.textFields?[1].text
            //갯수
            let numbers = alert.textFields?[2].text

            let url = "http://localhost:8080/api/devices"
            let param: Parameters = [
                "name": name!,
                "price": price!,
                "numbers": numbers!
            ]

            let alamo = Alamofire.request(url, method: .post,
                                          parameters: param,
                                          encoding:JSONEncoding.default)

            alamo.responseJSON() { response in
                print("JSON=\(response.result.value!)")
                if let jsonObject = response.result.value as? NSDictionary {
                    print("result = \(jsonObject["result"]!)")

                    DispatchQueue.main.async {
                        //이 부분이 있어야 리프레시가 된다.
                        self.initUI()
                    }
                }
            }
        })
        self.present(alert, animated: true, completion: nil)


    }

    //목록 편집 형식을 결정하는 함수(삭제 / 수정)
    override func tableView(_ tableView: UITableView, editingStyleForRowAt indexPath: IndexPath) -> UITableViewCellEditingStyle {
        return UITableViewCellEditingStyle.delete
    }

    //편집 모드에서 delete버튼을 클릭했을 때 호출되는 메서드이다.
    //이 메서드를 추가하는 것만으로도 사용자가 셀을 스와이프 했을 때 delete버튼이 나타난다.
    override func tableView(_ tableView: UITableView, commit editingStyle: UITableViewCellEditingStyle, forRowAt indexPath: IndexPath) {
        //삭제할 행의 id를 구한다.
        let id = self.deviceList[indexPath.row].id
        let url = "http://localhost:8080/api/devices/" + id
        let alamo = Alamofire.request(url, method: .delete)
        alamo.responseJSON() { response in
            if let error = response.result.error {
                print("error delete")
                print(error)
            } else {
                DispatchQueue.main.async {
                    self.initUI()
                }
            }
        }

    }

    override func tableView(_ tableView: UITableView, didSelectRowAt indexPath: IndexPath) {
        let alert = UIAlertController(title: "기존 디바이스 정보 수정",
                                      message: "새로운 디바이스를 등록해 주세요", preferredStyle: .alert)

        let name = self.deviceList[indexPath.row].name
        let price = self.deviceList[indexPath.row].price
        let numbers = self.deviceList[indexPath.row].numbers
        alert.addTextField() { (tf) in tf.text = name }
        alert.addTextField() { (tf) in tf.text = price }
        alert.addTextField() { (tf) in tf.text = numbers }

        alert.addAction(UIAlertAction(title: "취소", style: .cancel))
        alert.addAction(UIAlertAction(title: "확인", style: .default) {
            (_) in
            //새로운 디바이스 등록 로직이 들어감
            //이름
            let name = alert.textFields?[0].text
            //가격
            let price = alert.textFields?[1].text
            //갯수
            let numbers = alert.textFields?[2].text
            //id
            let id = self.deviceList[indexPath.row].id
            print("id: \(id)")

            let url = "http://localhost:8080/api/devices/" + id
            let param: Parameters = [
                "name": name!,
                "price": price!,
                "numbers": numbers!
            ]
            //수정 작업을 위해 .put을 사용한다.
            let alamo = Alamofire.request(url, method: .put,
                                          parameters: param,
                                          encoding:JSONEncoding.default)

            alamo.responseJSON() { response in
                print("JSON=\(response.result.value!)")
                if let jsonObject = response.result.value as? NSDictionary {
                    print("result = \(jsonObject["message"]!)")

                    DispatchQueue.main.async {
                        //이 부분이 있어야 리프레시가 된다.
                        self.initUI()
                    }
                }
            }
        })
        self.present(alert, animated: true, completion: nil)

    }
입력, 수정, 삭제, 리스트 출력이 잘 되는지 확인해 봅니다.

