아두이노 코딩-32: 아두이노 PM 측정기로 공기청정기 대신 Red/Blue LED를 ON/OFF하자.
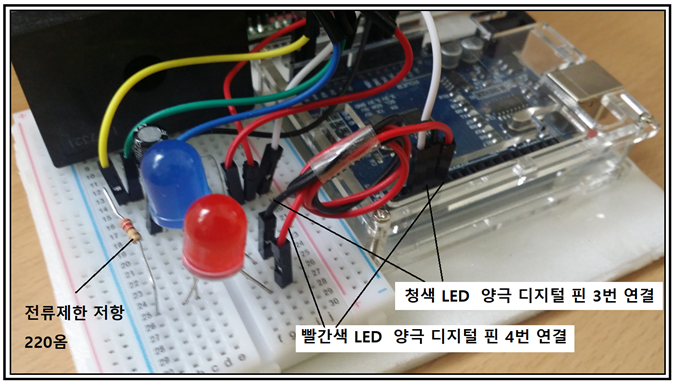
아두이노 PM 측정기의 뼈대가 완성되었으므로 측정 값을 바탕으로 하여 LED를 ON OFF 하는 회로를 아래의 배선도를 참고하면서 꾸며 보자. 이미 lcd 까지 배선이 되어 있으므로 위 사진을 참조하여 빵판에 2개의 청색 및 빨간색 LED 와 220Ω 저항을 배치한다. 저항의 Rme 부분은 빵판 상의 CND 에 직접 연결하고 LED 의 양극 끝 부분은 점퍼선을 사용하여 빵판에서 아두이노의 디지털 핀에 연결한다.

미세먼지 측정기에서 측정한 PM 의 값에 따라 LED를 ON OFF 할 수 있도록 아두이노 PM 미세먼지 측정기의 코드를 업데이트 수정해 보자.
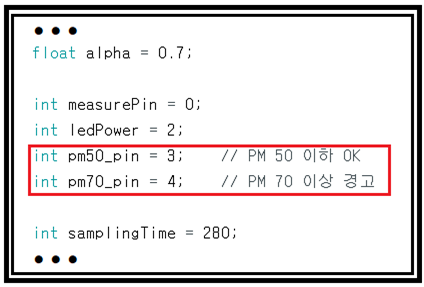
헤더 영역에서 2개의 LED를 연결할 수 있도록 디지털 핀 번호를 청색 LED 3번과 빨간 색 LED 4번으로 설정한다.
setup()에서 디지털 핀 3번과 4번 pinMode를 OUTOUT 으로 설정하고 처음 시작 시에는 LOW 로 설정해 OFF 상태로 두자.
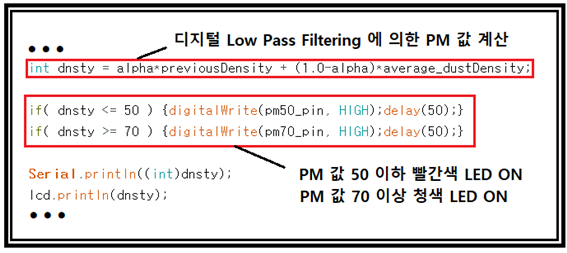
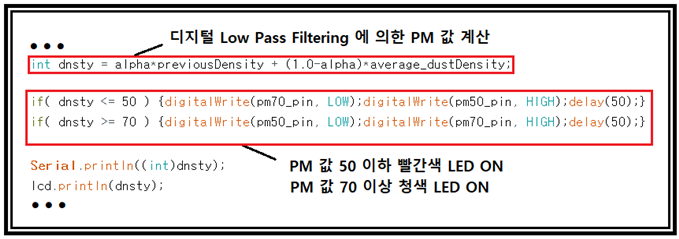
loop()에서 평균값 계산 및 디지털 Low Pas Filtering 이 끝나 임세먼지 농도 PM 값이 결정되면 이 값이 50 이하인지 아니면 70 이상인지 if 제어문을 사용하여 판단하고 digitalWrite 명령을 실행하여 LED를 ON 한다.
PM 값이 50 이하는 공기가 꺠끗한 공기 영역이며 그 이상은 미세먼지 오염 영역이다. 하지만 PM 값 50을 사이에 두고 LED ON OFF 가 지나치게 번쩍거리면 애매한 상태가 되므로 PM 값 20 정도의 여유를 두어 완충 후 LED ON 색상이 바뀌도록 한다.
시중에서 판매하는 공기 청정기를 보면 PM 값에 따른 색상별 LED ON OFF 기능이 있음을 참조하자.
한편 공기 청정기를 연결하여 스위치를 ON OFF 하기 위해서는 아두이노 if 제어문에서 미세먼지 PM 값으로부터 얻어진 결과를 디지털 핀에 공급하여 LED를 ON 함과 동시에 이 데이터를 또다른 디지털 핀에 제공하여 릴레이를 설치해야 한다.
릴레이라 함은 전류나 전압의 크기가 작은 신호를 받아 큰 전류 전압으로 작동하는 외부 장치의 스위치를 ON OFF 하는 부품이다. 릴레이 사용법에 관해서는 별도로 예제를 준비해서 다룰 예정이다.
아두이노 PM 미세먼지 측정기를 완성하는데 다음의 블로그를 순차적으로 참고하면 도움이 될 것이다.
아두이노 코딩-27: 미세먼지 측정 엘렉트로닉스 회로 배선과 아두이노 코딩
https://steemit.com/kr/@codingart/27
아두이노 코딩-28: 미세먼지 측정기에 I2C lcd를 달아볼까요?
https://steemit.com/kr/@codingart/28-i2c-lcd
아두이노 코딩-30: 아두이노 PM 미세먼지 측정기 Low Pass Filtering 기법 적용 I
https://steemit.com/kr/@codingart/30-pm-low-pass-filtering-i
아두이노 코딩-31: 아두이노 PM 측정기 샘플 데이터 평균값 계산 및 Low Pass Filtering 기법 적용 II
https://steemit.com/kr/@codingart/31-pm-low-pass-filtering-ii
//PM_sensor_i2clcd_avr_LED_01
#include <Wire.h>
#include <LiquidCrystal_I2C.h>
LiquidCrystal_I2C lcd(0x3F,16,2);
float previous_dustDensity = 0;
float alpha = 0.7;
int measurePin = 0; //Connect dust sensor to Arduino A0 pin
int ledPower = 2; //Connect 3 led driver pins of dust sensor to Arduino D2
int pm50_pin = 3; // PM 50 이하 OK
int pm70_pin = 4; // PM 70 이상 경고
int samplingTime = 280;
int deltaTime = 40;
int sleepTime = 9680;
float voMeasured = 0;
float calcVoltage = 0;
float dustDensity = 0;
float average_dustDensity = 0;
float previousDensity = 0.0;
int num = 50; //샘플수
float sum = 0.0;
float D[] = {
0.0, 0.0, 0.0, 0.0, 0.0,0.0, 0.0, 0.0, 0.0,0.0,
0.0, 0.0, 0.0, 0.0, 0.0,0.0, 0.0, 0.0, 0.0,0.0,
0.0, 0.0, 0.0, 0.0, 0.0,0.0, 0.0, 0.0, 0.0,0.0,
0.0, 0.0, 0.0, 0.0, 0.0,0.0, 0.0, 0.0, 0.0,0.0,
0.0, 0.0, 0.0, 0.0, 0.0,0.0, 0.0, 0.0, 0.0,0.0
};
void setup(){
lcd.init();
lcd.backlight();
Serial.begin(9600);
pinMode(ledPower,OUTPUT);// 미세먼지 센서 내부 LED
pinMode(pm50_pin, OUTPUT);digitalWrite(pm50_pin,LOW);
pinMode(pm70_pin, OUTPUT);digitalWrite(pm70_pin,LOW);
}
void loop() {
// average_dustDensity = alphaprevious_dustDensity + (1.0-alpha)particleSensing();
D[num-1] = particleSensing();
for ( int i = 0; i<num; i++ ) {
D[i] = D[i+1];
sum = sum + D[i];
}
average_dustDensity = sum/num;
lcd.setCursor(3,0);
// int dnsty = average_dustDensity;
int dnsty = alphapreviousDensity + (1.0-alpha)average_dustDensity;
if( dnsty <= 50 ) {digitalWrite(pm70_pin, LOW);digitalWrite(pm50_pin, HIGH);delay(50);}
if( dnsty >= 70 ) {digitalWrite(pm50_pin, LOW);digitalWrite(pm70_pin, HIGH);delay(50);}

Serial.println((int)dnsty);
lcd.println(dnsty);
sum = 0.0;
previousDensity = average_dustDensity;
}
float particleSensing() {
digitalWrite(ledPower,LOW); // power on the LED
delayMicroseconds(samplingTime);
voMeasured = analogRead(measurePin);
delayMicroseconds(deltaTime);
digitalWrite(ledPower,HIGH); // turn the LED off
delayMicroseconds(sleepTime);
// 0 - 5V mapped to 0 - 1023 integer values
calcVoltage = voMeasured * (5.0 / 1024.0);
if( calcVoltage > 0.6 ) {
// linear eqn from http://www.howmuchsnow.com/arduino/airquality/
dustDensity =1000.0*( 0.172 * calcVoltage - 0.1);
delay(190);
}
return dustDensity;
}//끝
Congratulations @codingart! You have completed some achievement on Steemit and have been rewarded with new badge(s) :
Click on any badge to view your own Board of Honor on SteemitBoard.
To support your work, I also upvoted your post!
For more information about SteemitBoard, click here
If you no longer want to receive notifications, reply to this comment with the word
STOPThankx!
5월 다시 파이팅해요!
호출에 감사드립니다!
pairplay 가 kr-dev 컨텐츠를 응원합니다! :)